Adorable Amigurumi Cat Crochet Pattern: A Step-by-Step Guide to Your New Heart Cat Friend
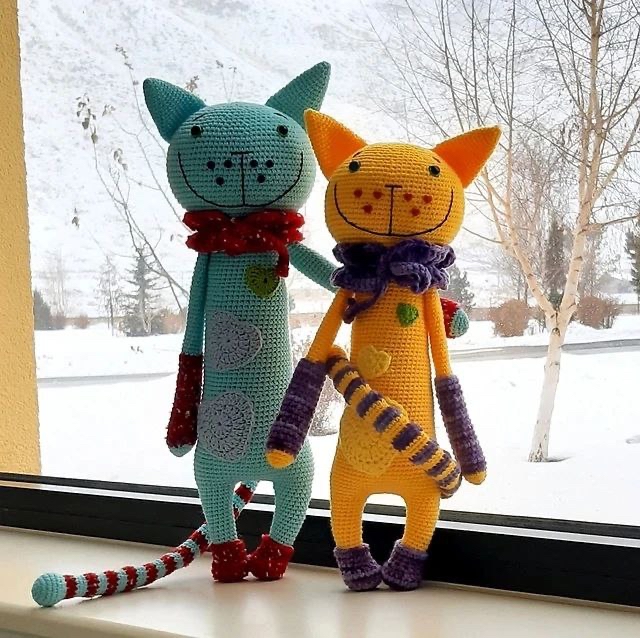
Are you looking for your next cozy crochet project? There is nothing quite as heartwarming as a handmade plushie, and this adorable Amigurumi Heart Cat is the perfect project for your crochet basket. This charming kitty, featuring sweet heart details and a colorful scarf, makes for a wonderful gift for children, a cute desk companion, or a lovely addition to your own nursery decor.
This pattern is designed to be beginner-friendly for those who have mastered the basics of amigurumi, such as working in continuous spirals and making increases and decreases. Once finished, you will have a substantial, huggable kitty standing approximately 17 inches tall! Grab your favorite hooks and some soft yarn, and let’s dive into this delightful tutorial.
Materials & Abbreviations
To ensure your cat turns out looking professional and cuddly, please use the following materials. Using a consistent yarn weight will help maintain the shape of your plushie.
What You Will Need
- Yarn: Cotton/Acrylic blend yarn (such as Yarn Art Jeans). You will need several colors: a primary body color (like light blue), a dark gray for the feet, a decorative/contrast color for the scarf and arms (like red or purple), and a bit of black embroidery thread for the face.
- Crochet Hooks: A 2.0 mm (B-1) hook for most of the body, and a 2.5 mm (C) hook specifically for the shoes and the scarf to give them a slightly tighter stitch.
- Eyes: 0.3-inch (approx. 8mm) safety eyes.
- Buttons: 6 small buttons to use as whiskers.
- Stuffing: High-quality polyester fiberfill (Polyfill).
- Tools: A tapestry needle for sewing and assembly, and sharp scissors.
US Crochet Abbreviations
All instructions are written in United States terminology. Please ensure you are comfortable with these terms before beginning:
- MR: Magic Ring (or Magic Circle)
- Sc: Single Crochet
- Inc: Increase (2 sc in the same stitch)
- Dec: Decrease (sc 2 stitches together)
- Sl st: Slip Stitch
- Ch: Chain
- Dc: Double Crochet
- St(s): Stitch(es)
Step-by-Step Instructions
The Legs (Make 2)
Start with dark gray yarn. We will create the feet first, then transition to your main body color.
- Round 1: 6 sc in a Magic Ring (6)
- Round 2: 6 inc (12)
- Round 3: 12 sc (12)
- Rounds 4-7: Change to main body color. 12 sc (12)
- Round 8: 1 inc, 11 sc (13)
- Rounds 9-10: 13 sc (13)
- Round 11: 1 sc, 1 inc, 11 sc (14)
- Rounds 12-13: 14 sc (14)
- Round 14: 2 sc, 1 inc, 11 sc (15)
- Rounds 15-16: 15 sc (15)
- Round 17: 3 sc, 1 inc, 11 sc (16)
- Round 18: 16 sc (16)
- Round 19: 4 sc, 1 inc, 11 sc (17)
- Round 20: 17 sc (17)
- Round 21: 5 sc, 1 inc, 11 sc (18)
- Round 22: 6 sc, 1 inc, 11 sc, then work 7 offset stitches (19)
Note: Stuff the legs firmly with fiberfill as you work your way up.
The Body
We will now connect the legs to form the torso. The “back” of the cat will be your starting point for the rounds.
- Round 23: Join the legs. Ch 7, sl st into the first ch, 19 sc on one leg, 7 sc across the join, 19 sc on the second leg, 7 sc across the other join (52)
- Round 24: (3 sc, 1 inc) x 13 (65)
- Rounds 25-29: 65 sc (65)
- Round 30: (1 dec, 11 sc) x 5 (60)
- Rounds 31-36: 60 sc (60)
- Round 37: (1 dec, 10 sc) x 5 (55)
- Rounds 38-43: 55 sc (55)
- Round 44: (1 dec, 9 sc) x 5 (50)
- Rounds 45-54: 50 sc (50)
- Round 55: (1 dec, 8 sc) x 5 (45)
- Rounds 56-65: 45 sc (45)
- Round 66: (1 dec, 7 sc) x 5 (40)
- Rounds 67-76: 40 sc (40)
- Round 77: (1 dec, 6 sc) x 5 (35)
- Round 78: Attach the arms to the sides of the body. 35 sc (35)
- Rounds 79-83: 35 sc (35)
Remember to stuff the body very well as you progress to maintain the upright shape.
The Arms (Make 2)
These are worked without stuffing to keep them slim. Use the main color first, then switch to your decorative color.
- Round 1: 6 sc in a Magic Ring (6)
- Round 2: 6 inc (12)
- Round 3: (2 sc, 1 inc) x 4 (16)
- Round 4: 16 sc (16)
- Rounds 5-10: Switch to decorative yarn. 16 sc (16)
- Round 11: 1 dec, 14 sc (15)
- Rounds 12-16: 15 sc (15)
- Round 17: 1 dec, 13 sc (14)
- Rounds 18-22: 14 sc (14)
- Round 23: Switch back to main color. Dec through the back loop only, 12 sc (13)
- Rounds 24-48: 13 sc (13)
At the end, work 3 sc as offset stitches, fold the arm in half, and sew the opening shut.
The Head
The head is a large, round piece. Pay close attention to the eye placement!
- Round 84: 35 inc (70)
- Round 85: 14 sc, (1 inc, 1 sc) x 7, 22 sc, (1 sc, 1 inc) x 7, 6 sc (84)
- Rounds 86-100: 84 sc (84)
- Round 101: (1 dec, 10 sc) x 7 (77)
- Round 102: 4 sc, (1 dec, 9 sc) x 6, 1 dec, 5 sc (70)
- Round 103: (1 dec, 8 sc) x 7 (63)
- Round 104: 63 sc (63)
- Round 105: 3 sc, (1 dec, 7 sc) x 6, 1 dec, 4 sc (56)
- Round 106: 56 sc (56)
- Round 107: (1 dec, 6 sc) x 7 (49)
- Round 108: 49 sc (49)
IMPORTANT: Insert the safety eyes between rounds 101 and 102. Ensure there are 17 stitches between the eyes for a perfect expression.
- Round 109: 2 sc, (1 dec, 5 sc) x 6, 1 dec, 3 sc (42)
- Round 110: (1 dec, 4 sc) x 7 (35)
- Round 111: 1 sc, (1 dec, 3 sc) x 6, 1 dec, 2 sc (28)
- Round 112: (1 dec, 2 sc) x 7 (21)
- Round 113: (1 dec, 1 sc) x 7 (14)
- Round 114: 7 dec (7). Fasten off and pull the hole tight.
The Tail
- Round 1: 6 sc in a Magic Ring (6)
- Round 2: 6 inc (12)
- Round 3: (1 sc, 1 inc) x 6 (18)
- Rounds 4-6: 18 sc (18)
- Round 7: (1 dec, 1 sc) x 6 (12)
- Round 8: 12 sc (12)
For the striped effect, alternate your decorative and main colors. Work 2 rounds of decorative yarn and 3 rounds of main yarn, repeating this sequence 14 times. Finish with 2 rounds of decorative yarn. Fold in half and sew the opening shut.
The Ears (Make 2)
- Round 1: 6 sc in a Magic Ring (6)
- Round 2: (1 inc, 2 sc) x 2 (8)
- Round 3: (1 inc, 3 sc) x 2 (10)
- Round 4: (1 inc, 4 sc) x 2 (12)
- Round 5: (1 inc, 5 sc) x 2 (14)
- Round 6: 14 sc (14)
- Round 7: (1 inc, 6 sc) x 2 (16)
- Round 8: 16 sc (16)
- Round 9: (1 inc, 7 sc) x 2 (18)
- Round 10: 18 sc (18)
- Round 11: (1 inc, 8 sc) x 2 (20)
- Round 12: 20 sc (20)
- Round 13: (1 inc, 9 sc) x 2 (22)
- Round 14: 22 sc (22)
- Round 15: (1 inc, 10 sc) x 2 (24)
- Round 16: 24 sc (24). Fasten off, leaving a long tail for sewing.
Accessories: Scarf and Shoes
The Scarf
Using a 2.5 mm hook and decorative yarn:
- Ch 30 + 2 ch. Starting in the 3rd chain from the hook, work 2 dc in each chain. Sl st to the last chain.
- Tassels: Ch 25. From the 2nd chain from the hook, work 24 sc, then sl st. Repeat for the second tassel using the same method. Add extra decorative loops to the ends for flair.
The Shoes (Make 2)
Using a 2.5 mm hook and red/dark yarn:
- Round 1: 6 sc in a Magic Ring (6)
- Round 2: 6 inc (12)
- Round 3: (1 sc, 1 inc) x 6 (18)
- Rounds 4-5: 18 sc (18)
- Round 6: 5 sc, 4 dec, 5 sc (14)
- Rounds 7-9: 14 sc (14)
Finishing
Assembly is where your kitty truly comes to life! Use your tapestry needle and black embroidery thread for the facial details.
Facial Features
- Nose: Between rounds 3 and 4 from the eyes, embroider a nose that is 3 stitches wide.
- Mouth: Embroider a smile line approximately 2 rows below the eyes, extending about 3 stitches to each side.
- Eyebrows: Lightly embroider two small lines above the eyes to give the cat character.
- Whiskers: Sew your 6 small buttons onto the cheeks to create cute, tactile whiskers.
Body Assembly
- Ears: Sew the ears onto the head, approximately 12 stitches away from the eyes and 1 row below the eye level.
- Tail: Sew the tail onto the body, roughly 13 rows up from the leg line.
Tips for Success
To make your amigurumi look as professional as possible, keep these tips in mind:
- Tension is Key: Try to keep your tension consistent. If your stitches are too loose, the stuffing might show through.
- Use Stitch Markers: Since amigurumi is worked in a continuous spiral, it is very easy to lose your place. Always use a stitch marker to mark the start of every round.
- Stuffing Technique: Stuff your project in small increments. This allows you to push the stuffing into the corners (like the ears and limbs) so you don’t end up with lumps.
- Color Changes: When changing colors, pull the new color through the last two loops of the final stitch of the previous color to ensure a clean transition.