Adorable Amigurumi Puppy Crochet Pattern: A Step-by-Step Guide for Beginners
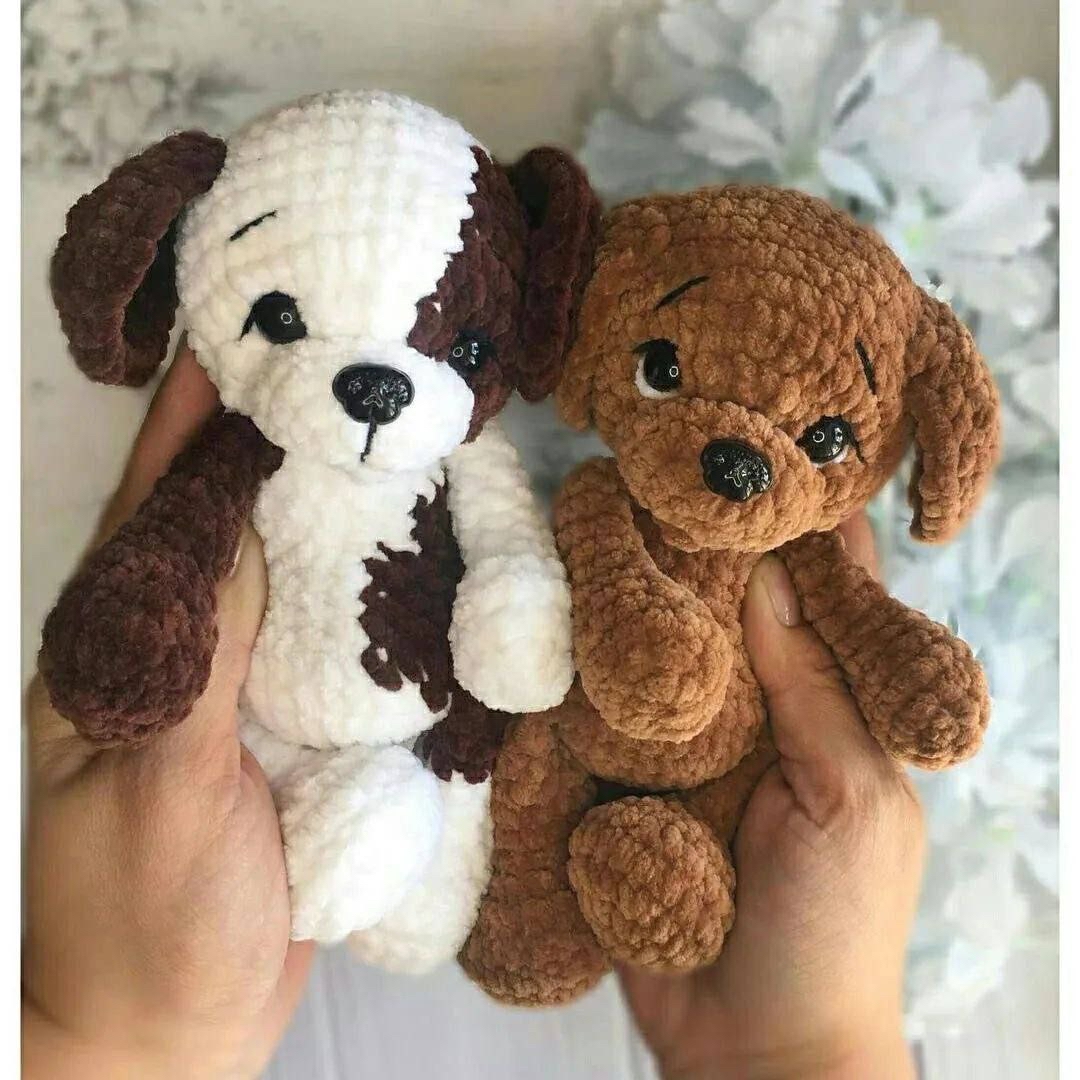
There is nothing quite as heartwarming as a cuddly, wide-eyed puppy. Whether you are looking to create a unique gift for a child, a charming companion for your desk, or a new addition to your amigurumi collection, this plush puppy pattern is the perfect project. This little pup is designed with a soft, chunky texture that makes it incredibly huggable and gives it that sought-after “kawaii” aesthetic.
This tutorial is designed for beginners and intermediate crocheters alike. We will be working with super bulky plush yarn, which makes for quick progress and a very squishy finished product. By the end of this guide, you will have a finished puppy measuring approximately 7 to 7.5 inches tall, complete with a sweet, soulful expression. Let’s grab our hooks and get started!
Materials and Abbreviations
To ensure your puppy turns out as adorable as the photos, I recommend using high-quality chenille or velvet-style plush yarn. This type of yarn is what gives amigurumi that professional, boutique-store look.
What You Will Need
- Plush Yarn: Super bulky chenille yarn (like Himalaya Dolphin Baby). You will need your main color (approximately 2 ounces per puppy) and a small amount of white for the eye details.
- Embroidery Yarn: A thin black yarn (like Vita Coco) for the eyelids and eyebrows.
- Crochet Hook: 4.0mm (G/6) hook.
- Safety Eyes: 12mm safety eyes.
- Safety Nose: A small safety nose (approximately 0.6 x 0.5 inches).
- Stuffing: High-quality polyester fiberfill.
- Tools: A long yarn needle, sharp scissors, and stitch markers.
- Shaping Tools: Strong thread for tightening the facial features and several sewing pins.
Abbreviations (US Terms)
Please note that this pattern uses standard US crochet terminology. If you are used to UK terms, please adjust accordingly.
- MR: Magic Ring
- ch: Chain
- sc: Single Crochet
- inc: Increase (2 sc in one stitch)
- dec: Decrease (sc 2 stitches together)
- sl st: Slip Stitch
- hdc: Half Double Crochet
- hdc inc: Half Double Crochet Increase (2 hdc in one stitch)
- (…) x n: Repeat the instructions inside the parentheses “n” times
- Numbers in parentheses: The total number of stitches at the end of the round
Step-by-Step Instructions
The Head
The head is the most important part of this pattern, as it houses the “soulful” expression of your puppy. We will be working in continuous rounds.
Round 1: 6 sc in a MR (6)
Round 2: 6 inc (12)
Round 3: (1 sc, inc) x 6 (18)
Round 4-5: 18 sc (2 rounds)
Round 6: 3 sc, 12 hdc inc, 3 sc (30)
Round 7: 4 sc, inc, (4 hdc, hdc inc) x 4, 4 sc, inc (36)
Round 8-12: 36 sc (5 rounds)
Important: During Round 8-12, you must insert the safety eyes and the nose. Use a stitch marker to keep track of your rounds. Place the first eye between the 3rd and 4th increase of Round 6. Place the second eye between the 8th and 9th increase of Round 6. There should be approximately 5 increases between the eyes. Place the safety nose centered between Rounds 2 and 3, using the eyes as your guide.
Round 13: (4 sc, dec) x 6 (30)
Round 14: (3 sc, dec) x 6 (24)
Round 15: (2 sc, dec) x 6 (18)
Round 16: (1 sc, dec) x 6 (12)
Round 17: 6 dec (6)
Fasten off, leaving a long tail for sewing. Close the hole using a yarn needle.
The Muzzle
The muzzle adds dimension to the face. We will work this in a flat row.
Ch 3. From the second chain from the hook: 1 sc, 3 sc in the first chain, and 1 sc on the other side of the chain (5 sc total). Fasten off, leaving a long tail for sewing.
The Body
As you work the body, begin stuffing it firmly. To create a cute “puppy belly,” add a bit more stuffing toward the front of the piece as you progress.
Round 1: 6 sc in a MR (6)
Round 2: 6 inc (12)
Round 3: (1 sc, inc) x 6 (18)
Round 4: (2 sc, inc) x 6 (24)
Round 5: (3 sc, inc) x 6 (30)
Joining the legs and tail:
Round 6: 5 sc, 5 sc with the first leg, 10 sc, 5 sc with the second leg, 3 sc, 2 sc with the first two stitches of the tail (30)
Round 7: 2 sc with the tail stitches, 28 sc (30)
Note: Place a marker at the exact center of the back to keep your sides even.
Shaping the belly:
Round 8: 6 sc, (1 sc, dec) x 6, 6 sc (24)
Round 9: 7 sc, dec, 6 sc, dec, 7 sc (22)
Round 10: 8 sc, dec, 2 sc, dec, 8 sc (20)
Round 11: 8 sc, 2 dec, 8 sc (18)
Round 12-13: 18 sc (2 rounds)
Joining the upper legs:
Round 14: 2 sc, 4 sc with the first upper leg, 6 sc, 4 sc with the second upper leg, 2 sc (18)
Round 15: (1 sc, dec) x 6 (12)
Round 16: 12 sc (12)
Fasten off, leaving a long tail for sewing the head to the body.
The Legs
You will need to make two upper legs and two lower legs.
Upper Legs (Make 2)
Ch 4. From the second chain from the hook: 2 sc, 3 sc in the 1st chain, 1 sc on the other side of the chain, inc (8)
Round 2: inc, 1 sc, 3 inc, 1 sc, 2 inc (14)
Round 3: 14 sc (14)
Round 4: (5 sc, dec) x 2 (12)
Round 5: 2 sc, dec, 8 sc (11)
Round 6: 3 sc, 5 sc (8)
Round 7-12: 8 sc (6 rounds) + sl st in the last stitch.
Fold the piece in half and sc through both sides (4 sc) to close. Stuff only the “palm” area lightly. Fasten off.
Lower Legs (Make 2)
Round 1: 7 sc in a MR (7)
Round 2: 7 inc (14)
Round 3: (1 sc, inc) x 7 (21)
Round 4-5: 21 sc (2 rounds)
Round 6: 3 sc, (1 sc, dec) x 5, 3 sc (16)
Round 7: 3 sc, 5 dec, 3 sc (11)
Round 8: 4 sc, dec, 5 sc (10)
Round 9-13: 10 sc (5 rounds)
Fold in half and sc through both sides (5 sc) to close. Stuff only the “foot” area. Fasten off.
The Ears (Make 2)
Row 1: Ch 4. From the second chain: inc, 1 sc, inc (5)
Note: Work in rows, turning your work after each row.
Row 2: inc, 3 sc, inc (7)
Row 3-4: 7 sc (2 rows)
Row 5: dec, 3 sc, dec (5)
Row 6: 5 sc (5)
Row 7: dec, 1 sc, dec (3)
Row 8: 3 sc (3)
Finish by working a sl st around three sides of the ear, making increases in the corners to give them a rounded shape. Fasten off, leaving a tail for sewing.
The Tail
Round 1: 5 sc in a MR (5)
Round 2-8: 5 sc (7 rounds)
Round 9: 4 sc, inc (6)
Round 10: inc, 5 sc (7)
Round 11: 6 sc, inc (8)
Fold in half and sc through both sides (4 sc) to close. Do not stuff the tail. Fasten off.
Finishing
Shaping the Face (The “Secret” Step)
To get that adorable, slightly “pushed-in” puppy snout, we use a technique called tightening or “pulling” the face. This is what makes the eyes look large and expressive.
- The Eyes: Using a needle and strong thread, mark two points at the bottom of the head between Rounds 7 and 8 (about 0.25 inches apart). Thread your needle through the eye’s base and pull it toward these points. Do this for both eyes. Tie off securely and hide the thread inside.
- The Mouth: Mark two points on the muzzle between Rounds 3 and 4. Pull the thread through to create a slight indentation for the mouth. Tie off and hide the thread.
- The Muzzle: Sew the muzzle onto the face using the long tail you left earlier. I recommend tilting the muzzle slightly downward to create a “puppy-dog gaze.”
Assembly
- Head to Body: Use two knitting needles or large pins to position the head on the body. Ensure it is level. Sew the head securely to the body, adding a little extra stuffing into the neck area to prevent the head from wobbling.
- Ears: Pin the ears onto the head between Rounds 9 and 15. Space them about 0.5 inches apart. Sew them firmly in place.
- Limbs: Sew the upper legs to the sides of the body and the lower legs to the bottom. Sew the tail to the back.
- Final Details: Using your black embroidery yarn, stitch the eyelids and eyebrows. For a professional touch, you can use a small amount of white plush yarn to embroider tiny white “shines” into the eyes.
Tips
Tension is Key: When working with plush yarn, try to keep your tension even. If you crochet too loosely, the stuffing will show through the gaps. If you crochet too tightly, it can be difficult to insert safety eyes.
Stuffing Strategy: Always stuff your pieces as you go. It is much harder to stuff a finished limb or head once it is sewn shut. For the body, stuff it firmly to give the puppy structure, but leave the belly slightly softer to maintain that cute shape.
Color Variations: Don’t feel limited to the colors in the photo! This pattern looks incredible with spotted patterns or different colored patches. You can even use two different shades of brown to create a “bi-color” pup.
Eye Placement: If your puppy looks a bit “off,” it is almost always due to the eye placement. Double-check that your eyes are at the correct distance and height before you move on to the shaping phase.