Adorable Mini Crochet Chicken Pattern: A Step-by-Step Amigurumi Tutorial
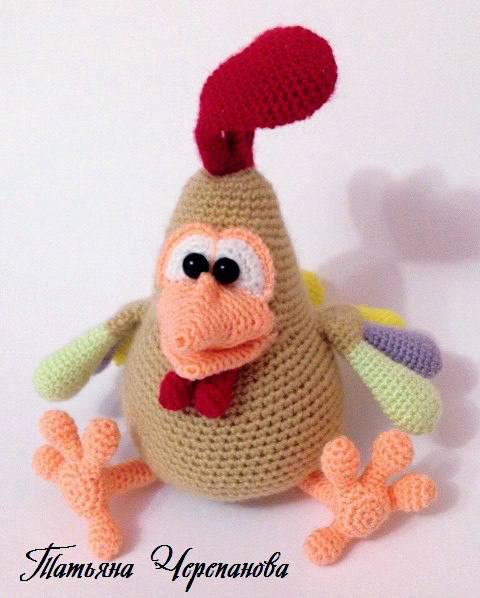
Looking for a quick and cute project to brighten up your crochet nook? This mini amigurumi chicken is the perfect companion for beginners and experienced crocheters alike. With its quirky expression and colorful feathers, this little hen is sure to bring a smile to anyone’s face. In this tutorial, we will walk you through every stitch to create this charming bird, which stands about 4 inches tall when sitting.
Materials & Abbreviations
To get the best results, use a fine-weight acrylic yarn (fingering or lace weight) to keep the stitches tight and the shape firm.
Materials Needed:
- Yarn: 100% Acrylic yarn in the following colors:
- Sand/Tan (for the body)
- Peach/Salmon (for the beak and feet)
- Red (for the comb and wattle)
- Light Green, Purple, and Yellow (for the accent feathers)
- White (for the eye base)
- Crochet Hooks: 1.15 mm and 1.25 mm
- Other Supplies: Fiberfill stuffing, safety eyes or half-beads, fabric glue, yarn needle, and scissors.
Abbreviations (US Terms):
- ch: chain
- mr: magic ring
- sc: single crochet
- inc: increase (2 sc in one stitch)
- dec: decrease (sc 2 together)
- bob: 3 sc in one stitch
- sl st: slip stitch
- dc: double crochet
- turn: turn the piece
- FLO: front loop only
- BLO: back loop only
- Rnd: round
Step-by-Step Instructions
The Tail (3 Feathers)
Make three feather tubes. You can make them all one color or use different accent colors (Green, Purple, Yellow). Stuff only the tips.
Use a 1.15 mm hook:
- Rnd 1: 6 sc in mr (6)
- Rnd 2: inc * 6 (12)
- Rnd 3: (1 sc, inc) * 6 (18)
- Rnds 4-6: sc in each stitch around (18) – 3 rounds
- Rnd 7: (dec, 7 sc) * 2 (16)
- Rnds 8-9: sc in each stitch around (16) – 2 rounds
- Rnd 10: (dec, 6 sc) * 2 (14)
- Rnds 11-12: sc in each stitch around (14) – 2 rounds
- Rnd 13: (dec, 5 sc) * 2 (12)
- Rnds 14-15: sc in each stitch around (12) – 2 rounds
- Rnd 16: (dec, 4 sc) * 2 (10)
- Rnds 17-18: sc in each stitch around (10) – 2 rounds
- Rnd 19: (dec, 3 sc) * 2 (8)
- Rnd 20: sc in each stitch around (8)
Do not cut the yarn. Switch to Sand-colored yarn to join the feathers. Work 4 sc across the first feather, 4 sc across the second, 8 sc across the third (middle), 4 sc across the second, and 4 sc across the first (Total 24 stitches). Sl st to join and fasten off.
The Wings (Make 2)
Each wing consists of three small feathers joined by a base. Stuff only the tips.
Feather 1 (2 pieces):
- Rnd 1: 6 sc in mr (6)
- Rnd 2: inc * 6 (12)
- Rnd 3: (1 sc, inc) * 6 (18)
- Rnds 4-6: sc in each stitch around (18)
- Rnd 7: (dec, 7 sc) * 2 (16)
- Rnd 8: sc in each stitch around (16)
- Rnd 9: (dec, 6 sc) * 2 (14)
- Rnd 10: sc in each stitch around (14)
- Rnd 11: (dec, 5 sc) * 2 (12)
- Rnd 12: sc in each stitch around (12)
- Rnd 13: (dec, 4 sc) * 2 (10)
- Rnd 14: sc in each stitch around (10)
- Rnd 15: (dec, 3 sc) * 2 (8). Sl st and fasten off.
Feather 2 (2 pieces): Follow same as Feather 1, but Rnd 4 is just 18 sc, and Rnd 5 is (dec, 7 sc)*2. Continue decreasing similarly until Rnd 13 (8 stitches). Sl st and fasten off.
Feather 3 (2 pieces): Follow same as Feather 1, but Rnd 4 is (dec, 7 sc)*2. Continue decreasing similarly until Rnd 13 (8 stitches). Sl st and fasten off.
Wing Base: Use Sand yarn. Rnd 1: 6 sc in mr. Rnd 2: inc * 6 (12). Rnd 3: (1 sc, inc) * 6 (18). Rnd 4: Join the feathers by working 3 sc together with Feather 1, 3 sc together with Feather 2, 3 sc together with Feather 3, then 3 sc, and finally 3 sc together with the back feather and 3 sc (18). Stuff feathers. Rnd 5: (1 sc, dec) * 6 (12). Rnd 6: (1 sc, dec) * 4 (8). Rnds 7-16: sc in each stitch around (8). Sl st and fasten off.
The Eye Base (1 piece)
Use White yarn:
- Rnd 1: ch 2, 3 sc in 2nd ch from hook, ch 1, turn (3)
- Rnd 2: 3 inc, ch 1, turn (6)
- Rnd 3: (1 sc, inc) * 3, ch 1, turn (9)
- Rnd 4: (2 sc, inc) * 3, ch 1, turn (12)
- Rnd 5: (3 sc, inc) * 3, ch 1, turn (15)
- Rnd 6: (4 sc, inc) * 3, ch 1, turn (18)
- Rnd 7: Work along the straight edge: 4 sc, inc, 5 sc (11)
Switch to Peach yarn. Work FLO along the curve of Rnd 6: 18 sc, ch 1, turn. Rnd 9: 18 sc, ch 1, turn. Rnd 10: 18 sc worked into the BLO of Rnd 6. Sl st and leave a tail for sewing.
The Beak and Chin
Chin/Wattle (Make 2): Use Red yarn. Rnd 1: 6 sc in mr. Rnd 2: inc * 6 (12). Rnd 3: 12 sc. Rnd 4: dec * 6 (6). Rnds 5-7: sc in each stitch around (6). Sl st and fasten off.
Lower Beak (1 piece): Use Peach yarn. Rnd 1: 6 sc in mr. Rnd 2: (inc, 2 sc) * 2 (8). Rnd 3: 1 sc, inc, 3 sc, inc, 2 sc (10). Rnd 4: 2 sc, inc, 4 sc, inc, 2 sc (12). Rnd 5: 3 sc, inc, 5 sc, inc, 2 sc (14). Rnd 6: 4 sc, inc, 6 sc, inc, 2 sc (16). Rnd 7: 5 sc, inc, 7 sc, inc, 2 sc (18). Rnd 8: 6 sc, inc, 8 sc, inc, 2 sc (20). Rnd 9: 7 sc, inc, 9 sc, inc, 2 sc (22). Rnd 10: 8 sc, inc, 2 sc, 3 sc across the inside of Chin 1, 3 sc across the inside of Chin 2, 2 sc, inc, 2 sc (24). Rnd 11: 12 sc, 3 sc across the top of Chin 1, 3 sc across the top of Chin 2, 6 sc (24). Rnd 12: (3 sc, inc) * 5, inc. Sl st and fasten off.
Upper Beak (1 piece): Use Peach yarn. Rnd 1: 6 sc in mr. Rnd 2: (1 sc, inc) * 3 (9). Rnd 3: (2 sc, inc) * 3 (12). Rnd 4: 12 sc. Rnd 5: 3 sc, inc, 3 sc, bob, 3 sc, inc (16). Rnd 6: 16 sc. Rnd 7: 4 sc, inc, 4 sc, 2 inc, 4 sc, inc (20). Rnd 8: 5 sc, bob, 6 sc, bob, 6 sc, bob (26). Rnd 9: 8 sc, inc, 12 sc, inc, 4 sc (28). Rnd 10: 9 sc, inc, 5 sc, 2 dec, 5 sc, inc, 3 sc (28). Rnd 11: 9 sc, bob, 5 sc, 2 dec, 5 sc, bob, 3 sc (30). Rnd 12: 13 sc, join to Eye Base with 11 sc, 2 sc. Rnd 13: Join to Lower Beak with 15 sc, 2 sc. Sl st and fasten off. Stuff the upper beak lightly.
The Feet (Make 2)
Each foot has toes joined to a base. Use Peach yarn.
- Outer Toes (4 pieces): Rnd 1: 6 sc in mr. Rnd 2: inc * 6 (12). Rnd 3: 12 sc. Rnd 4: dec * 6 (6). Rnds 5-6: 6 sc. Sl st and fasten off.
- Middle Toes (2 pieces): Same as Outer Toes, but Rnds 5-7: 6 sc. Sl st and fasten off.
- Back Toes (2 pieces): Rnd 1: 5 sc in mr. Rnd 2: inc * 5 (10). Rnd 3: 10 sc. Rnd 4: 4 dec, 2 sc (6). Rnd 5: 6 sc. Sl st and fasten off.
Foot Base: Rnd 1: 6 sc in mr. Rnd 2: inc * 6 (12). Rnd 3: (1 sc, inc) * 6 (18). Rnd 4: Join 1st outer toe (3 sc), middle toe (3 sc), 2nd outer toe (3 sc), 3 sc, back toe (3 sc), 3 sc (18). Rnd 5: (1 sc, dec) * 6 (12). Rnd 6: (1 sc, dec) * 4 (8). Rnds 7-16: sc in each stitch around (8). Sl st and fasten off.
The Comb (1 piece)
The comb is made of three joined sections in Red yarn.
Section 1: Rnd 1: 6 sc in mr. Rnd 2: inc * 6 (12). Rnd 3: (1 sc, inc) * 6 (18). Rnd 4: (2 sc, inc) * 6 (24). Rnds 5-8: 24 sc. Rnd 9: (10 sc, dec) * 2 (22). Rnd 10: 22 sc. Rnd 11: (9 sc, dec) * 2 (20). Rnd 12: 20 sc. Rnd 13: 8 sc, 2 dec, 8 sc (18). Rnd 14: 18 sc. Rnd 15: 7 sc, 2 dec, 7 sc (16). Rnd 16: 16 sc. Rnd 17: 6 sc, 2 dec, 6 sc (14). Rnd 18: 14 sc. Rnd 19: 5 sc, 2 dec, 5 sc (12). Rnd 20: 12 sc. Rnd 21: 4 sc, 2 dec, 4 sc (10). Rnd 22: 10 sc. Rnd 23: (dec, 3 sc) * 2 (8). Rnd 24: 8 sc. Sl st and fasten off.
Section 2: Follow Section 1, but Rnds 4-6: 18 sc. Decrease similarly until Rnd 16 (8 stitches). Sl st and fasten off.
Section 3: Follow Section 1, but Rnd 4: (dec, 7 sc) * 2 (16). Decrease similarly until Rnd 13 (8 stitches). Do not fasten off; join to Section 2 and Section 1 using sc to create the comb base (Total 24 stitches). Rnd 15: (2 sc, dec) * 6 (18). Rnd 16: (1 sc, dec) * 6 (12). Switch to Sand yarn.
The Body (The Main Piece)
Use a 1.25 mm hook and Sand yarn:
- Rnd 1: (1 sc, inc) * 6 (18)
- Rnd 2: (2 sc, inc) * 6 (24)
- Rnd 3: (3 sc, inc) * 6 (30)
- Rnds 4-6: sc in each stitch around (30)
- Rnd 7: (9 sc, inc) * 3 (33)
- Rnd 8: 33 sc
- Rnd 9: (10 sc, inc) * 3 (36)
- Rnd 10: 36 sc
- Rnd 11: (11 sc, inc) * 3 (39)
- Rnd 12: 39 sc
- Rnd 13: (12 sc, inc) * 3 (42)
- Rnd 14: 42 sc
- Rnd 15: (13 sc, inc) * 3 (45)
- Rnd 16: 15 sc, join 15 sc to Upper Beak, 15 sc (45)
- Rnd 17: 15 sc, join 15 sc to Lower Beak, 15 sc (45)
- Rnd 18: (14 sc, inc) * 3 (48)
- Rnd 19: (7 sc, inc) * 6 (54)
- Rnd 20: 7 sc, join 6 sc to right wing (inside), 28 sc, join 6 sc to left wing (inside), 7 sc (54)
- Rnd 21: 7 sc, 6 sc across right wing, 28 sc, 6 sc across left wing, 3 sc, 4 sc in FLO of Rnd 20 (54)
- Rnd 22: 4 sc in FLO of Rnd 21, 50 sc (54)
- Rnds 23-24: sc in each stitch around (54)
- Rnd 25: 50 sc, 4 sc together in BLO of Rnd 20 (54)
- Rnd 26: 4 sc, join to BLO of Rnd 21, 4 sc, inc, (8 sc, inc) * 5 (60)
- Rnd 27: 50 sc, 10 sc in FLO of Rnd 26 (60)
- Rnd 28: 10 sc in FLO of Rnd 27, 50 sc (60)
- Rnds 29-30: sc in each stitch around (60)
- Rnd 31: 50 sc, 10 sc in BLO of Rnd 26 (60)
- Rnd 32: 10 sc in BLO of Rnd 27, 4 sc, inc, (14 sc, inc) * 3 (64)
- Rnd 33: 15 sc, inc, 32 sc, inc, 15 sc (66)
- Rnd 34: 60 sc, join 6 sc to Tail (inside) (66)
- Rnd 35: Join 6 sc to Tail (inside), (7 sc, dec) * 3, (dec, 7 sc) * 3, 3 dec across tail (57)
- Rnd 36: 3 dec across tail, 11 sc, join 4 sc to right foot (inside), (1 sc, dec) * 3, (dec, 1 sc) * 3, join 4 sc to left foot (inside), 13 sc (48)
- Rnd 37: 14 sc, 4 sc across right foot, 12 sc, 4 sc across left foot, 14 sc (48)
Closing the Body: Stuff the chicken firmly with fiberfill.
- Rnd 38: (6 sc, dec) * 6 (42)
- Rnd 39: (5 sc, dec) * 6 (36)
- Rnd 40: (4 sc, dec) * 6 (30)
- Rnd 41: (3 sc, dec) * 6 (24)
- Rnd 42: (2 sc, dec) * 6 (18)
- Rnd 43: (1 sc, dec) * 6 (12)
- Rnd 44: dec * 6 (6)
Fasten off and weave in ends.
Finishing
Now it’s time to add the final touches to give your chicken personality!
- Eyes: Sew the Eye Base onto the face. Glue your safety eyes or beads onto the white base.
- Facial Sculpting: Use a yarn needle and matching peach yarn to create “indentations” for the nose. Pull the yarn from one side of the bridge of the nose to the other to pinch the shape slightly.
- Final Assembly: Ensure the comb is securely attached to the top of the head and the tail is centered at the back.
Tips for Success
- Tension is Key: Since this is a small project with very small hooks, maintain a consistent tension to avoid gaps where stuffing might show through.
- Marker Use: Use a stitch marker for the body, especially when joining the wings and feet. This ensures your additions are perfectly symmetrical.
- Stuffing: Don’t overstuff the beak, but make sure the body is firm so the chicken can sit upright.
- Yarn Choice: If you can’t find the specific brands mentioned in the original guide, any “Super Fine” or “Fingering” weight acrylic yarn will work perfectly.