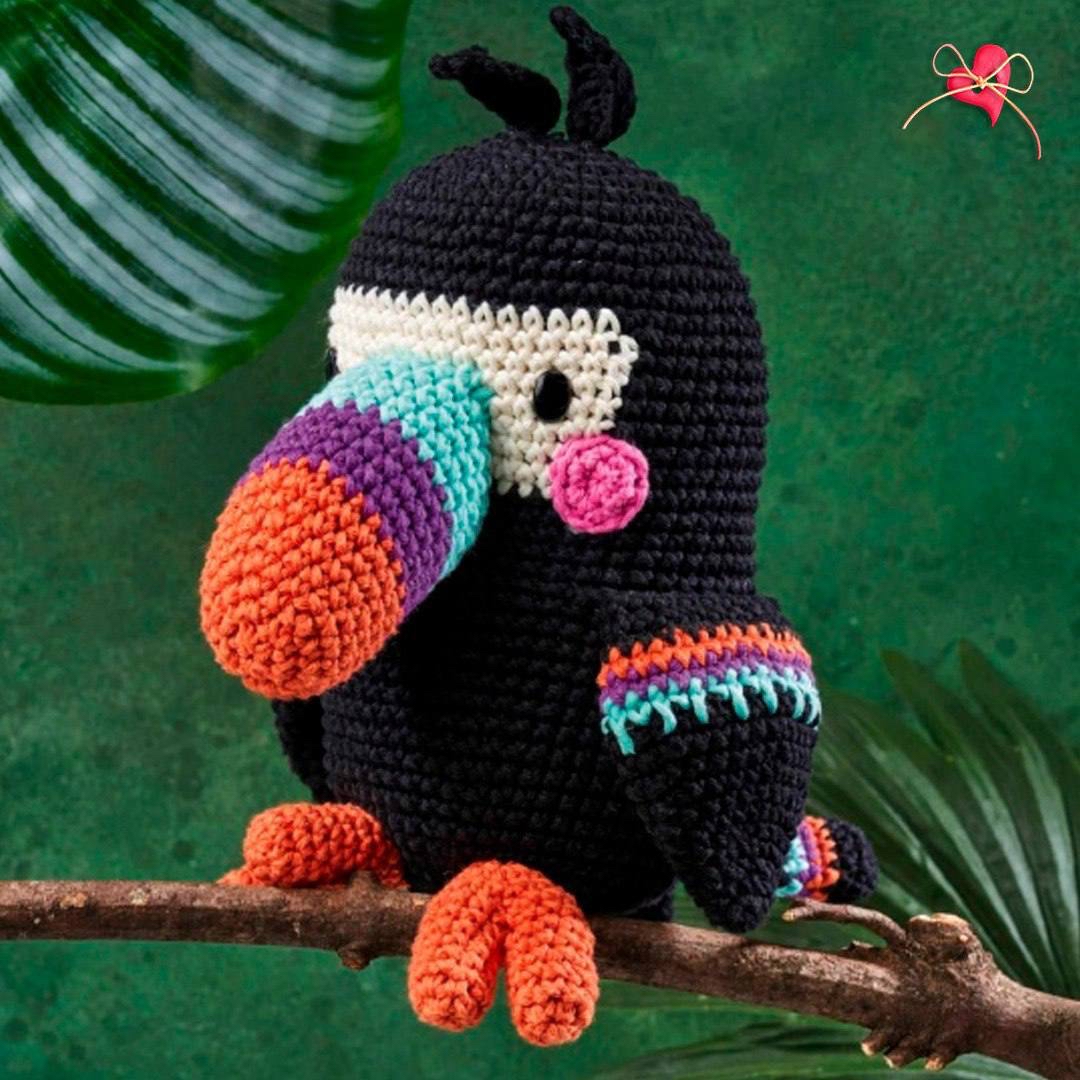
Tropical Amigurumi Toucan Crochet Pattern: A Step-by-Step Guide
Bring a splash of the rainforest into your home with this adorable, colorful Amigurumi Toucan! This project is perfect for anyone looking to add a bit of tropical flair to their crochet collection. With its vibrant, multi-colored beak and charmingly round body, this little bird is as fun to make as it is to display. Whether you are making this for a nursery, a gift for a friend, or just a treat for yourself, this pattern is designed to be engaging and rewarding.
This tutorial is written with a focus on clarity, making it accessible for those who are comfortable with basic amigurumi techniques. Get your favorite hooks and colorful yarns ready—it’s time to bring this tropical friend to life!
Materials & Abbreviations
To ensure your toucan turns out looking just like the photos, I recommend using a 100% cotton yarn. Cotton provides excellent stitch definition, which is crucial for amigurumi shapes.
What You Will Need
- Yarn (100% Cotton, approx. 2.5 oz/85 yds per ball):
- Color A: Black (3 balls)
- Color B: Bronze (018)
- Color C: Cream (002)
- Color D: Grape (054)
- Color E: Ice Green (075)
- Color F: Lollipop (036)
- Crochet Hook: 4 mm (US G/6)
- Safety Eyes: 14 mm oval eyes
- Stuffing: High-quality polyester fiberfill
- Other Tools: Tapestry needle, stitch markers, and scissors
Abbreviations (US Terms)
- Ch: Chain
- Dc: Double Crochet
- Dc2tog: Double crochet two together (decrease)
- Rs: Right Side
- St(s): Stitch(es)
- Spiked Dc: Insert your hook into the stitch two rounds below, yarn over, and pull up a loop to the height of the current round. Yarn over and pull through two loops on the hook.
- Magic Ring: The standard starting loop for amigurumi.
Note: This pattern is worked in continuous rounds (the spiral method). Do not join each round with a slip stitch. Use a stitch marker to keep track of the first stitch of every round.
Step-by-Step Instructions
Head and Body
Start with Color A (Black). Create a magic ring and work the following rounds:
- Round 1 (Rs): Ch 1 (does not count as a stitch), 6 dc in the magic ring. [6 sts]
- Round 2 (Rs): 2 dc in each st around. [12 sts]
- Round 3: (Dc in the next st, 2 dc in the next st) repeat 6 times. [18 sts]
- Round 4: (Dc in next 2 sts, 2 dc in the next st) repeat 6 times. [24 sts]
- Round 5: (Dc in next 3 sts, 2 dc in the next st) repeat 6 times. [30 sts]
- Round 6: (Dc in next 4 sts, 2 dc in the next st) repeat 6 times. [36 sts]
- Round 7: (Dc in next 5 sts, 2 dc in the next st) repeat 6 times. [42 sts]
- Round 8: (Dc in next 6 sts, 2 dc in the next st) repeat 6 times. [48 sts]
- Round 9: (Dc in next 7 sts, 2 dc in the next st) repeat 6 times. [54 sts]
- Rounds 10-12: Dc in each st around. [54 sts]
- Round 13: Dc in the next 19 sts. Switch to Color C (Cream), dc in the next 16 sts. Switch back to Color A (Black), dc in the remaining 19 sts. [54 sts]
- Rounds 14-19: (Dc in the next 18 sts, switch to Color C, dc in the next 18 sts, switch to Color A, dc in the next 18 sts). [54 sts]
- Round 20: Dc in the next 19 sts, switch to Color C, dc in the next 16 sts, switch to Color A, dc in the remaining 19 sts. [54 sts]
Pro Tip: At this stage, separate Color C from your work. You will use Color A to finish the outline of the white section later.
- Round 21: Dc in each st around. [54 sts]
- Round 22: Dc in the next 21 sts, (dc2tog) repeat 6 times, dc in the remaining 21 sts. [48 sts]
- Rounds 23-25: Dc in each st around. [48 sts]
Eye Placement: Insert the 14 mm safety eyes between rounds 16 and 17, ensuring they are approximately 10 stitches apart. Begin stuffing the body firmly with fiberfill as you continue.
- Round 26: Dc in the next 20 sts, 2 dc in each of the next 6 sts, dc in the remaining 20 sts. [54 sts]
- Rounds 27-38: Dc in each st around. [54 sts]
- Round 39: (Dc in next 7 sts, dc2tog) repeat 6 times. [48 sts]
- Round 40: (Dc in next 6 sts, dc2tog) repeat 6 times. [42 sts]
- Round 41: (Dc in next 5 sts, dc2tog) repeat 6 times. [36 sts]
- Round 42: (Dc in next 4 sts, dc2tog) repeat 6 times. [30 sts]
- Round 43: (Dc in next 3 sts, dc2tog) repeat 6 times. [24 sts]
- Round 44: (Dc in next 2 sts, dc2tog) repeat 6 times. [18 sts]
- Round 45: (Dc in next 1 st, dc2tog) repeat 6 times. [12 sts]
- Round 46: (dc2tog) repeat 6 times. [6 sts]
Fasten off, leaving a long tail for sewing.
The Colorful Beak
Using Color B (Bronze), create a magic ring and work the following:
- Round 1 (Rs): Ch 1, 6 dc in magic ring. [6 sts]
- Round 2 (Rs): 2 dc in each st around. [12 sts]
- Round 3: (Dc in the next st, 2 dc in the next st) repeat 6 times. [18 sts]
- Round 4: Dc in the next 8 sts, 2 dc in the next 2 sts, dc in the remaining 8 sts. [20 sts]
- Round 5: Dc in each st around. [20 sts]
- Round 6: Dc in the next 9 sts, 2 dc in the next 2 sts, dc in the remaining 9 sts. [22 sts]
Stuff the beak very firmly. Once finished, sew it to the front of the head.
Wings (Make 2)
Start with Color A (Black):
- Round 1: Magic ring, ch 1, 6 dc in ring. [6 sts]
- Round 2: 2 dc in each st around. [12 sts]
- Round 3: Dc in each st around. [12 sts]
- Round 4: Dc in the next 8 sts, 2 dc in the next 2 sts, dc in the remaining 8 sts. [20 sts]
- Round 5: Dc in the next 9 sts, 2 dc in the next 2 sts, dc in the remaining 9 sts. [22 sts]
To add the colorful stripe detail, work three rows of stripes (including one row of double crochet in the back loop) using Color D (Grape) and Color E (Ice Green) before finishing the wing.
Tail Feathers (Make 3)
Round 1 (Color A): Dc in the next 7 sts, 2 dc in the next st, dc in the remaining 7 sts. [16 sts]
Round 2 (Color D): Dc in the next 10 sts, 2 dc in the next 2 sts, dc in the remaining 10 sts. [24 sts]
Round 3 (Color E): Dc in each st around. [24 sts]
Rounds 4-6 (Color A): Dc in each st around. [24 sts]
Feet (Make 4)
Start with Color B (Bronze):
- Round 1 (Rs): Magic ring, ch 1, 6 dc in ring. [6 sts]
- Round 2 (Rs): (Dc in the next st, 2 dc in the next st) repeat 3 times. [9 sts]
- Rounds 3-7: Dc in each st around. [9 sts]
- Round 8 (Color E): Dc in each st around. [9 sts]
- Round 9 (Color D): Dc in the next 7 sts, dc2tog in the next st. [8 sts]
- Round 10 (Color A): Dc in the next 2 sts, dc2tog 3 times. [5 sts]
Rosy Cheeks (Make 2)
Using Color F (Lollipop):
- Round 1: Magic ring, ch 1, 5 dc in ring. [5 sts]
- Round 2: 2 dc in each st around. [10 sts]
Head Feathers (Make 2)
Using Color A (Black):
Ch 7. In the 2nd ch from the hook, work: (ss, ch, htr, ch, 3dc in the last ch, ch, htr, ch, ss). Fasten off.
Finishing
Now comes the fun part—assembly! Follow these steps to bring your toucan together:
- Stuffing: Ensure the head and body are stuffed evenly so the bird sits upright.
- Beak: Sew the beak securely between rounds 16 and 17.
- Wings: Attach the wings to the sides of the body at rounds 26-27. Space them about 18 stitches apart.
- Feet: Sew the feet to the bottom of the body.
- Tail: Attach the tail feathers to the back of the body between rounds 33 and 36.
- Details: Sew the rosy cheeks just below the eyes and attach the head feathers to the top of the head.
Tips
To ensure a professional finish, keep these tips in mind:
- Tension Matters: While your tension doesn’t need to be perfect, try to keep it consistent so the stuffing doesn’t show through the stitches.
- Use Markers: Working in a spiral can be tricky. Always use a stitch marker at the start of your round so you don’t lose your place.
- Safety First: If you are making this toy for a child under 36 months, please do not use plastic safety eyes. Instead, embroider the eyes using black cotton thread to ensure it is completely safe for little ones.
- Perfect Stuffing: When stuffing the beak, pack it tightly! A floppy beak can change the whole look of your toucan.