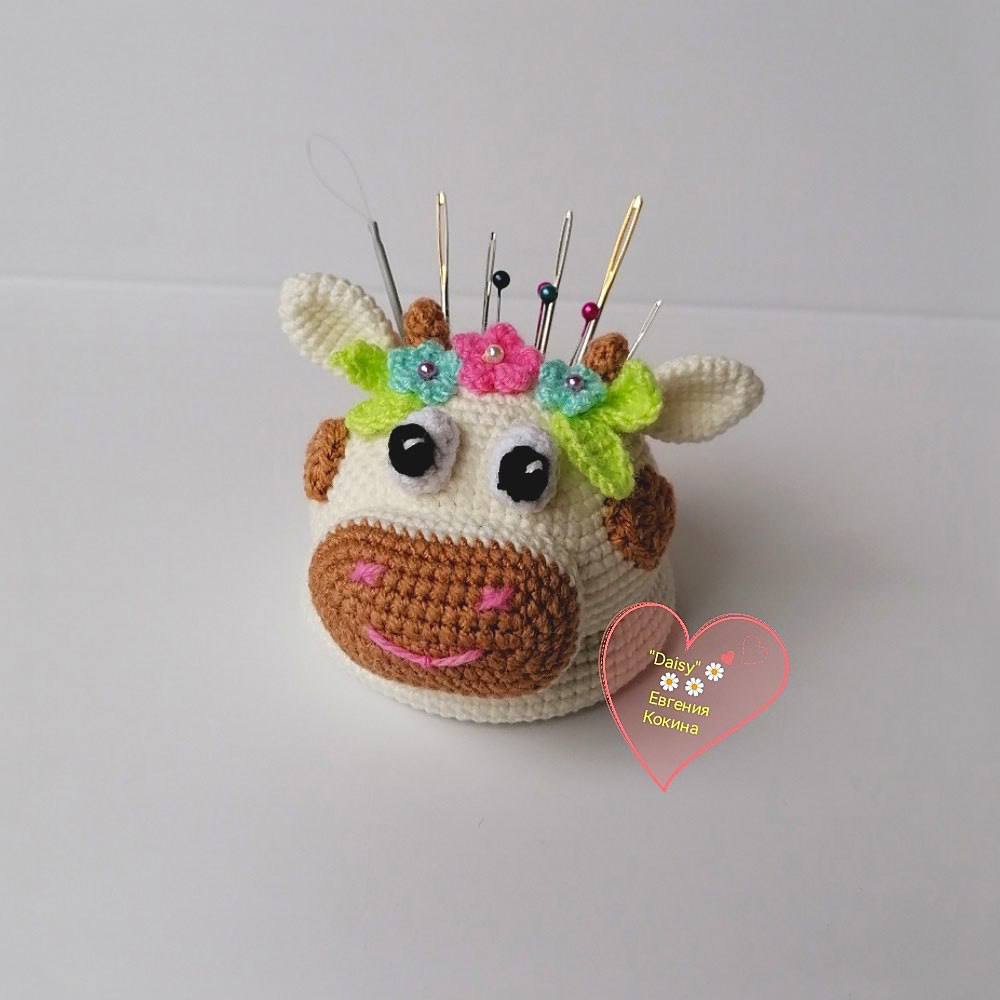
Adorable Crochet Cow Pincushion Pattern: A Step-by-Step Tutorial
Whether you are a seasoned pro or just starting your crochet journey, every crafter needs a reliable place to keep their pins and needles. Why settle for a boring store-bought pincushion when you can create this charming, chunky little cow? This project is perfect for using up scrap yarn and makes a wonderful gift for your sewing-obsessed friends.
This pattern is designed to be beginner-friendly, focusing on basic stitches and simple shaping. We will create a sturdy, weighted base so your cow stays upright on your desk, topped with a cute face and floral decorations. Let’s dive in!
Materials & Abbreviations
Materials You’ll Need
- Yarn:
- Cream or Off-White cotton yarn (Main body)
- White cotton yarn (Eye whites)
- Black cotton yarn (Pupils)
- Beige cotton or baby yarn (Muzzle, horns, heart, and teardrop)
- Bright Pink yarn (Flowers)
- Light Blue/Iceberg yarn (Flowers)
- Light Green yarn (Leaves)
- Crochet Hook: 2.5mm (or a size that works well with your chosen yarn to keep the fabric tight)
- Stuffing: Polyester fiberfill (Polyfill)
- Tools: Yarn needle, scissors, and a few small beads for flower centers
US Crochet Terms & Abbreviations
- ch: chain
- sc: single crochet
- hdc: half double crochet
- dc: double crochet
- sl st: slip stitch
- inc: increase (two stitches in one stitch)
- dec: decrease (two stitches joined into one)
- MR: magic ring
- st(s): stitch(es)
Step-by-Step Instructions
The Top Section
We start by creating the dome of the cow’s head. This will be the part that actually holds the pins.
- Round 1: Create a MR and work 8 sc into it. (8 sts)
- Round 2: inc in each st around. (16 sts)
- Round 3: (1 sc, inc) x 8. (24 sts)
- Round 4: (3 sc, inc) x 6. (30 sts)
- Round 5: (4 sc, inc) x 6. (36 sts)
- Round 6: (5 sc, inc) x 6. (42 sts)
- Round 7: (6 sc, inc) x 6. (48 sts)
- Round 8: (7 sc, inc) x 6. (54 sts)
- Round 9: (8 sc, inc) x 6. (60 sts)
- Round 10: sc in each st around. (60 sts)
- Round 11: (9 sc, inc) x 6. (66 sts)
- Round 12: sc in each st around. (66 sts)
- Round 13: (10 sc, inc) x 6. (72 sts)
- Round 14: sc in each st around. (72 sts)
- Round 15: (11 sc, inc) x 6. (78 sts)
- Rounds 16-20: sc in each st around for 5 rows. (78 sts)
Note: Do not cut the yarn yet! We will use this tail later to create the stability ring.
The Bottom Base
You will need to crochet two identical circles for the bottom.
- Round 1: MR, 8 sc. (8 sts)
- Round 2: inc in each st around. (16 sts)
- Round 3: (1 sc, inc) x 8. (24 sts)
- Round 4: (3 sc, inc) x 6. (30 sts)
- Round 5: (4 sc, inc) x 6. (36 sts)
- Round 6: (5 sc, inc) x 6. (42 sts)
- Round 7: (6 sc, inc) x 6. (48 sts)
- Round 8: (7 sc, inc) x 6. (54 sts)
- Round 9: (8 sc, inc) x 6. (60 sts)
- Round 10: (9 sc, inc) x 6. (66 sts)
- Round 11: (10 sc, inc) x 6. (72 sts)
Fasten off the first circle. For the second circle, do not cut the yarn.
Assembling the Body
Joining the Bottoms
Place the two circles on top of each other. Working through both layers:
- Join Round: (11 sc, inc) x 6. (78 sts)
Joining the Top and Bottom
Now, we connect the dome (Top) to the double-layered base (Bottom). To create a pocket for stuffing, we will use a specific technique:
- Connection Round: Work 78 sc around. In the Top section, insert your hook into the front loop only. In the Bottom section, insert your hook through both loops.
- Walls: Continue working sc in each stitch for 9 more rounds (78 sc per round). Stuff the cow firmly as you go.
The Stability Ring (The “Roll”)
Go back to the yarn tail you left at the end of the Top section. We will now work into the remaining back loops of that last row of the Top section to create a sturdy rim.
- Work 1 round of 78 sc.
- Work 9 more rounds of 78 sc in both loops. (78 sts per round)
- Final Join: Work one last round of 78 sc, joining the stability ring to the body of the cow. Fasten off and weave in ends.
Facial Features and Accessories
The Muzzle
Use beige yarn. Start with a chain of 11.
- Row 1: Starting in 2nd ch from hook: inc, 8 sc, 4 sc in last ch, 8 sc, inc. (24 sts)
- Row 2: inc, inc, 8 sc, (inc) x 4, 8 sc, inc, inc. (32 sts)
- Row 3: (1 sc, inc) x 2, 8 sc, (1 sc, inc) x 4, 8 sc, (1 sc, inc) x 2. (40 sts)
- Row 4: (2 sc, inc) x 2, 8 sc, (2 sc, inc) x 4, 8 sc, (2 sc, inc) x 2. (48 sts)
- Row 5: 36 sc in beige, switch to cream yarn, 12 sc. (48 sts)
- Rows 6-7: sc in each st around. (48 sts)
- Row 8: (6 sc, dec) x 6. (42 sts)
Fasten off, stuff lightly, and sew to the front of the head. Embroider nostrils and a small smile using pink yarn.
Horns & Ears
- Horns (Make 2): Beige yarn. MR 6 sc. Round 2: 6 sc. Round 3: (inc, 5 sc). Round 4: 7 sc. Stuff lightly and sew to the top.
- Ears (Make 2): Cream yarn. MR 6 sc. R2: (1 sc, inc) x 3 (9). R3: (2 sc, inc) x 3 (12). R4: (3 sc, inc) x 3 (15). R5-9: sc around. R10: (3 sc, dec) x 3 (12). R11: 1 sc. Fold in half and sc across 6 sts to close. Sew to head.
Eyes, Flowers, and Leaves
- Eyes: White part: Ch 5. Working around the chain: inc hdc, 2 hdc, 4 hdc in last ch, 2 hdc, inc hdc (12). R2: 12 sc. Pupil: MR 6 sc in black. Sew pupil onto white and add a tiny white stitch for a highlight.
- Flowers (Make 3): Pink or Blue yarn. In a MR, work (2 ch, dc, 2 ch, sl st) x 5. Fasten off and add a bead to the center.
- Leaves (Make 4): Green yarn. Ch 6 or 8. Work sc, hdc, and dc along the chain to create a leaf shape, then work back down the other side of the chain mirroring the stitches.
- Heart & Teardrop: These are small decorative accents worked in beige yarn using a combination of sc, hdc, and dc in a small magic ring or short chain.
Finishing
Now comes the fun part! Arrange your flowers and leaves into a crown on the cow’s head. Sew them on securely. Attach the heart to the cheek and the teardrop as a small beauty mark or accessory. Give your cow a little squeeze to ensure the stuffing is evenly distributed and she holds her shape.
Tips for Success
- Tension is Key: Because this is a pincushion, you want your stitches to be tight. This prevents pins from pushing through the crochet fabric and reaching your fingers.
- Stuffing: Don’t be afraid to overstuff the base slightly; it provides the weight needed to keep the cow from tipping over.
- Yarn Choices: While this pattern uses cotton for a clean look, you can use acrylic or a blend. Just ensure the yarn isn’t too “holey,” or the pins might slip through.
- Joining: If you find the “front loop only” join confusing, remember that you are essentially creating a double wall that allows the bottom part to be a separate “cup” inside the head.