DIY Crochet Angel Pattern: A Whimsical Amigurumi Tutorial
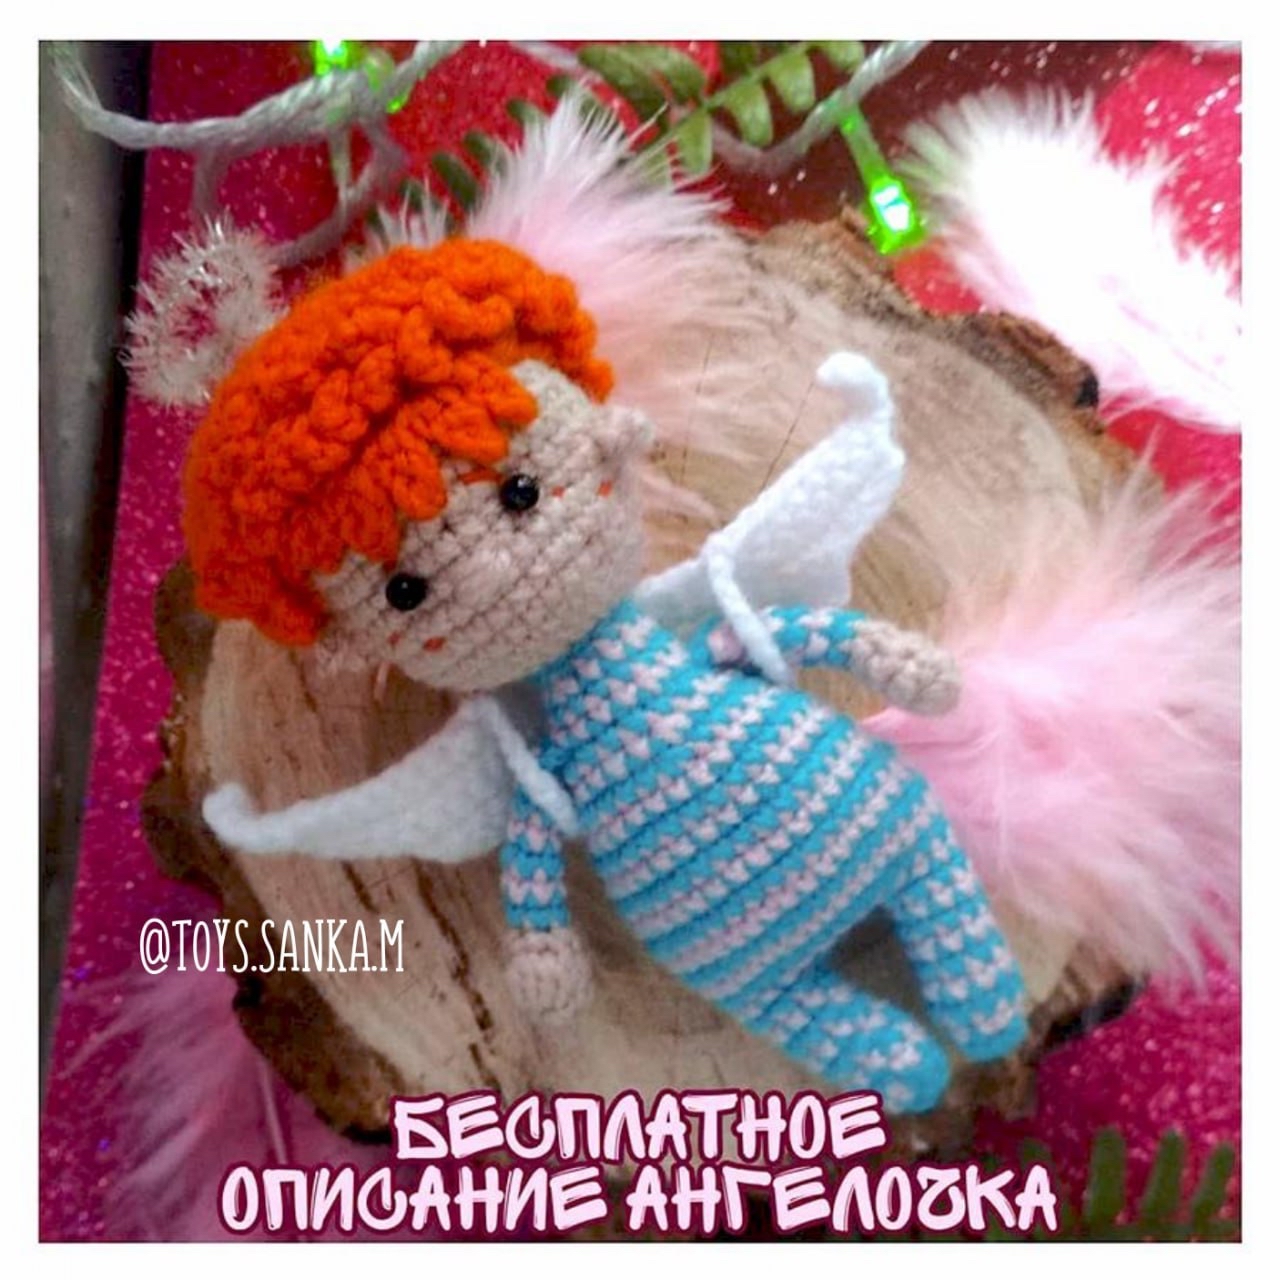
Are you looking for a sweet, whimsical project to add to your crochet collection? This adorable crochet angel is the perfect project for anyone wanting to create something magical. Whether you are making a nursery decoration, a sweet gift for a baby shower, or a unique Christmas ornament, this little angel is sure to bring a smile to everyone’s face. With her bright orange hair, striped outfit, and soft wings, she is a character filled with personality!
In this tutorial, we will walk through the process of creating this amigurumi angel step-by-step. This pattern is designed to be beginner-friendly, though you should be comfortable with basic stitches like single crochet and working in a magic ring. We will also cover how to add poseable wire to the arms and how to make the wings removable for extra versatility. Let’s grab our hooks and get started!
Materials & Abbreviations
Before we dive into the stitches, let’s make sure you have everything you need on your craft table. To achieve the look seen in the photos, I recommend using a medium-weight (worsted) cotton or acrylic yarn.
What You Will Need:
- Yarn: You will need several colors:
- A neutral beige/skin tone for the head and limbs.
- A bright orange for the hair.
- A combination of light blue and soft pink for the striped body.
- White or cream for the wings.
- Crochet Hook: A size appropriate for your yarn (typically 3.25mm to 4.0mm or a US size C-2 to G-4).
- Stuffing: Polyester fiberfill to keep your angel plump and sturdy.
- Safety Eyes: Small black safety eyes (approx. 6mm to 8mm).
- Wire: Thin floral wire or chenille wire for the arms (to make them poseable) and for the halo.
- Tools: A tapestry needle for sewing, scissors, and stitch markers.
Abbreviations (US Terms):
- MR: Magic Ring (or Magic Circle)
- sc: Single crochet
- inc: Increase (2 sc in one stitch)
- dec: Decrease (sc two stitches together)
- ch: Chain
- hdc: Half double crochet
- sl st: Slip stitch
- BLO: Back loop only
- st(s): Stitch(es)
Step-by-Step Instructions
The Body and Legs
We begin our journey from the bottom up, starting with the legs. You will need to make two identical legs.
Legs (Make 2):
- Round 1: 6 sc in a MR (6)
- Round 2: (1 sc, inc) repeat 3 times (9)
- Rounds 3-10: 9 sc per round (8 rounds total)
Once you have finished the second leg, do not fasten off. On the first leg, fasten off your yarn. On the second leg, do not fasten off; instead, chain 5 (5 ch) and join it to the first leg to create a bridge between them. This will form the base of the body.
- Round 11: 9 sc around the first leg, 5 sc over the chain bridge, 9 sc around the second leg, 5 sc over the chain bridge (28)
- Round 12: 28 sc (28)
- Round 13: 9 sc, (inc) repeat 6 times, 12 sc (33)
- Rounds 14-17: 33 sc (4 rounds)
Note: When performing decreases in the following rounds, ensure you are working strictly along the sides of the body to maintain a balanced shape.
- Round 18: 3 sc, dec, 1 sc, dec, 15 sc, dec, 1 sc, dec, 6 sc (30)
- Rounds 19-20: 30 sc (2 rounds)
- Round 21: 3 sc, (dec) repeat 2 times, 13 sc, (dec) repeat 2 times, 6 sc (26)
- Round 22: 26 sc (26)
- Round 23: (11 sc, dec) repeat 2 times (24)
- Round 24: (4 sc, dec) repeat 4 times (20)
- Round 25: 20 sc (20)
- Round 26: (3 sc, dec) repeat 4 times (16)
- Round 27: 16 sc (16)
- Round 28: (2 sc, dec) repeat 4 times (12)
- Round 29: 12 sc (12)
The Head
Switch to your beige/skin tone yarn to begin the head. We will use the back loop only (BLO) for the first round to create a distinct “neck” area.
- Round 30: In BLO: (inc) repeat 12 times (24)
- Round 31: (3 sc, inc) repeat 6 times (30)
- Round 32: (4 sc, inc) repeat 6 times (36)
- Rounds 33-38: 36 sc (6 rounds)
- Round 39: (4 sc, dec) repeat 6 times (30)
- Round 40: (3 sc, dec) repeat 6 times (24)
- Round 41: (2 sc, dec) repeat 6 times (18)
- Round 42: (1 sc, dec) repeat 6 times (12)
- Round 43: (dec) repeat 6 times (6)
Fasten off, pull the remaining strand through the center to close the hole tightly, and secure the yarn.
The Ears
To give your angel some personality, we will add small ears. Attach your yarn to the area between rounds 35 and 37 on the head.
- Work a small cluster (3 hdc into a single stitch) and finish with a slip stitch.
- Repeat this on the opposite side of the head to ensure symmetry.
The Poseable Arms (Make 2)
For the arms, we want to include wire so they can be posed. Instead of stuffing them with fiberfill, we will use wire.
- Round 1: 6 sc in a MR (6)
- Round 2: Create a small bobble (3 hdc in one stitch), then 5 sc (6)
- Rounds 3-4: 6 sc (2 rounds)
Switch to your clothing color yarn (the blue or pink you chose for the body).
- Rounds 5-10: 6 sc (6 rounds)
Assembly Tip: Place a piece of wire inside the arm. Fold the arm in half and work 3 sc through both layers to secure the wire. Fasten off, leaving a long tail for sewing to the body.
The Textured Orange Hair
The hair is the crowning glory of this angel! We will use a specific technique to create a textured, loopy look.
- Round 1: 6 sc in a MR (6)
- Round 2: In BLO: (inc) repeat 6 times (12)
- Round 3: In BLO: (1 sc, inc) repeat 6 times (18)
- Round 4: In BLO: (2 sc, inc) repeat 6 times (24)
- Round 5: In BLO: (3 sc, inc) repeat 6 times (30)
- Round 6: In BLO: (4 sc, inc) repeat 6 times (36)
- Round 7: In BLO: (5 sc, inc) repeat 6 times (42)
- Rounds 8-9: In BLO: 42 sc (2 rounds)
- Round 10: 18 sl st, then (ch 4, from the 2nd ch from hook crochet 3 sc, sl st in the next sc) repeat 5 times (19 total stitches)
To attach the hair, join your yarn to the front loop of Round 2. Work in a spiral: (ch 8, sl st in the next st) repeatedly until you reach the end. This will create beautiful loops. Sew the hair piece onto the head.
The Removable Wings
The wings are designed to be slightly separate from the body, allowing you to remove them if you wish.
- Start: Ch 5. From the 2nd ch from the hook, work 4 sc.
- Next Step: Ch 5, work 4 sc over the chain and 4 sc into the previous row.
- Turn your work: Work 8 sc, ch 5, 4 sc over the chain, and 8 sc into the previous row.
- Turn again: Work 12 sc, ch 5, 4 sc over the chain, and 12 sc into the previous row.
To make the wings removable, join your yarn to the first row of the body, ch 10, and sl st into the last row of the wings. This creates a little chain “loop” that keeps them attached but allows for easy removal. If you prefer them to be permanent, simply sew them directly to the back of the body.
Finishing
Now comes the fun part—bringing your angel to life! Follow these steps for a polished look:
- Stuffing: Stuff the body and head firmly with fiberfill before closing. Ensure the stuffing is even so there are no lumps.
- Eyes: Insert your safety eyes between rounds 34 and 35 (or wherever you prefer the facial expression to be). You can also use black thread to embroider small eyelashes or a tiny mouth.
- Sewing: Use your tapestry needle to sew the arms to the sides of the body and the head to the body. Ensure the head is centered.
- The Halo: Take your chenille wire and shape it into a circle. You can attach it to the hair or the head using a small amount of clear glue or by sewing it into the hair loops.
Tips for Success
To make your crochet angel look professional, keep these tips in mind:
- Tension is Key: Try to keep your stitches even. If you are a beginner, don’t worry if they aren’t perfect, but try not to pull the yarn too tight, or the piece will become stiff.
- Use Stitch Markers: Amigurumi is worked in continuous rounds. Using a stitch marker is essential so you don’t lose track of where your round begins.
- Color Changes: When changing colors (like moving from the legs to the body or the arms to the clothing), pull the new color through the last two loops of the final stitch of the previous color to ensure a clean transition.
- Wire Safety: When using wire in the arms, make sure the ends are tucked deep into the stuffing and secured so they don’t poke through the crochet fabric.
Happy crocheting! We can’t wait to see your beautiful little angels!