How to Crochet a Cute Amigurumi Flamingo: Step-by-Step Pattern
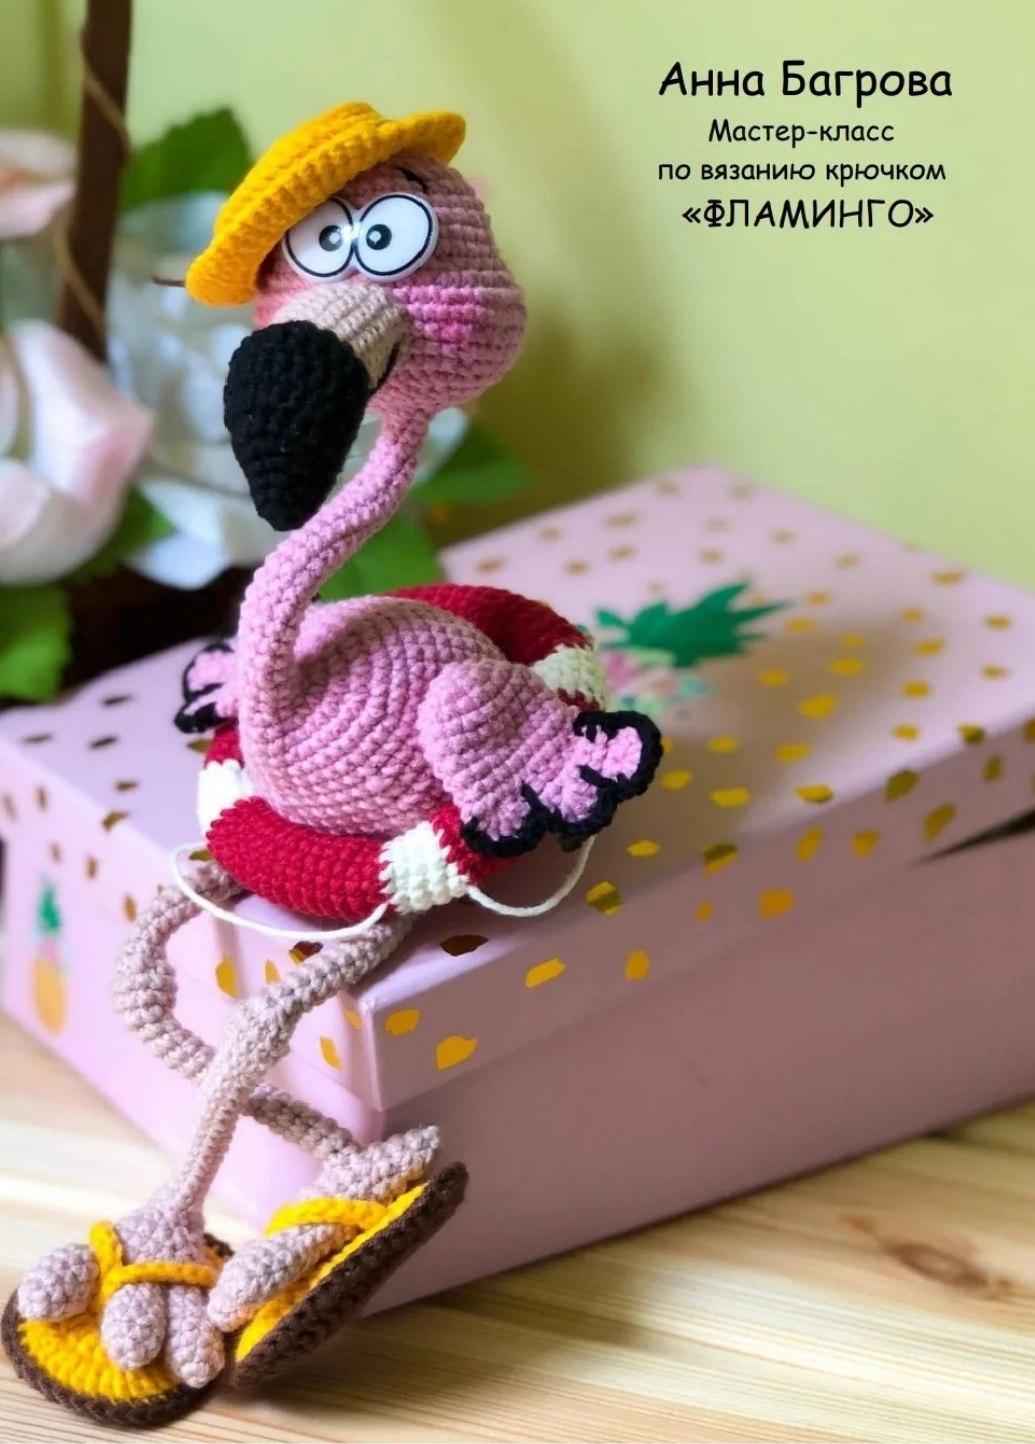
Bring a touch of the tropics into your home with this adorable amigurumi flamingo! Whether you are looking for a unique gift or a fun weekend project, this crochet flamingo is the perfect companion. With its quirky expression, tiny flip-flops, and a little life preserver, this bird is full of personality.
This pattern is designed to be beginner-friendly, though it does involve some wire work to make the flamingo poseable. Follow along with this detailed guide, and you’ll have your own pink feathered friend in no time!
Materials & Abbreviations
Materials Needed
- Yarn: Medium weight (Category 4) cotton or cotton-blend yarn in the following colors:
- Main Color: Pink
- Accent Colors: Beige, Black, Brown, Yellow, Red, and White
- Crochet Hook: 1.75mm (or a size that gives you a tight stitch to prevent stuffing from showing)
- Safety Eyes: 30mm x 17mm oval safety eyes
- Wire:
- 1.6mm aluminum wire (approx. 12 inches) for the body and neck
- 1mm aluminum wire (approx. 5 feet) for the legs
- Stuffing: Polyester fiberfill (poly-fill)
- Extras: A small piece of sturdy cardboard, a tapestry needle, and scissors
US Crochet Abbreviations
- MR: Magic Ring
- sc: Single crochet
- inc: Increase (2 sc in one stitch)
- dec: Decrease (sc 2 together)
- sl st: Slip stitch
- ch: Chain
- hdc: Half double crochet
- dc: Double crochet
- hdc inc: Half double crochet increase (2 hdc in one stitch)
- hdc dec: Half double crochet decrease (hdc 2 together)
- dc inc: Double crochet increase (2 dc in one stitch)
- 3sc1: 3 single crochet in one stitch
- BLO: Back loop only
- FLO: Front loop only
Step-by-Step Instructions
Head, Neck, and Body
The head, neck, and body are worked as one continuous piece in pink yarn. Start with the head.
Head:
Row 1: MR 6 (6)
Row 2: 6 inc (12)
Row 3: (1 sc, inc) * 6 (18)
Row 4: 1 sc, inc, (2 sc, inc) * 5, 1 sc (24)
Row 5: (3 sc, inc) * 6 (30)
Rows 6-7: 30 sc (30)
Row 8: (9 sc, inc) * 3 (33)
Row 9: 33 sc (33)
Row 10: 5 sc, inc, (10 sc, inc) * 2, 5 sc (36)
Row 11: (10 sc, dec) * 3 (33)
Row 12: 2 sc, inc, 4 sc, 5 inc, 9 sc, 5 inc, 4 sc, inc, 2 sc (45)
Row 13: 8 sc, (1 sc, inc) * 5, 9 sc, (inc, 1 sc) * 5, 8 sc (55)
Row 14: 3 sc, inc, 47 sc, inc, 3 sc (57)
Row 15: 9 sc, (1 sc, dec) * 5, 9 sc, (dec, 1 sc) * 5, 9 sc (47)
Row 16: (6 sc, dec) * 5, 7 sc (42)
Row 17: (5 sc, dec) * 6 (36)
Row 18: (4 sc, dec) * 6 (30)
Row 19: (3 sc, dec) * 6 (24)
Row 20: (2 sc, dec) * 6 (18)
Assembly Note: Insert safety eyes between rows 9 and 10. Stuff the head halfway. Cut a 12-inch piece of 1.6mm wire, curl the end into a small spiral for safety, and insert it into the head. Finish stuffing the head.
Neck:
Row 21: (1 sc, dec) * 6 (12)
Row 22: 6 dec (6)
Rows 23-24: 6 sc (6)
Row 25: inc, 5 sc (7)
Row 26: 7 sc (7)
Row 27: 3 sc, inc, 3 sc (8)
Rows 28-40: 8 sc (8)
Row 41: 3 sc, 2 inc, 3 sc (10)
Row 42: 9 sc, 1 sl st (10)
Row 43: 1 sl st, 8 sc, 1 sl st (10)
Row 44: 1 sl st, 3 sc, 2 inc, 3 sc, 1 sl st (12)
Row 45: 3 inc, 6 sc, 3 inc (18)
Body:
Row 46: 3 inc, 12 sc, 3 inc (24)
Row 47: (1 sc, inc) * 3, 12 sc, (inc, 1 sc) * 3 (30)
Row 48: (2 sc, inc) * 3, 12 sc, (inc, 2 sc) * 3 (36)
Rows 49-50: 36 sc (36)
Row 51: (5 sc, inc) * 6 (42)
Rows 52-53: 42 sc (42)
Row 54: (6 sc, inc) * 6 (48)
Rows 55-59: 48 sc (48)
Row 60: (6 sc, dec) * 6 (42)
Rows 61-63: 42 sc (42)
Row 64: (5 sc, dec) * 6 (36)
Rows 65-67: 36 sc (36)
Row 68: 6 sc, (2 sc, dec) * 6, 6 sc (30)
Row 69: 30 sc (30)
Row 70: 6 sc, (1 sc, dec) * 6, 6 sc (24)
Row 71: 24 sc (24)
Row 72: 12 dec (12)
Tail:
Fold the body in half. Work across both edges: Row 73 consists of chains and sc to create a base for the tail. Row 74 creates the feathers using a combination of sc, hdc, and dc. Once the three feathers are completed, edge them in black yarn with sc, placing 2 sc in the tip of each feather for a rounded look.
The Beak
Start with black yarn:
Row 1: MR 6 (6)
Row 2: 1 sc, 3 inc, 2 sc (9)
Row 3: 3 sc, 3 inc, 3 sc (12)
Row 4: 5 sc, 3 inc, 4 sc (15)
Row 5: 6 sc, 3 inc, 6 sc (18)
Row 6: 3 sc, 12 hdc, 3 sc (18)
Row 7: 3 sc, 3 hdc, hdc inc, 1 hdc, 2 hdc inc, 1 hdc, hdc inc, 3 hdc, 3 sc (22)
Row 8: 3 sl st, 3 hdc, 10 dc, 3 hdc, 3 sl st (22)
Row 9: 4 sl st, 2 hdc, 10 dc, 2 hdc, 4 sl st (22)
Row 10: 5 sl st, 1 hdc, hdc dec, 2 hdc, hdc dec, 2 hdc, hdc dec, 1 hdc, 5 sl st (19)
Switch to beige yarn:
Row 11: 18 sc, dec (17)
Rows 12-17: 18 sc (18)
Row 18: 8 sc, dec, 8 sc (17)
Row 19: 17 sc (17). Fasten off, leaving a tail for sewing.
The Legs (Make 2)
Use beige yarn. Start with the toes.
Toes:
Row 1: MR 6 (6)
Row 2: (1 sc, inc) * 3 (9)
Rows 3-5: 9 sc (9)
Row 6: (dec, 1 sc) * 3 (6)
Make three toes. Fasten off two; for the third, continue crocheting to join all three toes together into one foot (Row 7). Insert 1mm wire into each toe and twist them together. Stuff the foot.
Leg:
Work in rounds of sc to create the thin leg. At Row 33, switch to pink yarn and increase slightly to create the thigh before fastening off.
The Wings (Make 2)
Use pink yarn.
Row 1: MR 6 (6)
Row 2: 6 inc (12)
Row 3: (1 sc, inc) * 6 (18)
Row 4: 18 sc (18)
Row 5: (5 sc, inc) * 3 (21)
Row 6: 21 sc (21)
Row 7: (5 sc, dec) * 3 (18)
Rows 8-9: 18 sc (18)
Fold the wing in half and work across the edge to create a ridged “feather” effect using dc and sc. Edge the wings in black yarn with sc for definition.
Accessories
- Life Ring: Chain 13, join into a circle. Work 13 rows of sc, alternating 13 rows of red and 4 rows of white. Sew the ends together.
- Hat: Yellow yarn. MR 6, increasing to 36 sts. Row 7 is worked in BLO. Rows 8-10 are sc. Row 11 is worked in FLO with (1 sc, inc) to create the brim. Finish with 2 rows of sc.
- Flip-Flops: Crochet two yellow and two brown soles. Cut cardboard to match the sole shape and sandwich it between a yellow and brown piece, sewing them together with sc around the edge. Add yellow chain straps to the top.
Finishing
- Beak: Sew the beak tightly just below the eyes.
- Legs: Insert the leg wires into the body at Row 60, spaced about 6-9 stitches apart. Sew the legs securely.
- Wings: Sew the wings to the sides of the body.
- Details: Use black embroidery thread to sew small eyebrows and a smile. Use a bit of pink blush or pastel to add color to the cheeks.
- Dress Up: Place the hat on the head and slide the life ring around the flamingo’s body. Put on the flip-flops!
Tips for Success
- Tension: Keep your stitches tight, especially on the body and head, to ensure the stuffing doesn’t peek through.
- Wire Safety: Always curl the ends of your wires or cover them with a bit of tape before inserting them into the crochet work to avoid poking through the fabric.
- Customizing: Feel free to change the colors! A blue or purple flamingo can be just as cute as a pink one.
- Symmetry: When making the flip-flops and wings, remember to mirror the second piece so they look natural on the left and right sides.