Tiny Fluffy Amigurumi Kitten Crochet Pattern: A Micro Crochet Guide
There is something undeniably magical about the world of micro crochet. Creating something so small, so delicate, and so incredibly cute that it can sit right in the palm of your hand is a rewarding challenge for any crafter. If you have ever wanted to create a tiny, “kawaii” desk companion or a unique miniature gift, this fluffy white kitten pattern is the perfect project for you.
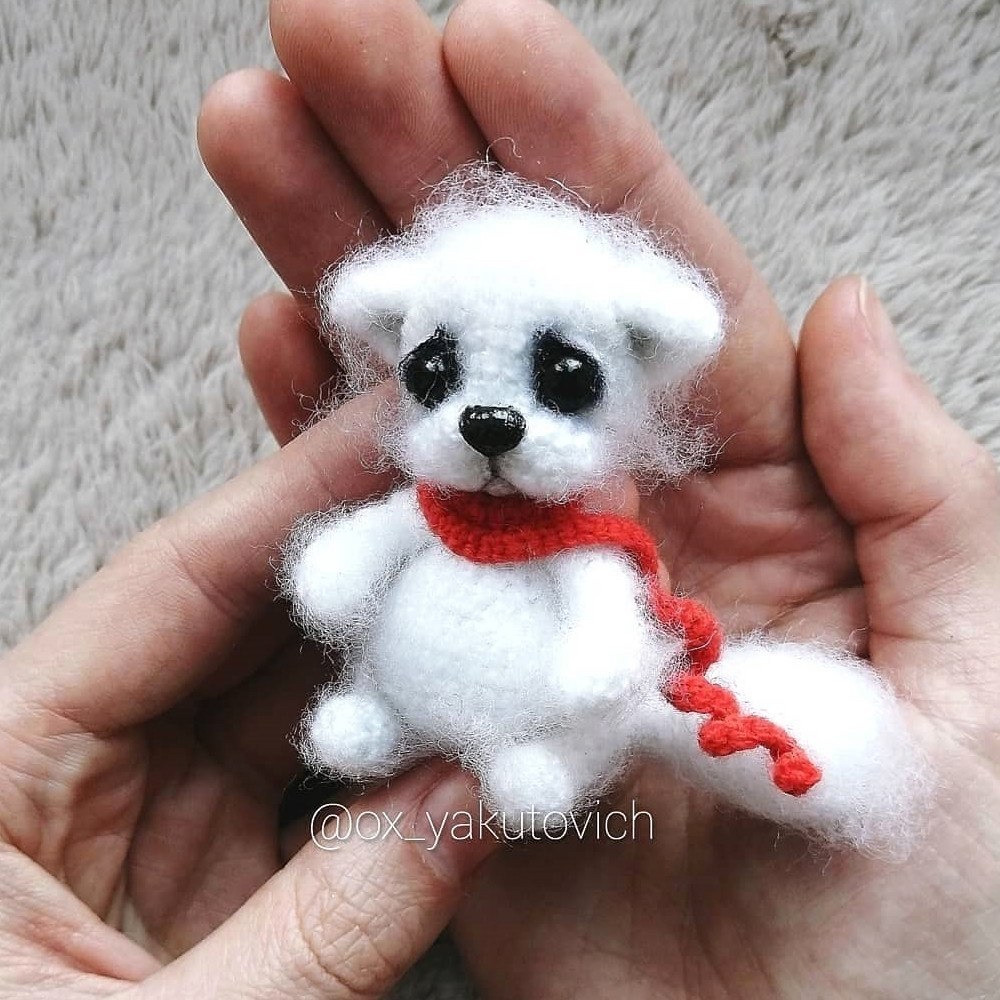
This little kitten is designed to be ultra-soft and fuzzy, thanks to the use of mohair-blend yarn. Standing at approximately 2.5 inches tall, this tiny creature features soulful eyes, a little red scarf, and a personality that is much bigger than its size. Whether you are a seasoned amigurumi artist or a beginner looking to master the art of working with very fine hooks, this tutorial will guide you through every single stitch.
Materials & Abbreviations
Because this is a micro-crochet project, the materials required are much smaller than your standard crochet kit. Precision is key here!
What You Will Need
- Crochet Hook: 0.75 mm (This is essential to keep your stitches tight so the stuffing doesn’t peek through).
- Yarn: White mohair-blend yarn (The mohair provides that signature “fluffy” kitten look). A small amount of red yarn for the scarf.
- Eyes: 4 mm black beads or safety eyes.
- Stuffing: Poly-fill or synthetic fiberfill.
- Tools: A tapestry needle, scissors, and a black permanent marker or fabric paint (for detailing the face).
- Extra: A small amount of glue (optional, for securing the eyes/eyelids).
Abbreviations (US Terms)
- MR: Magic Ring
- sc: Single crochet
- inc: Increase (2 sc in the same stitch)
- dec: Decrease (sc 2 stitches together)
- ch: Chain
- st(s): Stitch(es)
Note: Unless otherwise stated, perform all increases and decreases evenly throughout the round.
Step-by-Step Instructions
The Head
The head is worked in continuous rounds to create a smooth, rounded shape.
- R1: 6 sc in a MR (6)
- R2: 6 inc (12)
- R3: 6 inc (18)
- R4: 6 inc (24)
- R5: 6 inc (30)
- R6: 6 inc (36)
- R7: 6 inc (42)
- R8: 6 dec (36)
- R9: 6 dec (30)
- R10: 6 dec (24)
- R11: 24 sc (24)
- R12: 24 sc (24)
- R13: 24 sc (24)
- R14: 6 dec (18)
- R15: 6 dec (12)
- R16: 6 dec (6)
Fasten off, leaving a long tail for sewing. Stuff the head firmly with fiberfill.
The Body
The body follows a similar structure to the head to create an egg-shaped torso.
- R1: 6 sc in a MR (6)
- R2: 6 inc (12)
- R3: 6 inc (18)
- R4: 6 inc (24)
- R5: 6 inc (30)
- R6: 6 inc (36)
- R7: 6 inc (42)
- R8: 42 sc (42)
- R9: 42 sc (42)
- R10: 6 dec (36)
- R11: 6 dec (30)
- R12: 6 dec (24)
- R13: 24 sc (24)
- R14: 24 sc (24)
- R15: 6 dec (18)
- R16: 6 dec (12)
- R17: 6 dec (6)
Fasten off, leaving a long tail for sewing. Stuff the body firmly.
The Ears (Make 2)
- R1: 6 sc in a MR (6)
- R2: 3 inc (9)
- R3: 3 inc (12)
- R4: 2 inc (14)
Fasten off, leaving a tail for sewing. Do not stuff the ears.
The Legs
This kitten has two sets of limbs: upper legs and lower legs to give it a seated appearance.
Upper Legs (Make 2)
- R1: 6 sc in a MR (6)
- R2: 2 inc (8)
- R3: 8 sc (8)
- R4: 1 dec (7)
- R5–R7: 7 sc (7)
- R8: 1 inc (8)
- R9: 2 inc (10)
- R10: 10 sc (10)
- R11: 5 dec (5)
Fasten off, leaving a tail for sewing. Stuff lightly.
Lower Legs (Make 2)
- R1: 6 sc in a MR (6)
- R2: 6 inc (12)
- R3: (2 sc, 4 dec, 2 sc) = 8 sc
- R4–R5: 8 sc (8)
- R6: 2 inc (10)
- R7: 1 inc (11)
- R8: 2 inc (13)
- R9: 4 inc (17)
- R10: 17 sc (17)
- R11: 4 dec (13)
- R12: 6 dec (7)
Fasten off, leaving a tail for sewing. Stuff firmly.
The Tail
The tail is worked in a way that allows it to curve naturally.
- R1: 6 sc in a MR (6)
- R2: 6 inc (12)
- R3: 4 inc (16)
- R4: 2 inc (18)
- R5–R6: 18 sc (18)
- R7: 4 dec (14)
- R8: 14 sc (14)
- R9: 2 dec (12)
- R10–R12: 12 sc (12)
- R13: 1 dec (11)
- R14: 1 dec (10)
- R15: 10 sc (10)
- R16: 1 dec (9)
- R17: 9 sc (9)
- R18: 1 dec (8)
- R19: 8 sc (8)
- R20: 4 dec (4)
Fasten off, leaving a long tail for sewing. Stuff lightly.
Finishing
The assembly and facial detailing are what truly bring this tiny kitten to life. Follow these steps carefully to achieve that expressive, “soulful” look.
Assembly
- Body & Head: Sew the head onto the body. Ensure it is centered and stable.
- Limbs: Sew the upper legs to the sides of the body, and the lower legs to the bottom so the kitten sits upright. Sew the ears to the top of the head.
- Tail: Attach the tail to the back of the body.
- Scarf: Crochet a simple chain of red yarn and wrap it around the kitten’s neck to create a cute little scarf.
The Face (Detailed Tutorial)
- Eye Placement: Before sewing the eyes, use your tapestry needle to pull a thread through the head to create small indentations where the eyes will go. This gives the face “structure.”
- The Eyes: Sew your 4 mm black beads into those indentations. For an extra touch of realism, use a black marker to lightly color the edges of the bead/eye area. This adds depth to the gaze.
- Eyelids: To create the “sleepy” or “cute” eyelid look, crochet a tiny chain of stitches and sew them just above the eyes. You can use a tiny bit of glue to ensure they stay perfectly in place.
- Nose and Mouth: Use your needle to pull thread through the face to create a small indentation for the nose and mouth. Once shaped, use your black marker or fabric paint to color the tip of the nose.
Tips
Working with such small stitches and fine yarn can be tricky! Here are a few professional tips to ensure your kitten turns out perfectly:
Manage Your Tension
With a 0.75 mm hook, your tension must be very consistent. If your stitches are too loose, the white stuffing will show through the gaps, ruining the clean look of the kitten. If you find you are struggling, try using a slightly smaller hook or a smaller yarn weight.
Working with Mohair
Mohair yarn is beautiful but can be “fussy.” The long fibers can get caught in your hook or tangle easily. Try to work in a well-lit area and avoid pulling the yarn too aggressively. The fuzziness is your friend—it hides small imperfections in your stitching!
Creating Depth in the Eyes
The secret to a “professional” looking amigurumi is the eyes. Don’t just sew the beads on flat. By creating those physical indentations (depressions) in the head first, you mimic the anatomy of a real animal, making the kitten look much more lifelike and adorable.