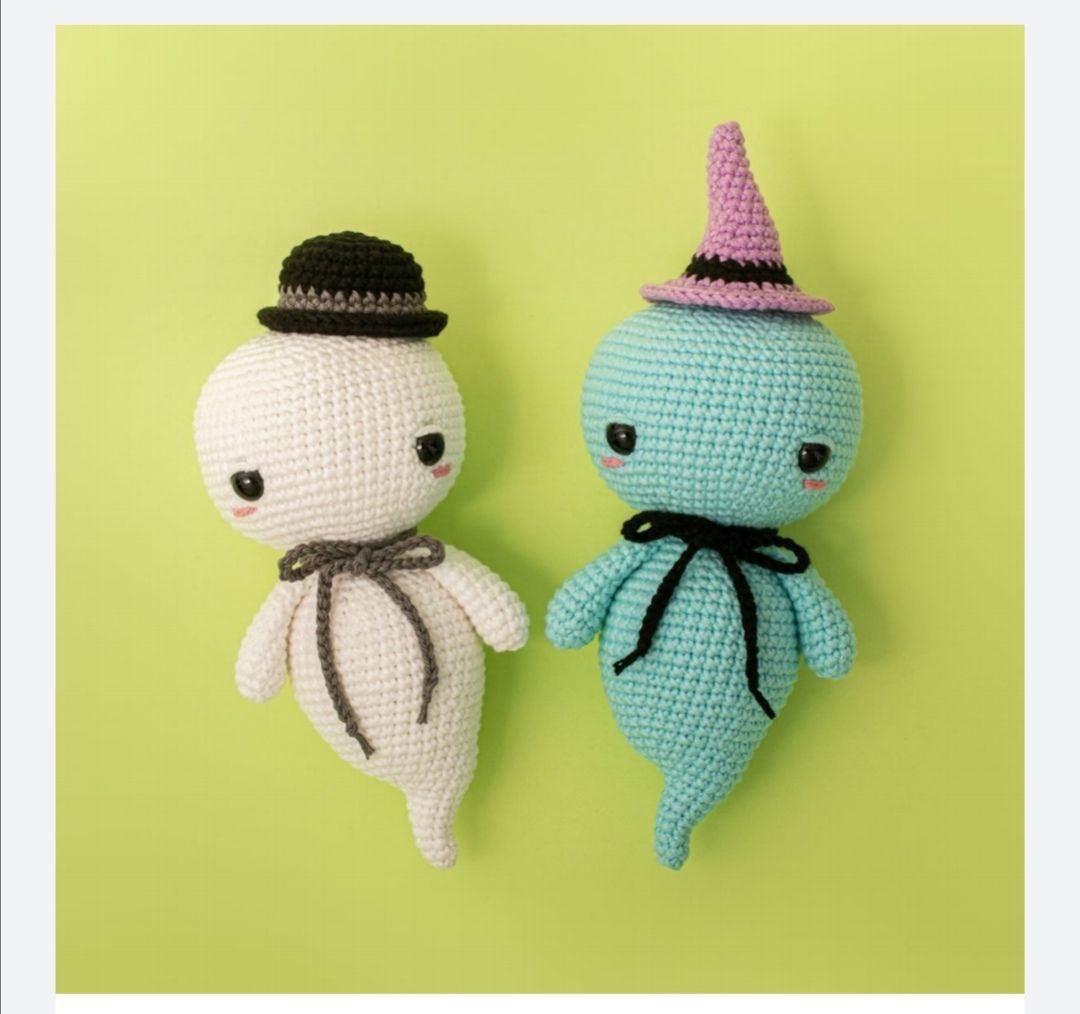
Cute Crochet Ghost Amigurumi Pattern: Easy Halloween Plush Tutorial
Introduction
Looking for a delightfully spooky project to add to your fall decor? This adorable crochet ghost amigurumi pattern is the perfect Halloween craft! Featuring a whimsical curved tail, sweet embroidered cheeks, and customizable miniature hats, these cute ghost plushies make fantastic desk buddies, Halloween gifts, or festive decorations.
Standing at approximately 6 inches tall (excluding the hat), this pattern is beginner-friendly and quick to stitch up. The body and head are crocheted seamlessly in one continuous piece from the bottom up, minimizing assembly at the end. You can customize your ghost with either a classic witch hat or a stylish bowler hat to give your little phantom its own unique personality!
Materials & Abbreviations
Materials Needed
- Yarn: Fine / Sport Weight Cotton Yarn (approx. 1.75 oz / 50g for the main ghost body in white or mint green, plus small scrap amounts in purple, black, gray, and medium pink for facial details and hats)
- Crochet Hook: Size 2.25 mm (US B-1) hook
- Safety Eyes: 1 pair of 10 mm safety eyes
- Pipe Cleaner: 1 piece of white chenille pipe cleaner cut to 1.2 inches (3 cm) long
- Stuffing: Polyester fiberfill stuffing
- Tapestry Needle: For sewing and embroidering details
- Notions: Stitch marker, straight pins, scissors
Abbreviations (US Crochet Terms)
- ch: chain
- sc: single crochet
- hdc: half double crochet
- inc: increase (work 2 single crochet stitches into the same stitch)
- hdc-inc: half double crochet increase (work 2 half double crochet stitches into the same stitch)
- dec: decrease (single crochet 2 stitches together)
- sl st: slip stitch
- st(s): stitch(es)
- MR: magic ring
- Rnd(s): round(s)
Step-by-Step Instructions
Ghost Body and Head
Worked in continuous rounds from the bottom of the tail up through the top of the head. Do not join rounds unless directed.
Start with main body color yarn (white or mint green):
- Rnd 1: 6 sc in MR (6)
- Rnd 2: 1 sc in each st around (6)
- Rnd 3: 1 sc, 1 inc, 4 sc (7)
- Rnd 4: 2 sc, 1 inc, 4 sc (8)
- Rnd 5: 3 sc, 1 inc, 4 sc (9)
- Rnd 6: 4 sc, 1 inc, 4 sc (10)
- Rnd 7: 5 sc, 1 inc, 4 sc (11)
- Rnd 8: 6 sc, 1 inc, 4 sc (12)
- Rnd 9: 6 inc, 6 sc (18)
- Rnd 10: 1 sc in each st around (18)
- Rnd 11: 1 sc, 6 inc, 11 sc (24)
- Rnd 12: 1 sc in each st around (24)
- Rnd 13: (3 sc, 1 inc) repeat 6 times (30)
Tail Preparation: Insert the 1.2-inch piece of white pipe cleaner into the tip of the tail. Lightly stuff fiberfill around the pipe cleaner to keep the tail shape plump.
- Rnds 14–15: 1 sc in each st around (30)
- Rnd 16: (4 sc, 1 inc) repeat 6 times (36)
- Rnds 17–18: 1 sc in each st around (36)
- Rnd 19: (5 sc, 1 inc) repeat 6 times (42)
- Rnds 20–25: 1 sc in each st around (42)
- Rnd 26: (5 sc, 1 dec) repeat 6 times (36)
- Rnd 27: 1 sc in each st around (36)
- Rnd 28: (4 sc, 1 dec) repeat 6 times (30)
- Rnd 29: 1 sc in each st around (30)
Stuff the body firmly with fiberfill, leaving space at the top opening. Continue crocheting:
- Rnd 30: (3 sc, 1 dec) repeat 6 times (24)
- Rnd 31: 1 sc in each st around (24)
- Rnd 32: (2 sc, 1 dec) repeat 6 times (18)
Do not cut the yarn. Add a bit more fiberfill to the body as you now begin the head expansion:
- Rnd 33: 18 inc (36)
- Rnd 34: (5 sc, 1 inc) repeat 6 times (42)
- Rnd 35: 3 sc, 1 inc, (6 sc, 1 inc) repeat 5 times, 3 sc (48)
- Rnd 36: (7 sc, 1 inc) repeat 6 times (54)
- Rnd 37: 4 sc, 1 inc, (8 sc, 1 inc) repeat 5 times, 4 sc (60)
- Rnds 38–49: 1 sc in each st around (60)
Facial Features Placement:
- Insert 10 mm safety eyes at Rnd 40, spaced approximately 14 stitches apart. Mark with pins first to check alignment.
- Embroider rosy cheeks right below the eyes using medium pink yarn, making straight stitches across 3 stitches using 2 strands of yarn.
- Embroider soft eyelids using your main ghost yarn color, making diagonal stitches over 4 stitches right above the safety eyes.
- Rnd 50: (8 sc, 1 dec) repeat 6 times (54)
- Rnd 51: (7 sc, 1 dec) repeat 6 times (48)
- Rnd 52: (6 sc, 1 dec) repeat 6 times (42)
- Rnd 53: (5 sc, 1 dec) repeat 6 times (36)
- Rnd 54: (4 sc, 1 dec) repeat 6 times (30)
- Rnd 55: (3 sc, 1 dec) repeat 6 times (24)
Stuff the head firmly with fiberfill. Continue crocheting to close:
- Rnd 56: (2 sc, 1 dec) repeat 6 times (18)
- Rnd 57: (1 sc, 1 dec) repeat 6 times (12)
Finish stuffing the top of the head completely.
- Rnd 58: 6 dec (6)
Fasten off, leaving a yarn tail. Thread the tail through the front loops of the remaining 6 stitches, pull tight to close the opening completely, and weave in the end inside the head.
Ghost Arms (Make 2)
Worked with main body color yarn:
- Rnd 1: 6 sc in MR (6)
- Rnd 2: 6 inc (12)
- Rnds 3–11: 1 sc in each st around (12)
Stuff only the lower tip of each arm lightly. Leave the top half unstuffed so the arms lie flat against the body when attached.
Flatten the top opening of the arm. Working through both thickness layers across the top, work 5 sc to close the arm opening. Fasten off, leaving a long tail for sewing.
Option 1: Witch Hat
Worked in purple and black yarn:
Start with purple yarn:
- Rnd 1: 6 sc in MR (6)
- Rnd 2: 1 sc in each st around (6)
- Rnd 3: 1 sc, 1 inc, 4 sc (7)
- Rnd 4: 2 sc, 1 inc, 4 sc (8)
- Rnd 5: 3 sc, 1 inc, 4 sc (9)
- Rnd 6: 4 sc, 1 inc, 4 sc (10)
- Rnd 7: 5 sc, 1 inc, 4 sc (11)
- Rnd 8: 6 sc, 1 inc, 4 sc (12)
- Rnd 9: (3 sc, 1 inc) repeat 3 times (15)
- Rnd 10: 1 sc in each st around (15)
- Rnd 11: (4 sc, 1 inc) repeat 3 times (18)
- Rnd 12: 1 sc in each st around (18)
Change to black yarn:
- Rnd 13: (5 sc, 1 inc) repeat 3 times (21)
- Rnd 14: (6 sc, 1 inc) repeat 3 times (24)
Change back to purple yarn:
- Rnd 15: (7 sc, 1 inc) repeat 3 times (27)
- Rnd 16: (2 sc, 1 inc) repeat 9 times (36)
- Rnd 17: (3 sc, 1 inc) repeat 9 times, finish with 1 sl st (45)
Fasten off, secure yarn ends, and weave into the inside of the hat.
Option 2: Bowler Hat
Worked in black and gray yarn:
Start with black yarn:
- Rnd 1: 6 sc in MR (6)
- Rnd 2: 6 inc (12)
- Rnd 3: (1 sc, 1 inc) repeat 6 times (18)
- Rnd 4: (2 sc, 1 inc) repeat 6 times (24)
- Rnd 5: (3 sc, 1 inc) repeat 6 times (30)
- Rnds 6–7: 1 sc in each st around (30)
Change to gray yarn:
- Rnds 8–9: 1 sc in each st around (30)
Change back to black yarn:
- Rnd 10: 1 sc in each st around (30)
- Rnd 11: 1 sl st, ch 1, 1 hdc into same st as sl st, 1 hdc, 1 hdc-inc, (2 hdc, 1 hdc-inc) repeat 9 times, sl st to first st to join (40)
Fasten off, weave in ends on the inside. Gently curl the outer brim of the bowler hat upwards for shape.
Neck Ribbon
Using chosen accent color yarn (dark gray, black, or purple):
Chain 95. Fasten off and trim excess yarn tails to your desired hanging length.
Finishing
Follow these steps to assemble your adorable ghost:
- Attach the Arms: Using straight pins, position the flat top edge of the arms on the sides of the body, located exactly 1 round below the neck seam. Use a tapestry needle to stitch them securely in place.
- Tie the Neck Ribbon: Wrap the crocheted chain around the ghost’s neck and tie it into a neat bow in the front.
- Attach the Hat: Place your chosen hat (witch hat or bowler hat) either straight on top or slightly tilted to one side for personality. Secure it with a few hidden stitches on each side, or leave it unsewn if you prefer interchangeable hats!
- Shape the Tail: Gently bend the tip of the tail (containing the internal pipe cleaner) toward the right side to create a playful, floating curve.
Tips for Success
- Staggered Increases: Notice how the head expansion rounds stagger increases (e.g., Round 35 and Round 37). Staggering prevents sharp corners, giving your amigurumi head a beautifully smooth, rounded shape instead of a hexagon.
- Proper Stuffing Technique: Keep arm stuffing minimal at the bottom tip. Keeping the upper arm empty allows them to lie flat against the body rather than sticking awkwardly outward.
- Seamless Color Changes: When changing colors for the hat bands, execute the final yarn over of the stitch preceding the color switch using the new yarn color for a clean transition.
- Safety First: If making this toy for infants or toddlers, embroider the eyes using black yarn instead of using plastic safety eyes.