Adorable Amigurumi Bee and Bumblebee Crochet Pattern
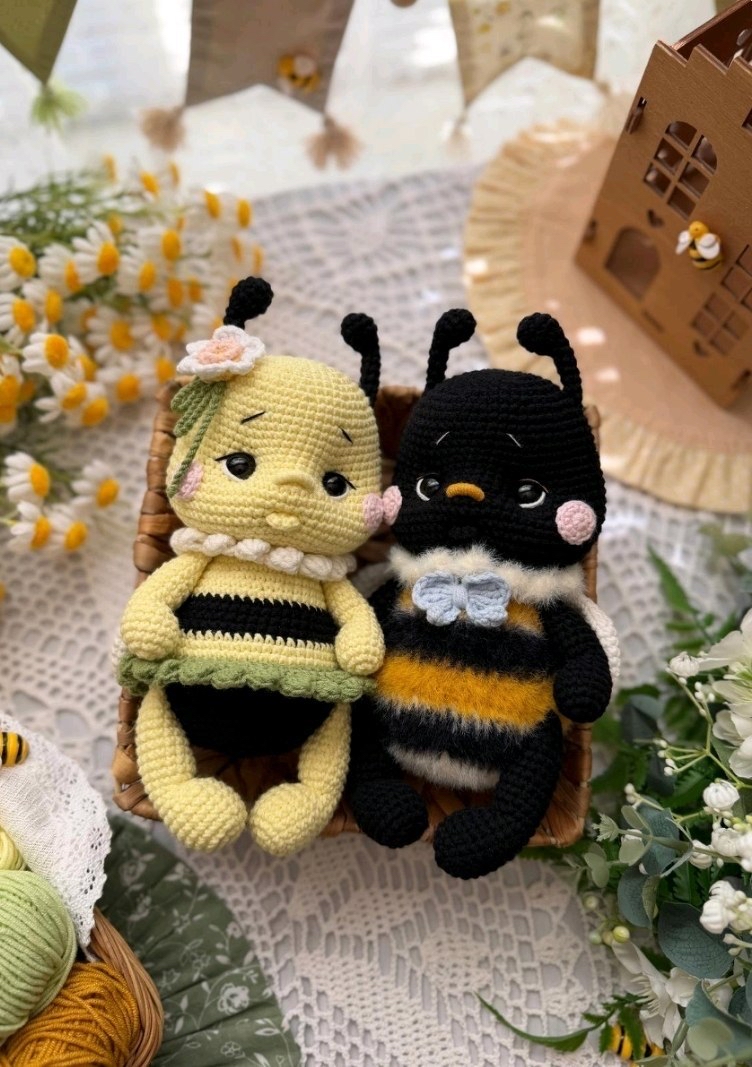
There is nothing quite as charming as a tiny, fuzzy insect to brighten up a nursery or a craft shelf! If you are looking for your next crochet project, you have come to the right place. In this tutorial, I will walk you through how to create two adorable characters: a bright, sunny Yellow Bee and a cozy, textured Bumblebee. These little pollinators are worked in amigurumi style, making them the perfect size for gifts, bag charms, or even just a cute companion for your desk.
This pattern is designed to be beginner-friendly, focusing on standard single crochet stitches. While the colors and textures differ between the two characters, the base structure remains the same, allowing you to master the shaping before moving on to the fun color changes. Let’s get our hooks ready and dive into the world of tiny bees!
Materials and Abbreviations
To ensure your bee turns out perfectly, I recommend using a high-quality cotton blend yarn. This provides the stitch definition needed for those cute facial features.
Yarn Requirements
You will need cotton-blend yarn in the following colors:
- For the Yellow Bee: Yellow (main body), Black (stripes and antennae), White (collar and wings), Green (skirt), Pink (cheeks), and a small amount of Peach for the flower.
- For the Bumblebee: Black (main body), Mustard/Gold (stripes), White (collar and accents), and Black/Mustard mix for the details.
Tools and Notions
- Crochet Hooks: 2.0mm or 2.1mm hook for the main toy body; 2.25mm hook for decorative elements like the collar, skirt, and flower.
- Safety Eyes: 12mm safety eyes.
- Stuffing: Polyester fiberfill.
- Needle: A large tapestry needle for sewing parts together and a long needle for the facial “indentation” technique.
- Other: Scissors and pink blush or pastel for the cheeks (optional).
Abbreviations (US Terms)
Please ensure you are using US terminology as follows:
- MR: Magic Ring
- sc: Single crochet
- inc: Increase
- dec: Decrease
- ch: Chain
- sl st: Slip stitch
- hdc: Half double crochet
- dc: Double crochet
- tr: Treble crochet
- BLO: Back loop only
- FLO: Front loop only
- st(s): Stitch(es)
Step-by-Step Instructions
The finished toy should stand approximately 8.5 to 9 inches tall, depending on your tension and yarn choice.
The Head and Body
We will start by working the head and body as one continuous piece. This creates a seamless, sturdy shape.
Base Pattern (Work in Yellow for Bee or Black for Bumblebee):
- Row 1: 6 sc in MR (6)
- Row 2: 6 inc (12)
- Row 3: (1 sc, inc) * 6 (18)
- Row 4: 1 sc, inc, (2 sc, inc) * 5, 1 sc (24)
- Row 5: (3 sc, inc) * 6 (30)
- Row 6: 2 sc, inc, (4 sc, inc) * 5, 2 sc (36)
- Row 7: (5 sc, inc) * 6 (42)
- Row 8: 3 sc, inc, (6 sc, inc) * 5, 3 sc (48)
- Row 9: (7 sc, inc) * 6 (54)
- Rows 10-14: 54 sc (5 rows)
- Row 15: 4 sc, inc, (8 sc, inc) * 5, 4 sc (60)
- Rows 16-18: 60 sc (3 rows)
- Row 19: (9 sc, inc) * 3, then (9 sc, inc) * 3 (66)
- Row 20: 18 sc, (2 sc, inc) * 3, 12 sc, (inc, 2 sc) * 3, 18 sc (72)
- Rows 21-25: 72 sc (5 rows)
Note on Eye Placement: Before continuing, insert your 12mm safety eyes between rows 18 and 19. They should be roughly 11-12 stitches apart.
Shaping the Neck and Body:
- Row 26: (4 sc, dec) * 12 (60)
- Row 27: 4 sc, dec, (8 sc, dec) * 5, 4 sc (54)
- Row 28: (7 sc, dec) * 6 (48)
- Row 29: 3 sc, dec, (6 sc, dec) * 5, 3 sc (42)
- Row 30: (5 sc, dec) * 6 (36)
- Row 31: 2 sc, dec, (4 sc, dec) * 5, 2 sc (30)
- Row 32: (3 sc, dec) * 6 (24)
- Row 33: 24 sc
- Row 34: (3 sc, inc) * 6 (30)
- Row 35: Work in BLO: 2 sc, inc, (4 sc, inc) * 5, 2 sc (36)
- Row 36: (5 sc, inc) * 6 (42)
- Rows 37-39: 42 sc (3 rows)
For the Yellow Bee: Transition to Black yarn at Row 40. Use staggered stitches to ensure the color change is centered on the back. Work 3 rows of 48 sc, then switch back to yellow. Continue with the increase pattern to reach 60 stitches, then work the stripes as indicated in the pattern by switching between black and yellow.
For the Bumblebee: Follow the same pattern but use the following color sequence: Black $\rightarrow$ Mustard $\rightarrow$ White $\rightarrow$ Black. Always stagger your color changes at the back so the seam is hidden!
The Collar and Skirt
The collar adds a lovely “ruffle” effect to the neck of your bee.
Using a 2.25mm hook and white yarn, attach to the front loops of the stitches from Row 34:
- Row 1: 2 sc, inc, (4 sc, inc) * 5, 2 sc (36)
- Row 2: (5 sc, inc) * 6 (42)
- Row 3: 3 sc, inc, (6 sc, inc) * 5, 3 sc (48)
- Row 4: (sl st, ch 3, 2 tr in same st with shared peak, ch 3, sl st) * 16, sl st.
For the skirt (Bee only), join green yarn to the front loops of Row 47 and work the ruffle pattern to create a flared base.
Arms, Legs, and Antennae
Arms and Legs: Both are worked similarly. Start with a MR of 6 sc. Increase gradually until you reach the desired width (approx. 13-15 stitches), then work straight for several rows. Stuff them firmly before closing the end.
Antennae: Using black yarn, work a small tube starting with a MR of 6 sc. Increase to 12, then decrease back down to 6. Stuff lightly and sew to the top of the head.
Wings and Decorative Flower
Wings: Work in white yarn. Start with a MR of 6 sc, increase to 30 sc, and then work several rows of straight sc. Shape the edges by decreasing at the corners to create a leaf-like wing shape. Do not stuff the wings.
Flower: Using a 2.25mm hook, create a yellow center with a MR. Add peach petals using a chain and slip stitch technique, followed by white petals using double crochet clusters. Finish with a small blue bow to attach it to the head.
Finishing
Assembly is where your bee truly comes to life! This pattern uses a special “eye pulling” technique to create depth in the face.
Creating the Face Indentation
To give your bee that adorable, slightly recessed eye look, follow these steps carefully:
- The Eye Sockets: Using your main yarn color and a long needle, insert the needle between rows 32 and 33, near the eyes. Pull the thread through to create an indentation. Repeat this on both sides of the eyes.
- The Eye Depth: Carefully pull the thread through the top internal corners of the eye sockets to create a “socket” effect. This helps the safety eyes sit deeply and realistically.
- The Mouth: Use your main yarn color to embroider a small mouth in the indentation created between rows 24 and 25.
Final Details
- Cheeks: Sew on small pink circles or use dry blush/eyeshadow to add a soft pink glow just below the eyes.
- Nose: Embroider a small nose between rows 20 and 21 using yellow (for the Bee) or mustard (for the Bumblebee).
- Assembly: Sew the arms at an angle between rows 34 and 37. Sew the legs at an angle between rows 48 and 52. Finally, attach the wings to the back, tucked just under the collar.
Tips
Mind Your Tension: Amigurumi requires tight, consistent stitches to ensure the stuffing doesn’t peek through. If you find your stitches are loose, try switching to a slightly smaller hook.
Seamless Color Changes: When changing colors for the stripes, always work the final stitch of the old color and the first stitch of the new color together. To keep the stripes looking professional, always perform your color changes at the “back” of the piece.
Stuffing Technique: Stuff the head and body firmly, but be careful not to overstuff near the neck, or the head might wobble. Use your needle to push stuffing into the small crevices around the eyes and limbs.
Customization: Don’t be afraid to get creative! You can add different colored flowers, or even tiny eyelashes using black embroidery floss to give your bee even more personality.