Easy Crochet Baby Whale Pattern: Free Amigurumi Tutorial
Looking for a quick and adorable project to brighten up your day? This crochet baby whale is the perfect addition to any plushie collection. Whether you are a seasoned pro or a beginner looking for your first amigurumi project, this little whale is a delight to make. With its round, squishy body and sweet expression, it makes a wonderful gift for baby showers, birthdays, or just as a cute desk companion.
In this tutorial, we will guide you through every stitch needed to create your own colorful whale. We have adapted this pattern using standard US crochet terms and imperial measurements to ensure a smooth crafting experience. Grab your favorite variegated yarn, and let’s dive in!
Materials & Abbreviations
To get started on your baby whale, you will need to gather the following supplies. While the pattern is designed for versatility, we recommend using a medium-weight yarn for a sturdy, cuddly finish.
Materials Needed
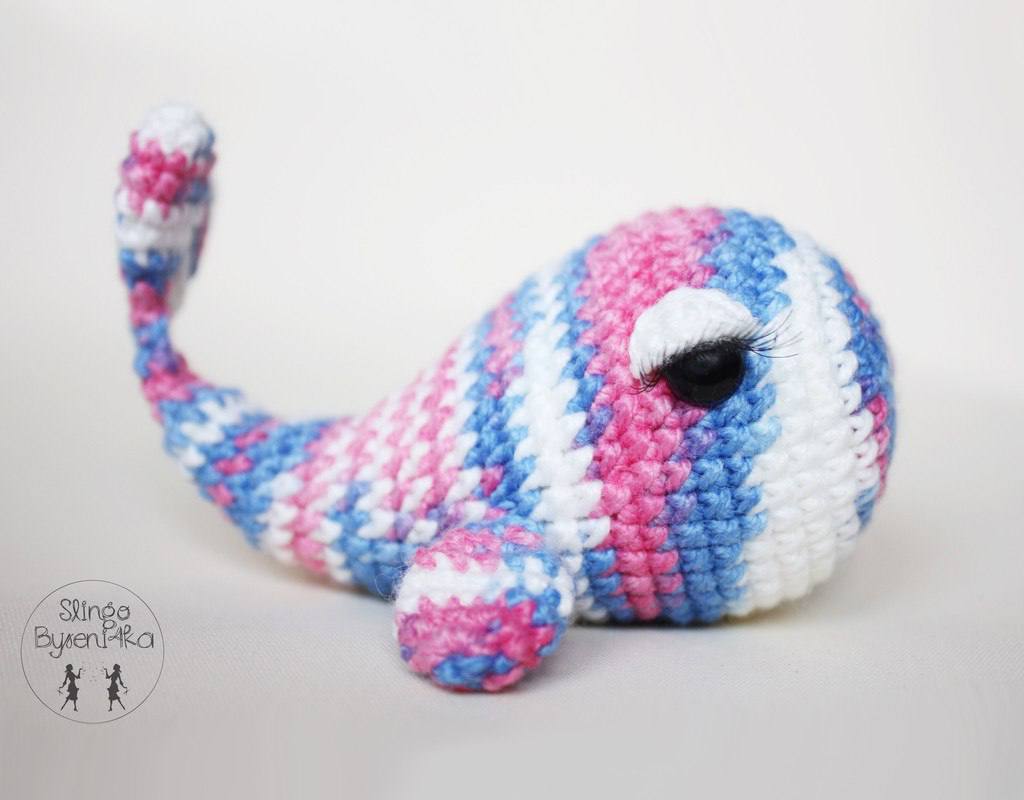
- Yarn: Medium weight (4) yarn. A multi-colored or variegated yarn in blues, pinks, and whites works beautifully to create the striped look seen in the photos.
- Crochet Hook: A size that matches your yarn (typically a 3.25mm or 3.5mm hook for amigurumi to keep the stitches tight).
- Safety Eyes: Two plastic safety eyes (size depends on your desired finished size; 8mm to 10mm is usually ideal).
- Toy Eyelashes: Small craft eyelashes for an extra cute look.
- Fiberfill: High-quality polyester stuffing.
- Tapestry Needle: For sewing the fins and eyelids in place.
- Scissors: For trimming yarn ends.
Abbreviations (US Terms)
- sc: Single crochet
- inc: Increase (2 single crochet in the same stitch)
- dec: Decrease (single crochet 2 stitches together)
- ch: Chain
- hdc: Half double crochet
- dc: Double crochet
- sl st: Slip stitch
- st(s): Stitch(es)
- MR: Magic Ring
Step-by-Step Instructions
This pattern is worked in continuous rounds. Do not join your rounds with a slip stitch unless specified; instead, use a stitch marker to keep track of the beginning of each round.
The Body
The body is one long piece that creates the head, torso, and tail area. Be sure to keep your tension consistent so the stuffing doesn’t peek through.
- Round 1: 6 sc in a Magic Ring (6)
- Round 2: 6 inc (12)
- Round 3: (1 sc, inc) repeat 6 times (18)
- Round 4: (2 sc, inc) repeat 6 times (24)
- Round 5: (3 sc, inc) repeat 6 times (30)
- Round 6: (4 sc, inc) repeat 6 times (36)
- Round 7: (5 sc, inc) repeat 6 times (42)
- Rounds 8-13: sc in each stitch around for 6 rounds (42)
Pro Tip: Place your safety eyes between rounds 9 and 10. Make sure they are spaced evenly to give your whale a friendly expression.
- Round 14: (5 sc, dec) repeat 6 times (36)
- Rounds 15-17: sc in each stitch around for 3 rounds (36)
- Round 18: (4 sc, dec) repeat 6 times (30)
- Rounds 19-20: sc in each stitch around for 2 rounds (30)
- Round 21: (3 sc, dec) repeat 6 times (24)
- Rounds 22-24: sc in each stitch around for 3 rounds (24)
At this point, begin stuffing the body firmly with fiberfill.
- Round 25: (2 sc, dec) repeat 6 times (18)
- Rounds 26-28: sc in each stitch around for 3 rounds (18)
- Round 29: (1 sc, dec) repeat 6 times (12)
- Rounds 30-32: sc in each stitch around for 3 rounds (12)
- Round 33: 6 dec (6)
- Rounds 34-35: sc in each stitch around for 2 rounds (6)
Finish stuffing the body completely. Fasten off, leaving a long tail for sewing. Gently flatten the end of the tube and sew the remaining 6 stitches closed to seal the body.
The Tail Fins (Make 2)
- Round 1: 6 sc in a Magic Ring (6)
- Round 2: 6 inc (12)
- Rounds 3-5: sc in each stitch around for 3 rounds (12)
- Round 6: (1 sc, dec) repeat 4 times (8)
- Round 7: sc in each stitch around (8)
- Round 8: 4 dec (4)
Fasten off and leave a tail for sewing.
The Side Fins (Make 2)
- Round 1: 6 sc in a Magic Ring (6)
- Round 2: 6 inc (12)
- Rounds 3-5: sc in each stitch around for 3 rounds (12)
- Round 6: (1 sc, dec) repeat 4 times (8)
- Round 7: sc in each stitch around (8)
Fasten off and leave a tail for sewing.
The Eyelids (Make 2)
These small details give the whale its sleepy, sweet look.
- Step 1: Chain 5.
- Step 2: Starting in the second chain from the hook, work: 1 hdc, 2 dc in the next stitch, 1 hdc, then finish with 1 sl st in the final stitch.
Fasten off, leaving a tail for sewing.
Finishing & Assembly
Now it is time to bring your whale to life! Using your tapestry needle and the yarn tails, follow these steps to assemble your plushie:
- The Tail: Position the two tail fins at the very end of the body. Sew them side-by-side to create a classic whale fluke.
- The Side Fins: Locate the middle area of the body. Sew the side fins symmetrically on either side of the torso.
- The Eyes: Glue the craft eyelashes onto the safety eyes. Then, sew the crochet eyelids slightly above the eyes to create a “half-closed” sleepy effect.
- Final Touches: Weave in all remaining yarn ends securely using your tapestry needle.
Tips for Success
Getting the Perfect Shape
If your whale looks a bit too long or too short, you can adjust the number of rounds in the middle section (Rounds 8-13). Adding more rounds will result in a longer body, while fewer rounds will make a chubbier, shorter whale.
Working with Variegated Yarn
Variegated yarn can sometimes create “blobs” of color rather than clean stripes. To fix this, you can gently pull and shift the stitches after you finish a round to align the colors more evenly.
Choosing the Right Stuffing
For the best results, use small clumps of fiberfill and push them into the corners using the handle of your crochet hook. This prevents lumps and ensures the whale maintains a smooth, professional silhouette.
Securing the Magic Ring
If you are new to the magic ring, remember to pull the tail tight and then work a few single crochets over the tail itself. This locks the ring in place so there is no hole at the top of the head.