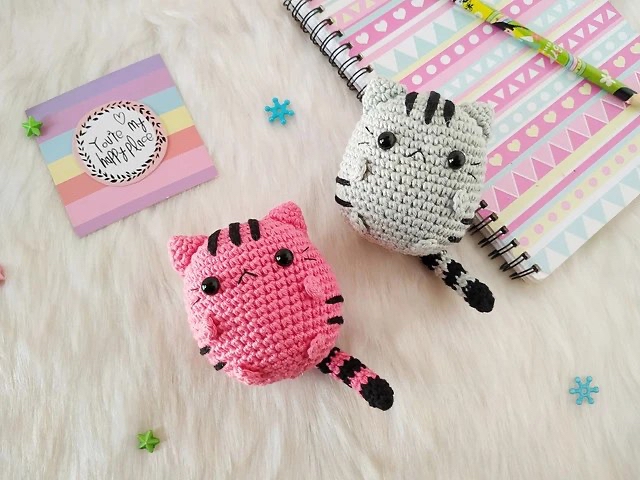
Chubby Amigurumi Cat Crochet Pattern: An Easy Tutorial for Beginners
If you are looking for your next adorable crochet project, look no further! There is nothing quite as satisfying as creating a “kawaii” style plushie that looks like it belongs on a desktop or a nursery shelf. This Chubby Amigurumi Cat is the perfect project for makers who want something quick, cute, and incredibly rewarding. Because of its round, stout shape, this cat is forgiving for beginners and provides a great way to practice working in the round.
This pattern focuses on creating a soft, squishy character that can be customized with various colors. While we are using a classic pink and black combo for this tutorial, the beauty of amigurumi is that you can use any colors your heart desires. Whether you want a calico cat, a grey tabby, or a bright purple creature, this pattern is your canvas!
Materials & Abbreviations
Before we pick up the hook, let’s make sure you have everything you need to complete your little feline friend. Since we are aiming for a sturdy, shaped plushie, having the right materials is key to achieving that professional, polished look.
What You Will Need
- Yarn: A cotton or cotton-blend yarn works best for amigurumi to ensure the stitches are tight and the stuffing doesn’t peek through. You will need one main color (we recommend a soft pink) and one accent color for the stripes (black is classic).
- Crochet Hook: A 2 mm crochet hook. Using a smaller hook than what is recommended on your yarn label is a pro tip for amigurumi; it keeps your tension tight!
- Safety Eyes: 8 mm safety eyes. If you prefer not to use plastic eyes, you can always embroider the eyes with black yarn.
- Stuffing: High-quality polyester fiberfill to make your cat extra chubby.
- Embroidery Floss: Black embroidery floss for the whiskers and mouth details.
- Tools: A yarn needle (tapestry needle) for sewing pieces together and sharp scissors.
Abbreviations (US Terms)
This pattern is written using standard US crochet terminology. Please ensure you are using US terms to avoid confusion with stitch heights!
- MR: Magic Ring
- sc: Single Crochet
- inc: Increase (2 sc in the same stitch)
- dec: Decrease (sc 2 stitches together)
- st(s): Stitch(es)
Step-by-Step Instructions
Ready to start? Grab your hook and let’s bring this little kitty to life. Remember to work in a continuous spiral. I highly recommend using a stitch marker to keep track of the start of each round.
Head and Body
Working in your main color (e.g., Pink).
Round 1: Create a Magic Ring and work 6 sc into the ring (6)
Round 2: 6 inc (12)
Round 3: (1 sc, 1 inc) repeat 6 times (18)
Round 4: (2 sc, 1 inc) repeat 6 times (24)
Round 5: (3 sc, 1 inc) repeat 6 times (30)
Round 6: (4 sc, 1 inc) repeat 6 times (36)
Round 7: (5 sc, 1 inc) repeat 6 times (42)
Rounds 8-19: sc in each stitch around (42). This creates the height of the head and body.
Note on Eye Placement: Before continuing, insert your 8 mm safety eyes between rounds 10 and 11. Ensure they are placed approximately 7 stitches apart to give your cat that cute, wide-eyed expression.
Round 20: (5 sc, 1 dec) repeat 6 times (36)
Round 21: (4 sc, 1 dec) repeat 6 times (30)
Round 22: (3 sc, 1 dec) repeat 6 times (24)
Round 23: (2 sc, 1 dec) repeat 6 times (18)
Stop here to stuff! Fill the head and body firmly with fiberfill. You want it to be quite plump to maintain the “chubby” shape, but be careful not to overstuff to the point where the stitches stretch too much.
Round 24: (1 sc, 1 dec) repeat 6 times (12)
Round 25: 6 dec (6)
Fasten off, leaving a long tail for sewing. Weave the tail through the remaining stitches to close the hole and hide the end inside the body.
The Legs (Make 4)
Working in your main color.
Make a Magic Ring and work 5 sc into the ring (5). Fasten off immediately, leaving a long tail for sewing the legs to the body.
The Ears (Make 2)
Working in your main color.
Round 1: Create a Magic Ring and work 4 sc into the ring (4)
Round 2: (1 sc, 1 inc) repeat 2 times (6)
Round 3: (1 sc, 1 inc) repeat 3 times (9)
Round 4: (2 sc, 1 inc) repeat 3 times (12)
Fasten off, leaving a long tail for sewing.
The Tail
Working in your accent color (e.g., Black).
Round 1: Create a Magic Ring and work 6 sc into the ring (6)
Round 2: (1 sc, 1 inc) repeat 2 times (8)
Round 3: 8 sc (8)
Rounds 4-17: sc in each stitch around (8). This creates a total of 14 rounds for the tail length.
Finishing the Tail: To make the tail more structured, work 4 sc through both layers of the tail. This will flatten it slightly and give it a nice shape. Fasten off, leaving a tail for sewing.
Finishing & Assembly
This is the most important part! The assembly is what turns individual pieces into a character with personality. Take your time and use your yarn needle to sew everything carefully.
Attaching the Limbs
- Ears: Sew the ears onto the top of the head between rounds 4 and 8. Position them slightly to the sides for a natural look.
- Front Legs: Sew the front legs vertically to the bottom of the body between rounds 14 and 15.
- Back Legs: Sew the back legs to the bottom of the body, but angle them slightly inward between rounds 20 and 21 to give the cat a sitting position.
- Tail: Attach the tail to the back of the body between rounds 18 and 19.
Embroidery & Details
Use your black embroidery floss to add the final facial features and the iconic stripes.
- Whiskers: Stitch the whiskers on either side of the nose, making sure to start about 1 stitch away from the eyes.
- Mouth: Stitch a small, downward-facing “v” shape for a cute, slightly grumpy or sleepy expression.
- Center Stripes: Embroider 3 black stripes vertically on the center of the face/body, starting from the top of the head down to round 7.
- Side Stripes (Face): Create 2 more stripes on the sides of the face. Place them roughly 2 stitches away from the center stripe to match the pattern.
- Body Stripes (Sides): On the sides of the body, add 2 black stripes at round 16 and 1 more stripe at round 18 on both sides.
- Body Stripes (Back): On the back of the cat, add 2 black stripes at round 10 and 1 stripe at round 12.
Tips for Success
Amigurumi can be tricky when you are first starting out. Here are a few tips to help you get a perfect result:
Watch Your Tension: If your stuffing is showing through the holes between stitches, your tension might be too loose. Try using a slightly smaller hook or pulling your stitches a bit tighter.
Use Stitch Markers: Since amigurumi is worked in a continuous spiral, it is incredibly easy to lose your place. Always use a marker at the first stitch of every round.
Stuffing Technique: When stuffing the head and body, push the fiberfill into the corners and crevices using your crochet hook or a pencil. This prevents “lumps” and ensures a smooth, professional shape.
Embroidering with Precision: When adding the stripes, use a pencil to lightly mark where you want them to go before you start stitching. This ensures your stripes are symmetrical and well-placed!
Happy crocheting! You now have a beautiful, chubby little cat to call your own.