How to Crochet a Cute Studious Piglet: Free Amigurumi Pattern
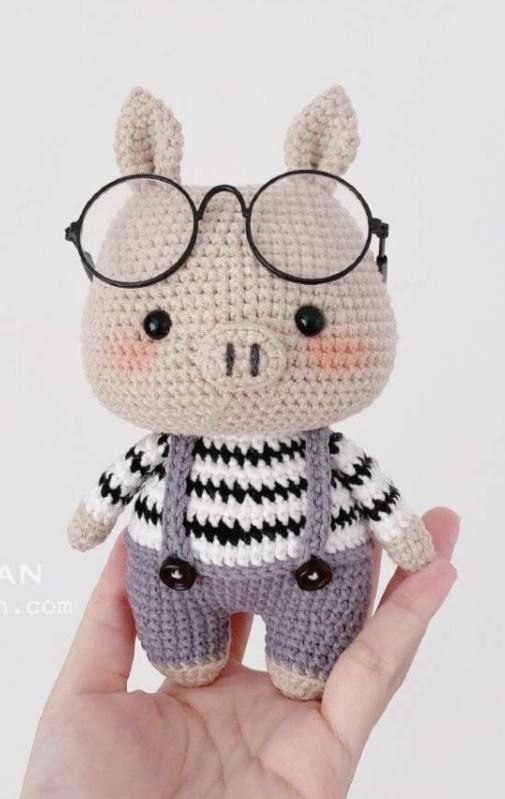
Looking for a project that is as adorable as it is rewarding? Meet Joey, the studious little piglet! With his tiny glasses and dapper outfit, this amigurumi pig is the perfect companion for any crochet lover. Whether you are looking to create a unique gift or add to your own collection of plushies, this detailed tutorial will guide you through every stitch.
This pattern is designed to be beginner-friendly, though it involves a few different techniques like working in the back loop only (BLO) and joining pieces. Grab your hook and some cozy yarn, and let’s get started on making your very own Joey!
Materials & Abbreviations
To create this little piglet, you will need a few basic supplies. For the best results, use a tight tension to ensure the stuffing doesn’t peek through the stitches.
Materials Needed
- Yarn: DK weight yarn (such as YarnArt Jeans) in Beige, Grey, White, and Black.
- Crochet Hook: 2.0 mm (or a size that works best for your tension).
- Eyes: 8 mm black safety eyes.
- Details: Black embroidery thread for the snout and nose.
- Stuffing: High-quality polyester fiberfill.
- Tools: Yarn needle, stitch markers, and scissors.
- Accessories: A pair of small doll glasses (optional) and two small buttons for the suspenders.
Abbreviations (US Terms)
- MR: Magic Ring
- ch: Chain
- sc: Single Crochet
- inc: Increase (2 sc in one stitch)
- dec: Decrease (invisible decrease recommended)
- sl st: Slip Stitch
- BLO: Back Loop Only
- st(s): Stitch(es)
Step-by-Step Instructions
The Ears (Make 2)
Using beige yarn, work the following:
- Round 1: 6 sc in MR (6)
- Round 2: (1 sc, inc) x 3 (9)
- Round 3: (2 sc, inc) x 3 (12)
- Round 4: (2 sc, inc) x 3 (15)
- Rounds 5-8: sc in each st around (15)
Fasten off, leaving a long tail for sewing to the head.
The Muzzle
Using beige yarn:
- Start: Chain 7. Begin in the second chain from the hook.
- Round 1: inc, 4 sc, inc, 4 sc, inc (14)
- Round 2: 2 inc, 4 sc, 2 inc, 4 sc, 2 inc (20)
- Round 3 (BLO): (3 sc, dec) x 4 (16)
Fasten off, leaving a tail for sewing. Stuff the muzzle lightly and use black embroidery thread to sew two small vertical lines for the nostrils.
The Head
Using beige yarn, we will create an oval shape for the head:
- Start: Chain 15. Begin in the second chain from the hook.
- Round 1: inc, 12 sc, 4 sc in the last st, 12 sc, inc (32)
- Round 2: 3 inc, 10 sc, 4 inc, 12 sc, 2 inc (40)
- Round 3: 1 sc, 2 inc, 14 sc, inc, 2 sc, inc, 14 sc, 2 inc, 1 sc (44)
- Round 4: sc in each st around (44)
- Round 5: 2 sc, 2 inc, 14 sc, inc, 4 sc, inc, 14 sc, 2 inc, 2 sc (48)
- Round 6: sc in each st around (48)
- Round 7: (7 sc, inc) x 6 (54)
- Round 8: sc in each st around (54)
- Round 9: (inc, 6 sc) x 4, (inc, 12 sc) x 2 (60)
- Round 10: sc in each st around (60)
- Round 11: (inc, 7 sc) x 4, (inc, 13 sc) x 2 (66)
- Round 12: sc in each st around (66)
- Round 13: (inc, 8 sc) x 4, (inc, 14 sc) x 2 (72)
- Round 14: (17 sc, inc) x 4 (76)
- Rounds 15-18: sc in each st around (76)
- Round 19: (8 sc, dec) x 8 (72)
- Round 20: (10 sc, dec) x 6 (66)
- Round 21: (9 sc, dec) x 6 (60)
- Round 22: (8 sc, dec) x 6 (54)
- Round 23: (7 sc, dec) x 6 (48)
- Round 24 (BLO): (2 sc, dec) x 12 (36)
- Round 25: (4 sc, dec) x 6 (30)
- Round 26: (3 sc, dec) x 6 (24)
Fasten off and weave in the ends. Before closing the head completely, place the 8mm safety eyes between rounds 13 and 14, approximately 11 stitches apart. Stuff the head firmly.
The Legs & Body
Legs (Make 2): Start with beige yarn.
- Round 1: 8 sc in MR (8)
- Round 2: 8 inc (16)
- Rounds 3-4: sc in each st around (16)
Change to grey yarn:
- Round 5 (BLO): sc in each st around (16)
- Rounds 6-7: sc in each st around (16)
Fasten off the first leg. For the second leg, repeat rounds 1-7 but do not fasten off; we will use this to start the body.
The Body: Starting from the second leg:
- Join: Chain 5.
- Round 8: 16 sc across the first leg, 5 sc along the chain, 16 sc across the second leg, 5 sc along the other side of the chain (42)
- Round 9: (6 sc, inc) x 6 (48)
- Round 10: (7 sc, inc) x 6 (54)
- Rounds 11-15: sc in each st around (54)
The Outfit (Shirt): Change to white and black stripes (alternate colors every round):
- Round 16 (BLO): sc in each st around (54)
- Round 17: sc in each st around (54)
- Round 18: sc in each st around (54)
- Round 19: (7 sc, dec) x 6 (48)
- Round 20: sc in each st around (48)
- Round 21: (6 sc, dec) x 6 (42)
- Round 22: sc in each st around (42)
- Round 23: (5 sc, dec) x 6 (36)
- Round 24: (4 sc, dec) x 6 (30)
- Round 25: sc in each st around (30)
- Round 26: (3 sc, dec) x 6 (24)
Fasten off, leaving a long tail for sewing. Stuff the body firmly.
The Arms (Make 2)
Using beige yarn:
- Round 1: 6 sc in MR (6)
- Round 2: 6 inc (12)
- Rounds 3-5: sc in each st around (12)
You can continue with white and black stripes for a few more rounds to match the shirt, or keep them beige. Fasten off leaving a tail for sewing.
The Suspenders
Using grey yarn, attach your yarn to the first stitch of the BLO round on the body (Round 16):
- Strap 1: 4 sl st, chain 41, 40 sc back along the chain, 43 sl st to fasten it back into the BLO loop.
- Strap 2: Chain 41, 40 sc back along the chain, 4 sl st to secure it.
Fasten off and weave in the ends.
Finishing
Now it’s time to bring Joey to life! Follow these assembly steps:
- Muzzle: Sew the muzzle to the center of the face, just below the eyes.
- Ears: Sew the ears to the top of the head, ensuring they are symmetrical.
- Head to Body: Sew the head securely to the body.
- Arms: Attach the arms to the sides of the body, just below the neck.
- Final Touches: Sew two small buttons to the front of the grey pants where the suspenders meet the waist. Gently slide on the glasses for that studious look!
Tips for Success
- Invisible Decreases: To keep your piglet looking smooth, use the invisible decrease method (working into the front loops only of the next two stitches).
- Stuffing: Stuff the legs and head very firmly, but be gentle with the body to ensure it doesn’t warp the shape of the outfit.
- Tension: If you notice holes in your work, try switching to a smaller hook. Amigurumi requires a tight fabric to hold the stuffing.
- Customizing: Feel free to change the colors! A pink piglet or a brown one would be just as cute.