Adorable Plush Crochet Puppy Pattern: A Step-by-Step Amigurumi Tutorial
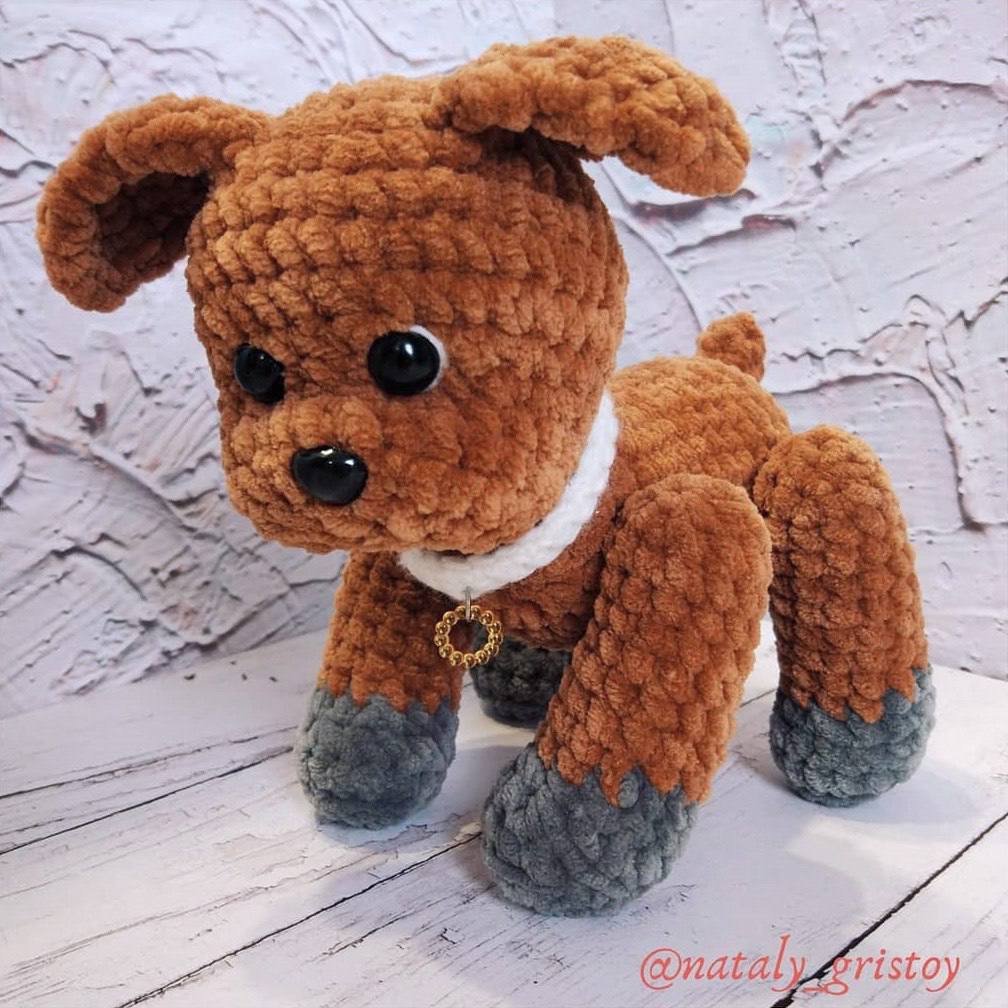
Looking for a project that is as cuddly as it is cute? This plush crochet puppy is the perfect addition to any toy collection. Using chunky chenille yarn, this puppy turns out incredibly soft, making it an ideal gift for children or a sweet desk companion for adults. Whether you are an experienced amigurumi artist or a beginner looking for a rewarding project, this detailed guide will walk you through every stitch.
The finished puppy stands approximately 6 inches tall, depending on your tension and the amount of stuffing used. Its chunky texture means it works up quickly, and the added details—like the sculpted muzzle and little boots—give it a professional, store-bought look with a handmade heart.
Materials & Abbreviations
To get started, gather the following materials. For this project, we recommend a plush “chenille” style yarn (such as YarnArt Dolce or Himalaya Dolphin) to achieve that signature velvet softness.
Materials Needed
- Main Color Yarn: Approximately 1/2 a skein of plush yarn (approx. 130 yards/100g).
- Accent Color Yarn: A small amount (about 1/8 of a skein) of a contrasting plush yarn for the paws.
- Crochet Hook: 4.0mm (G) hook. If your stitches are naturally loose, you may want to drop down to a 3.5mm hook to ensure the stuffing doesn’t show through.
- Safety Eyes: 12mm pair.
- Safety Nose: 15mm.
- Sewing Thread: A strong, thin thread or embroidery floss in a color matching the body for facial sculpting and assembly.
- Stuffing: High-quality polyester fiberfill.
- Tools: Yarn needle with a wide eye, scissors, and sewing pins.
- Optional: A small piece of white felt for the eyes and any scrap yarn for the collar.
Abbreviations (US Terms)
- MR: Magic Ring
- ch: Chain
- sc: Single crochet
- inc: Increase (2 sc in one stitch)
- dec: Decrease (sc 2 together)
- st(s): Stitch(es)
- ( ) * 8: Repeat the instructions inside the parentheses 8 times
- [#]: The total number of stitches at the end of the round
Beginner Tip: If you find the Magic Ring difficult with plush yarn, you can chain 2 and work your first round of stitches into the second chain from the hook instead.
Step-by-Step Instructions
The Head
Work in continuous rounds. Do not join at the end of each round unless specified.
- Round 1: 8 sc in MR [8]
- Round 2: 8 inc [16]
- Round 3: (1 sc, inc) * 8 [24]
- Round 4: (2 sc, inc) * 8 [32]
- Round 5: 32 sc [32]
- Round 6: (3 sc, inc) * 8 [40]
- Rounds 7-8: 40 sc [40]
- Round 9: (dec, 3 sc) * 8 [32]
- Round 10: (dec, 2 sc) * 4, 16 sc [28]
- Rounds 11-13: 28 sc [28]
- Round 14: (dec, 2 sc) * 7 [21]
- Round 15: 10 dec, 1 sc [11]
- Round 16: 5 dec, 1 sc [6]
- Round 17: 3 dec. Fasten off and weave in the end.
Eye and Nose Placement: Insert safety eyes in Round 10, between the 5th and 9th stitches from the start of the round. Insert the safety nose in Round 14, at the 5th stitch from the start of the round.
The Ears (Make 2)
The ears are worked in rows to create a flat, triangular shape.
- Row 1: 6 sc [6]
- Row 2: 6 sc [6]
- Row 3: inc, 4 sc, inc [8]
- Row 4: inc, 6 sc, inc [10]
- Row 5: dec, 6 sc, dec [8]
- Row 6: dec, 4 sc, dec [6]
- Row 7: dec, 2 sc, dec [4]
Fasten off, leaving a long tail for sewing.
The Tail
- Round 1: 4 sc in MR [4]
- Rounds 2-4: 4 sc [4]
- Round 5: 2 dec. Fasten off and weave in the end.
Stuff the tail very lightly.
The Paws (Make 4)
Start with the main body color and switch to the accent color for the bottom “boots.”
- Round 1: 8 sc in MR [8]
- Round 2: 8 inc [16]
- Round 3: 16 sc [16]
- Round 4: dec, 2 sc, dec, 10 sc [14]
- Round 5: 1 sc, dec, 11 sc [13]
- Rounds 6-13: 13 sc [13]
- Round 14: (dec, 1 sc) * 4, 1 sc [9]
- Round 15: 4 dec, 1 sc [5]
- Round 16: 2 dec. Fasten off and weave in the end.
Stuff the paws firmly. If you are using plastic limb joints, insert the joint during Round 13 before continuing to the end.
The Body
- Round 1: 8 sc in MR [8]
- Round 2: 8 inc [16]
- Round 3: (1 sc, inc) * 8 [24]
- Round 4: (2 sc, inc) * 8 [32]
- Rounds 5-6: 32 sc [32]
- Round 7: 6 sc, dec, 1 sc, dec, 22 sc [30]
- Rounds 8-9: 30 sc [30]
- Round 10: (13 sc, dec) * 2 [28]
- Rounds 11-12: 28 sc [28]
- Round 13: 3 sc, inc, 8 sc, inc, 15 sc [30]
- Rounds 14-15: 30 sc [30]
The Back Hump (Working in Rows):
From the start of the next round, work 5 sc. Leave the next 7 stitches unworked (these will form the back of the neck). Now, work in rows:
- Row 1 (Wrong Side): ch 1, turn, (2 sc, dec) until the end of the row.
- Row 2 (Right Side): ch 1, turn, (1 sc, dec) until the end of the row.
- Row 3 (Wrong Side): ch 1, turn, dec across the row.
- Row 4 (Right Side): ch 1, turn, dec across the row.
- Row 5 (Wrong Side): ch 1, turn, 7 sc across.
- Row 6 (Right Side): ch 1, turn, 7 sc across.
Joining the Hump:
To close the body, continue working in rounds. Sc 2, sc into the 7 unworked stitches of the neck, sc 2, then join back to the body. Work one final round: 2 sc, dec, 14 sc. Work one more round without any decreases. Fasten off.
Finishing & Assembly
Sculpting the Face
To give your puppy a cute, defined muzzle, use a strong matching thread. Insert the needle into the bottom of the muzzle and bring it up near the bottom of the left eye. Pass the needle through to the bottom of the right eye, then back down to the center of the muzzle. Gently pull the thread tight to “pinch” the face into shape and tie a secure knot.
Final Assembly
- Ears: Pin the ears to the top of the head and sew them securely.
- Paws: If not using joints, sew the front paws into Round 6 (at stitches 1 and 15) and the back paws into Round 14, symmetrical to the front.
- Tail: Sew the tail to the back of the body.
- The Collar: Chain a length that fits snugly around the puppy’s neck. Work one row of sc across the chain, then sew the ends together. You can add a small bead or ring to act as a collar tag.
Tips for Success
- Eye Depth: For a more expressive look, cut a tiny circle of white felt slightly larger than the safety eye. Place it behind the eye before snapping the washer in place. This creates a “glint” in the eye.
- Stuffing: Stuff the head firmly, but leave the muzzle area slightly softer. This makes it much easier to sculpt the face with thread.
- Tension: With plush yarn, it is easy to over-tighten. Keep your tension even to ensure the puppy stays symmetrical.