How to Crochet a Cute Amigurumi Sheep: A Step-by-Step Tutorial
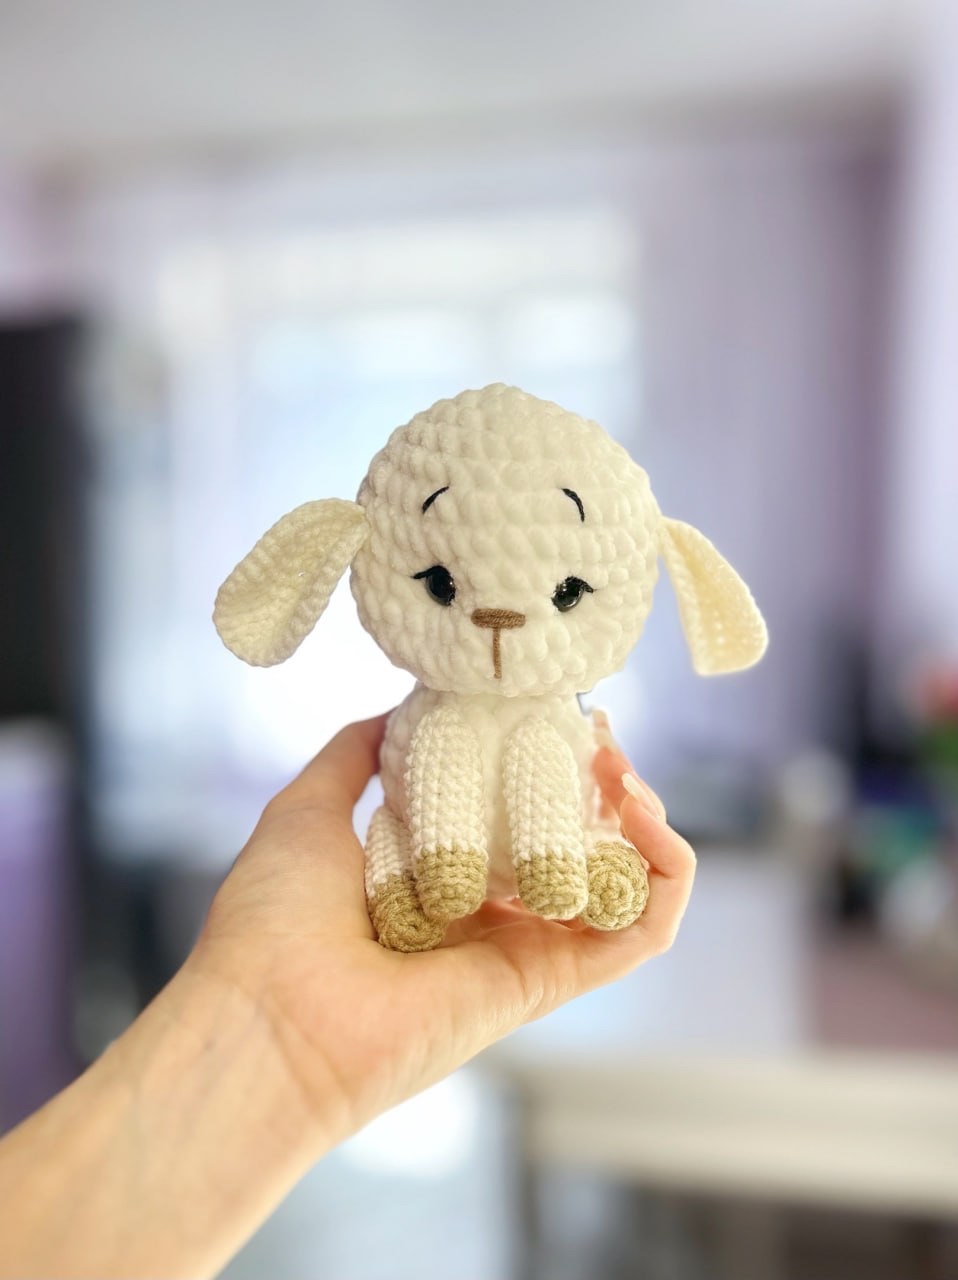
Are you looking for your next adorable crochet project? There is nothing quite as heartwarming as a tiny, chubby amigurumi animal to brighten up a nursery, a bookshelf, or to give as a handmade gift. Today, we are walking through the process of creating this incredibly sweet, soft amigurumi sheep. This little lamb features a wonderful combination of textures, using both velvety plush yarn for the body and smooth cotton yarn for the delicate details and limbs.
This pattern is perfect for intermediate beginners—those who have mastered the basic stitches and are ready to tackle color changes and working with different yarn weights. By the end of this tutorial, you will have a cuddly little companion that is approximately 5 inches tall, making it the perfect size to hold in the palm of your hand.
Materials & Abbreviations
To achieve the professional, high-quality look seen in the photos, it is important to use the right combination of yarns. This pattern uses a “hybrid” approach, mixing chunky plush yarn with standard cotton yarn to give the sheep its distinct shape and soft features.
Required Materials
- Plush Yarn (White): A super soft, chenille-style plush yarn (such as Himalaya Dolphin Baby) for the head and body.
- Cotton Yarn (White): A standard weight cotton or semi-cotton yarn (such as YarnArt Jeans) for the ears and legs.
- Cotton Yarn (Light Brown): A matching weight cotton yarn for the feet and nose details.
- Crochet Hooks:
- 4.0 mm (G/6) hook for the plush yarn.
- 2.0 mm (B/1) hook for the cotton yarn.
- Safety Eyes: 10 mm black safety eyes.
- Embroidery Thread: Black thread for the eyelashes and eyebrows.
- Stuffing: High-quality polyester fiberfill.
- Other Tools: A tapestry needle, sharp scissors, and stitch markers.
Abbreviations (US Terms)
Please ensure you are using US terminology to follow this pattern correctly:
- MR: Magic Ring
- sc: Single crochet
- inc: Increase (2 sc in the same stitch)
- dec: Decrease (sc 2 together)
- sl st: Slip stitch
- BLO: Back loop only
- (…): The number in parentheses indicates the total stitch count at the end of the round.
- (…) * n: Repeat the instructions inside the parentheses “n” times.
Step-by-Step Instructions
The Head
Work this section using the White Plush yarn and the 4.0 mm hook.
Round 1: 6 sc in a MR (6)
Round 2: inc * 6 (12)
Round 3: (1 sc, inc) * 6 (18)
Round 4: 1 sc, inc, (2 sc, inc) * 5, 1 sc (24)
Round 5: (3 sc, inc) * 6 (30)
Round 6: 2 sc, inc, (4 sc, inc) * 5, 2 sc (36)
Rounds 7-10: sc in each stitch around (4 rounds) (36)
Round 11: 2 sc, dec, (4 sc, dec) * 5, 2 sc (30)
Round 12: sc in each stitch around (30)
Eye Placement: Before continuing, insert the 10 mm safety eyes between Rounds 8 and 9. Ensure there are 4 stitches visible between the eyes. Once the eyes are secure, continue with the pattern.
Round 13: (3 sc, dec) * 6 (24). Start stuffing the head firmly with fiberfill.
Round 14: 1 sc, dec, (2 sc, dec) * 5, 1 sc (18)
Round 15: (1 sc, dec) * 6 (12), sl st to first sc.
Fasten off, leaving a long tail for sewing the head to the body.
The Ears (Make 2)
Work this section using the White Cotton yarn and the 2.0 mm hook.
Round 1: 6 sc in a MR (6)
Round 2: inc * 6 (12)
Round 3: (1 sc, inc) * 6 (18)
Round 4: (2 sc, inc) * 6 (24)
Round 5: (3 sc, inc) * 6 (30)
Round 6: (4 sc, inc) * 6 (36)
Fasten off, leaving a tail for sewing. Fold the ear in half so the opening is flat, and join the two sides together by working 2 sl st through both layers.
The Body
Work this section using the White Plush yarn and the 4.0 mm hook.
Round 1: 6 sc in a MR (6)
Round 2: inc * 6 (12)
Round 3: (1 sc, inc) * 6 (18)
Round 4: 1 sc, inc, (2 sc, inc) * 5, 1 sc (24)
Rounds 5-8: sc in each stitch around (4 rounds) (24)
Stuff the body firmly with fiberfill.
Round 9: 1 sc, dec, (2 sc, dec) * 5, 1 sc (18), sl st to first sc.
Fasten off, leaving a long tail for sewing.
Front Legs (Make 2)
Start with Light Brown Cotton yarn and the 2.0 mm hook.
Round 1: 6 sc in a MR (6)
Round 2: inc * 6 (12)
Round 3: 12 sc in BLO
Round 4: 12 sc
Color Change: Switch to White Cotton yarn for Round 5.
Round 5: 12 sc
Rounds 6-13: 12 sc (8 rounds)
Stuff the bottom part of the leg lightly.
Round 14: dec * 6 (6), sl st.
Fasten off, leaving a tail for sewing.
Back Legs (Make 2)
Start with Light Brown Cotton yarn and the 2.0 mm hook.
Round 1: 7 sc in a MR (7)
Round 2: inc * 7 (14)
Round 3: 14 sc in BLO
Round 4: 14 sc
Color Change: Switch to White Cotton yarn for Round 5.
Round 5: 14 sc
Rounds 6-13: 14 sc (8 rounds)
Stuff the bottom part of the leg lightly.
Round 14: dec * 7 (7), sl st.
Fasten off, leaving a tail for sewing.
Finishing
Assembly
Now comes the fun part—bringing your sheep to life! Use your tapestry needle and the tails left from each piece to sew the components together.
- Body to Head: Sew the head onto the top of the body.
- Ears: Sew the ears to the head between Rounds 7 and 8. Position them so they are 5 stitches away from the eyes horizontally and 1 stitch higher than the eye line.
- Front Legs: Sew these to the body between Rounds 9 and 10. Ensure there are 2 stitches of space between the legs.
- Back Legs: Sew these to the bottom of the body between Rounds 3 and 5, positioning them directly underneath where the ears are attached to give the sheep a sitting pose.
Face Details
To give your sheep its personality, use your black embroidery thread:
- Nose: Embroider a small nose between Rounds 9 and 10. It should be about 2 stitches wide. Add a small vertical line extending from the nose down through Rounds 10 to 12.
- Eyelashes: Add a few tiny strokes at the outer corners of the eyes.
- Eyebrows: Embroider small, soft eyebrows about 2 stitches above the eyes (aiming for the level of Rounds 5 and 6).
Tips for Success
Tension is Key: When working with plush yarn, it can be easy to lose sight of your stitches. Use stitch markers religiously! If you find your stitches are too loose, try using a slightly smaller hook to ensure the stuffing doesn’t peek through the holes.
Smooth Color Changes: When changing from the light brown cotton to the white cotton in the legs, try to change colors on the last pull-through of the final stitch of the previous round. This creates a much cleaner transition.
Stuffing Technique: When stuffing the head and body, work in small clumps rather than one big ball. This helps you push the stuffing into the corners (like the chin or the bottom of the body) so the toy looks smooth and rounded rather than lumpy.
Safety First: If you are making this toy for a very young infant, please consider embroidering the eyes with black thread instead of using plastic safety eyes to eliminate any choking hazards.