DIY Patchwork Teddy Bear Crochet Pattern: A Cute Amigurumi Tutorial
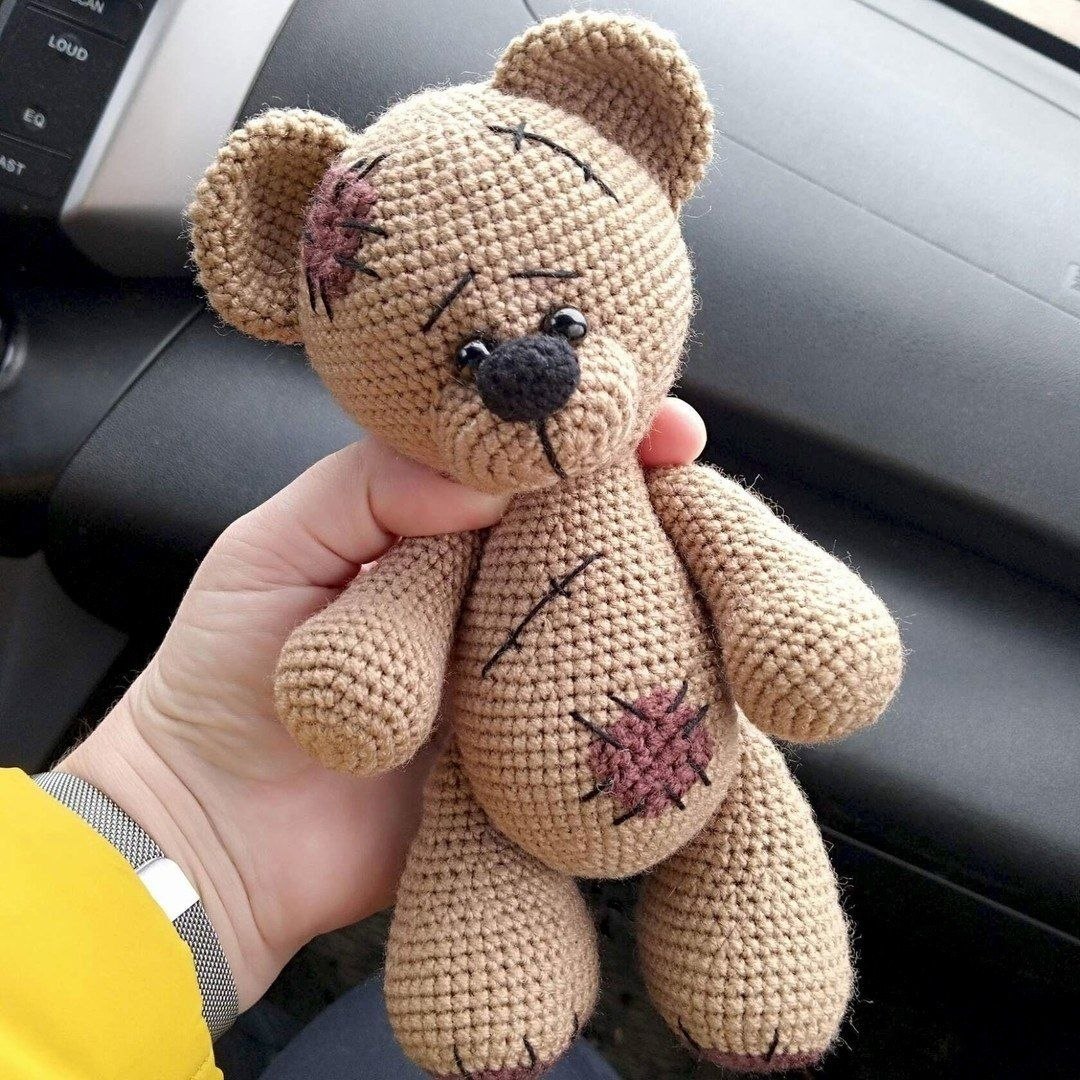
There is something incredibly nostalgic and comforting about a well-loved teddy bear. If you are looking for a crochet project that captures that “vintage heirloom” aesthetic, you have come to the right place! This patchwork teddy bear is designed to look like a cherished childhood friend, complete with adorable stitched-on patches and a slightly distressed, charming look.
This amigurumi project is perfect for intermediate beginners. While it uses standard stitches like the single crochet, it involves working in the round, increasing, and decreasing, as well as some simple assembly and embroidery. Whether you are making this as a gift for a little one or adding a cozy new friend to your own shelf, this pattern will guide you through every stitch.
Introduction
This tutorial will walk you through creating a medium-sized, textured teddy bear. The design features a large, rounded head, chunky limbs, and the signature “patchwork” look that makes it stand out. We will use a classic brown yarn for the main body and a contrasting color to create the unique leg details and the cute patches. Once the crochet work is complete, a little bit of embroidery will bring the bear to life with its “stitched” facial features and body marks.
Materials & Abbreviations
Materials Needed
- Yarn: Medium weight (worsted) cotton or acrylic yarn. You will need:
- Main Color: A warm brown or tan.
- Contrast Color 1: A color for the leg details (e.g., cream or light beige).
- Contrast Color 2: A color for the patches (e.g., dusty rose, sage green, or muted blue).
- Black Yarn: A small amount of thin black yarn or embroidery floss for the nose and “stitch” details.
- Crochet Hook: 1.25mm hook (or a hook size appropriate for your chosen yarn weight to ensure tight stitches).
- Stuffing: High-quality polyester fiberfill.
- Safety Eyes: Standard amigurumi safety eyes (size depends on your preferred scale).
- Tools: Tapestry needle, scissors, and stitch markers.
Abbreviations (US Terms)
- MR: Magic Ring
- Sc: Single Crochet
- Inc: Increase (2 sc in the same stitch)
- Dec: Decrease (sc 2 stitches together)
- Ch: Chain
- St: Stitch
- Sl st: Slip stitch
Step-by-Step Instructions
The Body
We begin with the main body in the brown color.
- R1: 6 sc in a MR (6)
- R2: 6 inc (12)
- R3: (1 sc, inc) x 6 (18)
- R4: (2 sc, inc) x 6 (24)
- R5: (3 sc, inc) x 6 (30)
- R6: (4 sc, inc) x 6 (36)
- R7: (5 sc, inc) x 6 (42)
- R8: (6 sc, inc) x 6 (48)
- R9: (7 sc, inc) x 6 (54)
- R10: (8 sc, inc) x 6 (60)
- R11-18: 60 sc (8 rows)
- R19: (3 sc, dec) x 6, then 30 sc (54)
- R20: 54 sc
- R21: (7 sc, dec) x 6 (48)
- R22: 48 sc
- R23: (6 sc, dec) x 6 (42)
Fasten off, leaving a long tail for sewing.
The Head
The head is quite large to give the bear its expressive look. Use the main brown color.
- R1: 6 sc in a MR (6)
- R2: 6 inc (12)
- R3: (1 sc, inc) x 6 (18)
- R4: (2 sc, inc) x 6 (24)
- R5: (3 sc, inc) x 6 (30)
- R6: (4 sc, inc) x 6 (36)
- R7: (5 sc, inc) x 6 (42)
- R8: (6 sc, inc) x 6 (48)
- R9: 48 sc
- R10: (7 sc, inc) x 6 (54)
- R11: (8 sc, inc) x 6 (60)
- R12: 60 sc
- R13: (9 sc, inc) x 6 (66)
- R14: (10 sc, inc) x 6 (72)
- R15-22: 72 sc (8 rows)
- R23: (10 sc, dec) x 6 (66)
- R24: (9 sc, dec) x 6 (60)
- R25: (8 sc, dec) x 6 (54)
- R26: (7 sc, dec) x 6 (48)
- R27: (6 sc, dec) x 6 (42)
- R28: (5 sc, dec) x 6 (36)
- R29: (4 sc, dec) x 6 (30)
- R30: (3 sc, dec) x 6 (24)
- R31: (2 sc, dec) x 6 (18)
- R32: (1 sc, dec) x 6 (12)
- R33: 6 dec (6)
Fasten off, leaving a long tail for sewing.
The Face and Nose
The Muzzle (Face)
Using the main brown color:
- R1: 6 sc in a MR (6)
- R2: (4 sc in one stitch, 2 sc) x 2 (12)
- R3: 1 sc, (inc) x 3, 3 sc, (inc) x 3, 2 sc (18)
- R4: 2 sc, (inc) x 3, 6 sc, (inc) x 3, 4 sc (24)
- R5: 3 sc, (inc, 1 sc) x 3, 6 sc, (inc, 1 sc) x 3, 3 sc (30)
- R6-7: 30 sc
Fasten off, leaving a long tail. This piece will be sewn to the head between rows 20 and 29 of the body.
The Nose
Using black yarn:
- R1: 6 sc in a MR (6)
- R2: (4 sc in one stitch) x 2 (12)
- R3: 1 sc, (inc) x 3, 3 sc, (inc) x 3, 2 sc (18)
- R4-5: 18 sc
- R6: (1 sc, dec) x 6 (12)
Fasten off, leaving a tail for sewing. Sew this onto the center of the muzzle.
The Ears
Using the main brown color:
- R1: 6 sc in a MR (6)
- R2: 6 inc (12)
- R3: (1 sc, inc) x 6 (18)
- R4: (2 sc, inc) x 6 (24)
- R5: (3 sc, inc) x 6 (30)
- R6-8: 30 sc
- R9: (3 sc, dec) x 6 (24)
Fasten off, leaving a tail. Sew to the top of the head.
The Arms
Using the main brown color:
- R1: 6 sc in a MR (6)
- R2: 6 inc (12)
- R3: (1 sc, inc) x 6 (18)
- R4: (2 sc, inc) x 6 (24)
- R5: (3 sc, inc) x 6 (30)
- R6-8: 30 sc
- R9: 8 sc, 3 dec (27)
- R10: 7 sc, 3 dec (24)
- R11: 9 sc, 3 dec, 9 sc (21)
- R12-14: 21 sc
- R15: (5 sc, dec) x 3 (18)
- R16-21: 18 sc
- R22: (1 sc, dec) x 6 (12)
- R23: 12 sc
- R24: 6 dec (6)
Fasten off, leaving a tail. Sew to the sides of the body.
The Legs
We begin the legs with the contrast color (e.g., cream), then switch to the main brown color.
- R1: 6 sc in a MR (6)
- R2: (4 sc in one stitch, 2 sc) x 2 (12)
- R3: 1 sc, (inc) x 3, 3 sc, (inc) x 3, 2 sc (18)
- R4: 2 sc, (inc) x 3, 6 sc, (inc) x 3, 4 sc (24)
- R5: 3 sc, (inc, 1 sc) x 3, 6 sc, (inc, 1 sc) x 3, 3 sc (30)
- R6: 4 sc, (inc, 1 sc) x 3, 9 sc, (inc, 1 sc) x 3, 5 sc (36)
Switch to main brown color:
- R7: 6 sc, (inc, 2 sc) x 3, 9 sc, (inc, 2 sc) x 3, 3 sc (42)
- R8-12: 42 sc (5 rows)
- R13: (12 sc, dec) x 3 (39)
- R14: (11 sc, dec) x 3 (36)
- R15: 36 sc
- R16: 4 sc, (1 sc, dec) x 4, 20 sc (32)
- R17: 4 sc, (1 sc, dec) x 2, 22 sc (30)
- R18: 30 sc
- R19: (3 sc, dec) x 6 (24)
- R20: 24 sc
- R21: (2 sc, dec) x 6 (18)
- R22: 18 sc
- R23-24: 18 sc
- R25: (1 sc, dec) x 6 (12)
- R26: 12 sc
- R27: 6 dec (6)
Fasten off, leaving a tail. Sew to the bottom of the body. Note: You may wish to embroider small lines on the bottom of the feet for toes.
The Tail
Using the main brown color:
- R1: 6 sc in a MR (6)
- R2: 6 inc (12)
- R3: (1 sc, inc) x 6 (18)
- R4-5: 18 sc
- R6: (1 sc, dec) x 6 (12)
- R7: (Dec to close)
Fasten off and sew to the back of the body.
The Signature Patches
Use your contrast patch color.
Large Patch
- R1: Chain 7. In the 2nd chain from hook, work 6 sc. Turn.
- R2-5: 6 sc.
Fasten off, leaving a tail for sewing.
Small Patch
- R1: Chain 6. In the 2nd chain from hook, work 5 sc. Turn.
- R2-5: 5 sc.
Fasten off, leaving a tail for sewing.
Finishing
Now comes the magic part where your bear gets its personality!
Assembly
- Stuffing: Stuff the head, body, arms, and legs firmly with fiberfill before closing. For the head, ensure it is rounded and well-supported. For the body, you can leave the top slightly less firm for a more “slouchy” feel.
- Sewing: Use your tapestry needle and the tails left from each part to sew the ears, arms, legs, tail, muzzle, and nose onto the body.
- Eyes: Insert your safety eyes into the head, just above where the muzzle will be sewn.
- Patches: Sew your large and small patches onto the bear’s body or ear for that perfect “repaired” look.
Embroidered Details
To finish the patchwork look, use your black embroidery floss or thin black yarn:
- Face: Embroider small, simple “X” stitches or straight lines around the eyes and near the muzzle to represent stitches.
- Body: Add a few “stitch” marks (simple straight lines with small cross-hatches) on the body to mimic where patches might have been sewn on.
- Feet: Add small lines on the bottom of the feet for toes.
Tips
- Tension is Key: When working amigurumi, try to keep your tension tight. This prevents the stuffing from peeking through your stitches.
- Use Stitch Markers: Because you are working in continuous rounds, it is very easy to lose your place. Always use a stitch marker at the beginning of your round.
- Safety First: If you are making this for a very small baby, skip the safety eyes and embroider the eyes instead to prevent any choking hazards.
- Experiment with Colors: While the brown is classic, don’t be afraid to try a grey bear or a white polar bear! The patches will look amazing in different color combinations.