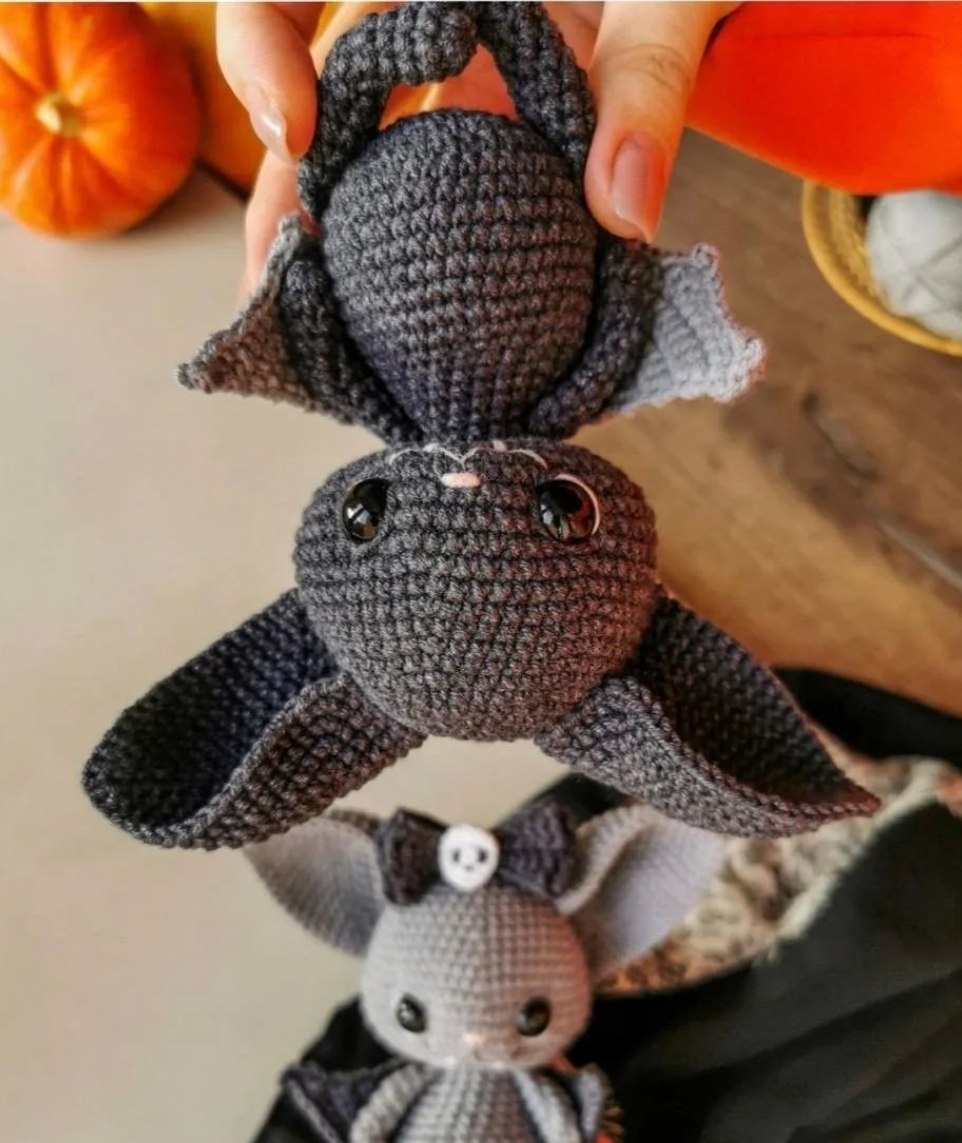
How to Crochet an Adorable Bat: The “Cloud” Amigurumi Pattern
Are you looking for the perfect spooky-cute project? Whether you are preparing for Halloween decor or just want to add a little nocturnal charm to your plushie collection, this “Cloud the Bat” amigurumi tutorial is for you. This little bat is designed with a soft, round body and expressive eyes that make it absolutely irresistible. In this guide, I will walk you through every single step, from the first magic ring to the final embroidered tooth, ensuring you can create your very own little flying friend with ease.
Introduction
Crocheting amigurumi is a wonderful way to practice tension control and shaping. This specific pattern is perfect for intermediate beginners—those who are comfortable with basic stitches but want to challenge themselves with shaping, eye sculpting, and detailed embroidery. The result is a high-quality, professional-looking toy that looks like it could have come straight from a boutique!
Materials & Abbreviations
Materials Needed
To ensure your bat looks as professional as the photos, I recommend using a cotton/acrylic blend yarn. This provides good stitch definition and keeps the shape firm.
- Crochet Hook: 1.7mm to 2mm (depending on your tension).
- Safety Eyes: 0.5 inch (12-14mm).
- Yarn:
- Main Color: Dark grey or graphite.
- Accent Color: A lighter grey for the wings.
- Details: White, black, and a skin/flesh tone for the face.
- Accessories: Any color you like for the bow, plus white and black for the skull decoration.
- Stuffing: Polyfill or similar fiberfill.
- Tools: A blunt tapestry needle, scissors, and stitch markers.
Crochet Abbreviations
Please note that these terms follow the standard US crochet terminology:
- MR: Magic Ring
- ch: Chain
- sc: Single crochet
- sl st: Slip stitch
- inc: Increase (2 sc in one stitch)
- dec: Decrease (sc 2 together)
- hdc: Half double crochet
- dc: Double crochet
- tr: Treble crochet
Step-by-Step Instructions
The Body
Using your main color, we will start by creating the base of the body. Working in continuous rounds is best for amigurumi to avoid visible seams.
- Row 1: 6 sc in a MR. To offset the start of your rounds, work 1 sc into the very first sc of the ring.
- Row 2: 6 inc (12)
- Row 3: [1 sc, inc] repeat 6 times (18)
- Row 4: [2 sc, inc] repeat 6 times (24)
- Row 5: [2 sc, inc] repeat 8 times (32)
- Row 6: [3 sc, inc] repeat 8 times (40)
- Rows 7-12: 40 sc (6 rows total)
Pro-Tip: From this point on, make sure your increases/decreases are centered on the back of the bat so the tummy stays symmetrical. Use stitch markers if you need to track your progress!
- Row 13: 10 sc, dec, [4 sc, dec] repeat 3 times, 10 sc (36)
- Row 14: 10 sc, dec, [3 sc, dec] repeat 3 times, 9 sc (32)
- Row 15: 9 sc, dec, [2 sc, dec] repeat 3 times, 9 sc (28)
- Row 16: 6 sc, dec, 12 sc, dec, 6 sc (26)
- Row 17: 6 sc, dec, 11 sc, dec, 5 sc (24)
- Row 18: 5 sc, dec, 10 sc, dec, 5 sc (22)
- Row 19: 5 sc, dec, 9 sc, dec, 4 sc (20)
- Row 20: 4 sc, dec, 8 sc, dec, 4 sc (18)
- Row 21: 4 sc, dec, 7 sc, dec, 3 sc (16)
Fasten off, leaving a long tail for sewing. Stuff the body firmly, paying extra attention to the tummy area to give it a nice, round shape.
The Bottom Legs
Make two identical pieces using the main color.
- Row 1: 8 sc in a MR.
- Rows 2-4: 8 sc (3 rows)
- Rows 5-7: 4 sl st, 4 hdc (3 rows)
- Row 8: 2 sc, dec, 2 sc, 2 inc (9)
- Row 9: 7 sc, inc, 1 sc (10)
- Rows 10-12: 10 sc (3 rows)
Stuff the top part of the leg. Fold the piece in half, aligning the starting edge with the side, and work 5 sc through both layers. Fasten off, leaving a long tail for sewing.
The Upper Arms
Make two identical pieces using the main color. These will not be stuffed.
- Row 1: 6 sc in a MR.
- Rows 2-4: 6 sc (3 rows)
- Rows 5-6: 3 sl st, 3 hdc (2 rows)
- Row 7: 4 sc, 3 sc in the same stitch, 1 sc (8)
- Rows 8-10: 8 sc (3 rows)
Fold the arm in half, aligning the starting edge with the side, and work 4 sc through both layers. Fasten off, leaving a long tail for sewing.
The Wings
Make one large piece using your accent color (lighter grey). You will work this in rows rather than rounds.
- Row 1: 5 sc in a MR. Leave a long tail for sewing.
- Row 2: inc, sc, inc, sc, inc (8)
- Row 3: inc, 2 sc, inc, 3 sc, inc (11)
- Row 4: inc, 4 sc, inc, 4 sc, inc (14)
- Row 5: inc, 5 sc, inc, 6 sc, inc (17)
- Row 6: inc, 7 sc, inc, 7 sc, inc (20)
- Row 7: inc, 8 sc, inc, 9 sc, inc (23)
- Row 8: inc, 10 sc, inc, 10 sc, inc (26)
- Row 9: inc, 11 sc, inc, 12 sc, inc (29)
- Row 10: inc, 13 sc, inc, 13 sc, inc (32)
- Row 11: inc, 14 sc, inc, 15 sc, inc (35)
- Row 12: inc, 16 sc, inc, 16 sc, inc (38)
- Row 13: inc, 17 sc, inc, 18 sc, inc (41)
- Row 14: inc, 19 sc, inc, 19 sc, inc (44)
The Wing Border (Decorative Edge)
This row adds that beautiful scalloped texture to the edges.
Row 15: 4 ch, sl st in the 3rd ch from hook, hdc in the 1st st of the previous row, sc in the next st, 5 sl st. Then, in the next stitch: [sc, then from the same stitch: hdc, dc, 2 ch, sl st in the top of the dc, hdc; in the next stitch: sc, 4 sl st]. Repeat the bracketed section 5 times. Finish with: sc, and in the last stitch [hdc, dc, 2 ch, sl st in the top of the dc]. Fasten off and weave in ends.
The Ears
Make two identical pieces using the main color. These will form a triangle shape.
- Row 1: 9 sc in a MR. To offset, work 1 sc in the first sc.
- Row 2: [3 sc in the same stitch, 2 sc] repeat 3 times (15)
- Row 3: 1 sc, [3 sc in the same stitch, 4 sc] repeat 2 times, 3 sc in the same stitch, 3 sc (21)
- Row 4: 2 sc, [3 sc in the same stitch, 6 sc] repeat 2 times, 3 sc in the same stitch, 4 sc (27)
- Row 5: 3 sc, [3 sc in the same stitch, 8 sc] repeat 2 times, 3 sc in the same stitch, 5 sc (33)
- Row 6: 4 sc, [3 sc in the same stitch, 10 sc] repeat 2 times, 3 sc in the same stitch, 6 sc (39)
- Row 7: 5 sc, [3 sc in the same stitch, 12 sc] repeat 2 times, 3 sc in the same stitch, 7 sc (45)
- Row 8: 6 sc, [3 sc in the same stitch, 14 sc] repeat 2 times, 3 sc in the same stitch, 8 sc (51)
- Row 9: 7 sc, [3 sc in the same stitch, 16 sc] repeat 2 times, 3 sc in the same stitch, 9 sc (57)
- Final Step: Work 8 sc to finish at the corner of the triangle. Fasten off, leaving a long tail.
The Head
Using the main color:
- Row 1: 6 sc in a MR. Offset by 1 sc in the first sc.
- Row 2: 6 inc (12)
- Row 3: [1 sc, inc] repeat 6 times (18)
- Row 4: [inc, 2 sc] repeat 6 times (24)
- Row 5: [3 sc, inc] repeat 6 times (30)
- Row 6: [1 sc, inc, 3 sc] repeat 6 times (36)
- Row 7: [11 sc, inc] repeat 3 times (39)
- Row 8: 5 sc, inc, [12 sc, inc] repeat 2 times, 7 sc (42)
- Row 9: [13 sc, inc] repeat 3 times (45)
- Row 10: 6 sc, inc, [14 sc, inc] repeat 2 times, 8 sc (48)
- Row 11: [15 sc, inc] repeat 3 times (51)
- Row 12: 7 sc, inc, [16 sc, inc] repeat 2 times, 9 sc (54)
- Row 13: [17 sc, inc] repeat 3 times (57)
- Row 14: 8 sc, inc, [18 sc, inc] repeat 2 times, 10 sc (60)
- Row 15: [14 sc, inc] repeat 4 times (64)
- Rows 16-18: 64 sc (3 rows)
Eye Placement: Insert your safety eyes between rows 16 and 17. The distance between the eyes (measured across row 17) should be 10 sc.
- Row 19: [6 sc, dec] repeat 8 times (56)
- Row 20: [5 sc, dec] repeat 8 times (48)
- Row 21: [4 sc, dec] repeat 8 times (40)
- Row 22: [3 sc, dec] repeat 8 times (32)
Stuff the head very firmly. Pay special attention to the bottom and sides to ensure it has a good shape for sculpting. Fasten off and weave in the tail inside the head.
Finishing
Sculpting the Face
This is the secret to making amigurumi look “alive.” We are going to create indentations for the eyes to give the bat a cute, slightly grumpy expression.
- Using your main color yarn and a needle, insert the needle into the center of the head between the last and second-to-last rows (Point 1).
- Bring the needle out between rows 16 and 17, just to the left of the left eye, as close to the eye as possible (Point 2).
- Insert the needle back into Point 1 and then into Point 3 (between rows 16 and 17, to the right of the left eye). Pull the thread to create a horizontal stitch above the eye and tighten.
- Repeat this process for the right eye: go from Point 1, through a stitch near the right eye (Point 5), and back to Point 4 (one stitch away from Point 1).
- Pull both threads downward firmly. Use your fingers to press the eyes into the head to deepen the sockets. Tie off and hide the ends inside.
Embroidery & Details
- Eyeballs: Using white yarn, embroider small white sections (the whites of the eyes) just below the safety eyes.
- Eyelids: Using the main color, embroider two small stitches—one above and one below the eye—to create a lid effect.
- Nose: Using skin/flesh tone, embroider two small stitches between the eyes (between rows 17 and 18, spanning about 2 sc).
- Mouth: Using a contrasting color, create a small mouth. Start by making a long horizontal stitch under the eyes. Add a small vertical stitch under the nose to connect them, and then extend the sides to create a rounded shape.
- Teeth: Using white thread, embroider three tiny vertical stitches under the center of each half of the mouth for a little vampire look!
Final Assembly
- Ears: Sew the ears onto the head. Start between rows 8 and 9, 17 sc from the center. Sew upwards diagonally for 5 rows, bend the ear, and sew it down toward the face.
- Body to Head: Sew the body to the head. Ensure the tummy is centered and symmetrical.
- Legs: Sew the bottom legs diagonally. The front point should be between rows 9 and 10 of the body, and the back point between rows 6 and 7.
- Arms: Sew the arms diagonally between the last and second-to-last rows of the body on the front, and two rows lower on the back.
- Wings: Sew the wings to the center of the back, starting between the last and second-to-last rows of the body.
Tips
- Tension is Key: If your stitches are too loose, the stuffing will show through. If they are too tight, the piece will be stiff. Try to maintain a consistent tension throughout.
- Use Stitch Markers: Amigurumi is worked in continuous rounds, which makes it very easy to lose your place. Always mark your first stitch of the round.
- Stuffing Technique: Don’t just shove stuffing in. Work it into the corners and crevices to avoid lumps. A well-stuffed toy holds its shape much better.
- Eye Placement: If your eyes look crooked, don’t panic! You can often adjust them slightly by pulling the thread or repositioning them before you finalize the sculpting.