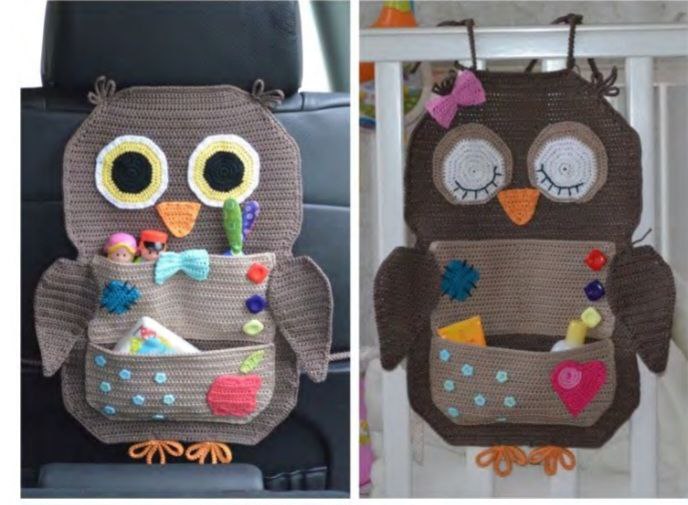
Adorable Crochet Owl Organizer Pattern: A Fun Hanging Pocket Tutorial
Are you looking for a whimsical, practical, and incredibly cute way to keep your space organized? This crochet owl organizer is the perfect weekend project! Whether you hang it on a nursery wall, tie it to a baby cot, or mount it to the back of a car seat, this multi-pocket organizer is as functional as it is adorable. Featuring spacious pockets, charming appliques like apples and hearts, and adorable leafy ears, this owl will happily guard your treasures.
This pattern is designed to be beginner-friendly but engaging, utilizing simple crochet stitches to construct the body, pockets, and decorative pieces. Let’s grab our hooks and get started!
Materials & Abbreviations
Materials Needed:
- Yarn: Sport weight (5-ply) cotton yarn.
- Dark Brown (Main Body & Wings): 2 skeins (approx. 50g / 125 yards each)
- Cream (Pocket Borders & Sewing): 1 skein (approx. 50g / 125 yards)
- Small amounts of light brown, light pink, dark pink, orange, blue, red, green, white, and black cotton yarn for pockets and decorations.
- Crochet Hook: Size D-3 (3.0 mm) or size needed to obtain gauge.
- Notions: Tapestry needle, embroidery needle, colorful buttons, pins, and scissors.
- Optional: Elastic band (if making a car seat organizer).
Finished Measurements:
Approximately 13 inches wide by 15.5 inches tall. (Note: actual size may vary slightly based on your tension and yarn choice).
Gauge:
25 stitches and 20 rows in half double crochet (hdc) = 4″ x 4″ (10 cm x 10 cm).
Abbreviations (US Terms):
- ch = chain
- sc = single crochet
- hdc = half double crochet
- dc = double crochet
- tr = treble crochet
- sl st = slip stitch
- st(s) = stitch(es)
- hdc2tog = half double crochet 2 together (decrease)
- sc2tog = single crochet 2 together (decrease)
- YO = yarn over
- WS = wrong side
Step-by-Step Instructions
Owl Body
The main body is worked from the bottom up in rows. Using your dark brown yarn, begin by chaining 43.
- Row 1: Hdc into the 3rd chain from your hook, hdc in each chain across, turn. (41 hdc)
- Row 2: Ch 2, work 2 hdc in the first st, hdc in next 39 sts, 2 hdc in the last st, turn. (43 sts)
- Row 3: Ch 2, work 2 hdc in the first st, hdc in next 41 sts, 2 hdc in the last st, turn. (45 sts)
- Row 4: Ch 2, work 2 hdc in the first st, hdc in next 43 sts, 2 hdc in the last st, turn. (47 sts)
- Row 5: Ch 2, work 2 hdc in the first st, hdc in next 45 sts, 2 hdc in the last st, turn. (49 sts)
- Row 6: Ch 2, work 2 hdc in the first st, hdc in next 47 sts, 2 hdc in the last st, turn. (51 sts)
- Row 7: Ch 2, work 2 hdc in the first st, hdc in next 49 sts, 2 hdc in the last st, turn. (53 sts)
- Row 8: Ch 2, work 2 hdc in the first st, hdc in next 51 sts, 2 hdc in the last st, turn. (55 sts)
- Row 9: Ch 2, work 2 hdc in the first st, hdc in next 53 sts, 2 hdc in the last st, turn. (57 sts)
- Row 10: Ch 2, work 57 hdc across, turn. (57 sts)
- Rows 11 to 40: Repeat Row 10.
- Row 41: Ch 2, hdc2tog, hdc in next 53 sts, hdc2tog, turn. (55 sts)
- Row 42: Ch 2, work 55 hdc across, turn.
- Row 43: Ch 2, hdc2tog, hdc in next 51 sts, hdc2tog, turn. (53 sts)
- Rows 44 to 45: Ch 2, work 53 hdc across, turn.
- Row 46: Ch 2, work 2 hdc in the first st, hdc in next 51 sts, 2 hdc in the last st, turn. (55 sts)
- Row 47: Ch 2, work 2 hdc in the first st, hdc in next 53 sts, 2 hdc in the last st, turn. (57 sts)
- Row 48: Ch 2, work 2 hdc in the first st, hdc in next 55 sts, 2 hdc in the last st, turn. (59 sts)
- Row 49: Ch 2, work 59 hdc across, turn. (59 sts)
- Rows 50 to 64: Repeat Row 49.
- Row 65: Ch 2, hdc2tog, hdc in next 55 sts, hdc2tog, turn. (57 sts)
- Row 66: Ch 2, hdc2tog, hdc in next 53 sts, hdc2tog, turn. (55 sts)
- Row 67: Ch 2, hdc2tog, hdc in next 51 sts, hdc2tog, turn. (53 sts)
- Row 68: Ch 2, hdc2tog, hdc in next 49 sts, hdc2tog, turn. (51 sts)
- Row 69: Ch 2, hdc2tog, hdc in next 47 sts, hdc2tog, turn. (49 sts)
- Row 70: Ch 2, hdc2tog, hdc in next 45 sts, hdc2tog, turn. (47 sts)
- Row 71: Ch 2, hdc2tog, hdc in next 43 sts, hdc2tog, turn. (45 sts)
- Row 72: Ch 2, hdc2tog, hdc in next 41 sts, hdc2tog, turn. (43 sts)
- Row 73: Ch 2, hdc2tog, hdc in next 39 sts, hdc2tog, turn. (41 sts)
- Row 74: Ch 2, hdc2tog, hdc in next 37 sts, hdc2tog, turn. (39 sts)
- Row 75: Ch 2, sc2tog, hdc in next 35 sts, sc2tog, turn. (37 sts)
- Row 76: Ch 2, sc2tog, hdc in next 33 sts, sc2tog, turn. (35 sts)
- Row 77: Ch 2, sc2tog, hdc in next 31 sts, sc2tog, turn. (33 sts)
- Row 78: Ch 2, sc2tog, hdc in next 29 sts, sc2tog, turn. (31 sts)
- Row 79: Ch 2, sc2tog, hdc in next 27 sts, sc2tog, turn. (29 sts)
- Row 80: Ch 2, sc2tog, hdc in next 25 sts, sc2tog, turn. (27 sts)
- Row 81: Ch 2, sc2tog, hdc in next 23 sts, sc2tog, turn. (25 sts)
- Fasten off.
Body Border:
Re-join your dark brown yarn in the center of the bottom edge of the owl body. Ch 2, work 17 hdc along the bottom edge, make 2 hdc in the corner stitch. Work 120 hdc up the side, make 2 hdc in the corner stitch (top of the head). Work 25 hdc across the top of the head, make 2 hdc in the corner stitch. Work 120 hdc down the opposite side, make 2 hdc in the corner stitch, and finish with 17 hdc along the bottom edge. Join with a sl st to the first hdc. Fasten off.
Owl Ears (Make Two):
- Re-join yarn on the top corner of the owl head and make 1 sl st.
- Ch 12 and make 1 sl st back into the same stitch. Sl st into the next stitch, then Ch 20.
- Make 1 sl st back into the same stitch. Sl st into the next stitch, Ch 12, make 1 sl st into the same stitch. Fasten off.
- Repeat steps 1 to 3 on the opposite side of the head for the second ear.
Pocket #1 (Lower Pocket with Rounded Bottom)
Using light brown yarn, Ch 39.
- Row 1: Hdc into 3rd ch from hook, work 37 hdc, turn.
- Row 2: Ch 2, work 2 hdc in first st, work 35 hdc, work 2 hdc in last st, turn.
- Row 3: Ch 2, work 2 hdc in first st, work 37 hdc, work 2 hdc in last st, turn.
- Row 4: Ch 2, work 2 hdc in first st, work 39 hdc, work 2 hdc in last st, turn.
- Row 5: Ch 2, work 2 hdc in first st, work 41 hdc, work 2 hdc in last st, turn.
- Row 6: Ch 2, work 2 hdc in first st, work 43 hdc, work 2 hdc in last st, turn.
- Row 7: Ch 2, work 47 hdc, turn.
- Rows 8 to 19: Repeat Row 7.
Border: Ch 1, work 12 sc down the side, 2 sc in the corner stitch, work 6 sc, 2 sc in the corner stitch, work 36 sc across the bottom, 2 sc in the corner stitch, work 6 sc, 2 sc in the corner stitch, and work 12 sc up the opposite side. Fasten off.
Pocket #2 (Upper Straight Pocket)
Using light brown yarn, Ch 49.
- Row 1: Hdc into 3rd ch from hook, work 47 hdc, turn.
- Row 2: Ch 2, work 47 hdc, turn.
- Rows 3 to 19: Repeat Row 2.
Border: Ch 1, work 27 sc down the side, 3 sc in the corner stitch, work 45 sc across the bottom, 3 sc in the corner stitch, work 27 sc up the opposite side. Fasten off.
Owl Wings (Make Two)
Using dark brown yarn, Ch 12.
- Row 1: Hdc into 3rd ch from hook, work 10 hdc, turn.
- Row 2: Ch 2, 2 hdc in 1st st, work 8 hdc, 2 hdc in last st, turn.
- Row 3: Ch 2, 2 hdc in 1st st, work 10 hdc, 2 hdc in last st, turn.
- Row 4: Ch 2, 2 hdc in 1st st, work 12 hdc, 2 hdc in last st, turn.
- Row 5: Ch 2, work 16 hdc, turn.
- Rows 6 to 9: Repeat Row 5.
- Row 10: Ch 2, hdc2tog, work 12 hdc, hdc2tog, turn.
- Row 11: Ch 2, work 14 hdc, turn.
- Row 12: Ch 2, hdc2tog, work 10 hdc, hdc2tog, turn.
- Row 13: Ch 2, work 12 hdc, turn.
- Row 14: Ch 2, hdc2tog, work 8 hdc, hdc2tog, turn.
- Row 15: Ch 2, work 10 hdc, turn.
- Row 16: Ch 2, hdc2tog, work 6 hdc, hdc2tog, turn.
- Row 17: Ch 2, work 8 hdc, turn.
- Row 18: Ch 2, hdc2tog, work 4 hdc, hdc2tog, turn.
- Row 19: Ch 2, work 6 hdc, turn.
- Row 20: Ch 2, hdc2tog, work 2 hdc, hdc2tog, turn.
- Row 21: Ch 2, work 4 hdc, turn.
- Row 22: Ch 2, work hdc2tog twice, turn.
- Row 23: Ch 2, work 2 hdc, turn.
- Row 24: Ch 2, work hdc2tog.
Wing Border: Ch 1, work 34 sc along the side, 2 sc in the corner stitch, work 8 sc, 2 sc in the corner stitch, work 34 sc along the opposite side, 3 sc in the last stitch. Join with a sl st to the first sc. Fasten off.
Owl Eyes (Make Two – Choose Type #1 or #2)
Type #1 (Open Eyes)
Using black yarn, Ch 5, join with a sl st to form a ring (or start with a magic loop).
- Rnd 1: Ch 1 (does not count as sc), work 12 sc into the ring; join with a sl st to the first st. (12 sts)
- Rnd 2: Ch 2 (does not count as hdc), work 2 hdc in every st around; join with a sl st to the first hdc. (24 sts)
- Rnd 3: Ch 2, (work 2 hdc, 2 hdc in next st) 8 times; join with a sl st. (32 sts)
- Rnd 4: Ch 2, (work 3 hdc, 2 hdc in next st) 8 times; join with a sl st. (40 sts)
- Rnd 5: Switch to yellow yarn. Ch 2, (work 4 hdc, 2 hdc in next st) 8 times; join with a sl st. (48 sts)
- Rnd 6: Ch 2, (work 5 hdc, 2 hdc in next st) 8 times; join with a sl st. (56 sts)
- Rnd 7: Switch to white yarn. Ch 2, (work 6 hdc, 2 hdc in next st) 8 times; join with a sl st. (64 sts)
- Fasten off, leaving a 10-inch tail for sewing.
Type #2 (Closed / Sleeping Eyes)
Using white yarn, Ch 5, join with a sl st to form a ring (or start with a magic loop).
- Rnds 1 to 6: Repeat the same instructions as Rnds 1 to 6 of the Open Eyes.
- Rnd 7: Switch to light brown yarn. Ch 1, work 6 sc, 2 sc in next st, work 6 hdc, 2 hdc in next st, (work 6 dc, 2 dc in next st) 2 times, work 6 hdc, 2 hdc in next st, work 6 sc, 2 sc in next st, work 16 sl sts; join with a sl st to the first st.
- Rnd 8: Ch 1, work 7 sc, 2 sc in next st, work 7 hdc, 2 hdc in next st, work 7 dc, (2 dc in next st) 2 times, work 7 dc, work 7 hdc, 2 hdc in next st, work 7 sc, 1 sl st in the next st.
- Fasten off, leaving a 10-inch tail. Embroider sleepy eyelashes onto the white portion with black yarn and a needle.
Owl Beak
Using orange yarn, work back and forth in rows:
- Row 1: Ch 3, work 3 hdc in the 1st ch, turn.
- Row 2: Ch 2, 2 hdc in first st, work 1 hdc, 2 hdc in last st, turn.
- Row 3: Ch 2, work 5 hdc, turn.
- Row 4: Ch 2, 2 hdc in first st, work 3 hdc, 2 hdc in last st, turn.
- Row 5: Ch 2, 2 hdc in first st, work 5 hdc, 2 hdc in last st, turn.
- Row 6: Ch 2, 2 hdc in first st, work 7 hdc, 2 hdc in the next st.
Border: Ch 1, work 9 sc along the first side edge, 3 sc in the corner, and 9 sc along the second side edge. Fasten off, leaving an 8-inch tail.
Applique Decorations
Sweet Pink Heart:
Using dark pink yarn, start with a Ch 5 and join with a sl st to form a ring.
- Rnd 1: Ch 1, work 6 sc into the ring; join with a sl st. (6 sts)
- Rnd 2: Ch 1, work 2 sc in each st around; join with a sl st. (12 sts)
- Rnd 3: Ch 1, (1 sc, 2 sc in next st) 6 times; join with a sl st. (18 sts)
- Rnd 4: Ch 1, (2 sc, 2 sc in next st) 6 times; join with a sl st. (24 sts)
- Now turn your work to crochet in rows across the top to form the heart lobes:
- Row 5: Ch 1, 2 sc in next st, work 10 sc, turn.
- Row 6: Ch 1, work 11 sc, 2 sc in next st, turn.
- Row 7: Ch 1, 2 sc in next st, work 12 sc, turn.
- Row 8: Ch 1, work 14 sc, turn.
- Row 9: Ch 1, sc2tog, work 12 sc, turn.
- Row 10: Ch 1, work 11 sc, sc2tog, turn.
- Row 11: Ch 1, sc2tog, work 10 sc, turn. Fasten off.
- Detailing: Use light pink yarn to slip stitch a beautiful spiral starting from the center of the circle.
- Border: Join dark pink at the corner. Ch 1, work 11 sc, 2 sc in next st, work 4 sc, 2 sc in next st, work 10 sc, 2 sc in next st, work 4 sc, 2 sc in next st, work 15 sc. Fasten off, leaving a 10-inch tail.
Red Apple:
Using red yarn, Ch 10.
- Row 1: Hdc into the 3rd ch from hook, work 2 hdc, work 2 sl sts, work 3 hdc, turn.
- Row 2: Ch 2, 2 hdc in first st, work 6 hdc, 2 hdc in last st, turn.
- Row 3: Ch 2, 2 hdc in first st, work 8 hdc, 2 hdc in last st, turn.
- Row 4: Ch 2, 2 hdc in first st, work 9 hdc, hdc2tog, turn.
- Row 5: Ch 2, hdc2tog, work 10 hdc, turn.
- Row 6: Ch 2, work 11 hdc, turn.
- Row 7: Ch 2, hdc2tog, work 10 hdc, turn.
- Row 8: Ch 2, hdc2tog, work 9 hdc, hdc2tog, turn.
- Row 9: Ch 2, hdc2tog, work 3 hdc, 2 sl sts, work 3 hdc, hdc2tog. Fasten off.
- Border: Re-join red yarn in the center of the bottom edge of the apple. Ch 1, work 5 sc, 2 sc in next st, work 10 sc, 2 sc in next st, work 11 sc, 2 sc in next st, work 13 sc, 2 sc in next st, work 4 sc. Fasten off, leaving an 8-inch tail.
Apple Leaf:
Using green yarn, Ch 10. Sc in the 2nd chain from your hook, work 1 hdc, work 1 dc, work 3 tr, work 1 dc, work 1 hdc, work 1 sl st in the last chain. Fasten off, leaving an 8-inch tail.
Blue Patch:
Using blue yarn, Ch 10.
- Row 1: Hdc into 3rd ch from hook, work 8 hdc, turn.
- Row 2: Ch 2, work 8 hdc, turn.
- Rows 3 to 5: Repeat Row 2. Fasten off, leaving an 8-inch tail.
Preppy Bow:
Using light blue or light pink yarn, Ch 17.
- Row 1: Hdc into 3rd ch from hook, work 6 hdc, work 1 sc, work 7 hdc, turn.
- Row 2: Ch 2, work 7 hdc, work 1 sc, work 7 hdc, turn.
- Rows 3 to 4: Repeat Row 2. Fasten off. Wrap yarn tightly around the center of the piece to pinch it into a bow shape.
Sturdy Romanian Crochet Cord
This beautiful, thick cord is perfect for the owl’s feet and hanging ties.
- Ch 3.
- Work 1 sc in the 2nd chain from your hook, then turn your work clockwise.
- Insert your hook into the unused back loop of that same chain. YO and pull up a loop, YO and draw through both loops on your hook (1 sc made in the back loop). Turn your work clockwise.
- From this point on, insert your hook into the two loops at the side of the cord, YO and pull up a loop, YO and pull through both loops on the hook. Turn your work clockwise.
- Repeat this step until your cord reaches the required length, then fasten off.
Required Cord Quantities & Lengths:
- Orange (for Owl Feet): Crochet 2 cords, each 8 inches long.
- Brown (for hanging ties):
- Wall Organiser: Crochet 1 cord, 14 inches long.
- Baby Cot Organiser: Crochet 2 cords, 14 inches long.
- Car Organiser: Crochet 2 cords (14 inches long) and 2 cords (27 inches long). *Note: You can swap the side ties for elastic if attaching to a car seat!
Finishing & Assembly
- Decorate Pocket #2 (Upper Pocket): Sew your blue patch and a few colorful buttons to the front of this pocket. Add simple decorative stitches with black embroidery thread around the blue patch for a rustic look. Pin the pocket onto the upper body, then sew the sides and bottom edge using cream yarn. Optional: Sew a vertical line down the middle of this pocket to split it into two handy compartments!
- Decorate Pocket #1 (Lower Pocket): Arrange your sweet heart or red apple and leaf appliques onto the lower pocket, along with matching buttons. Sew them in place. Pin this pocket to the lower body, below Pocket #2, and sew the sides and bottom using cream yarn.
- Attach Facial Features: Securely sew the eyes and beak onto the face area of the owl. If using closed eyes, make sure your embroidered eyelashes face down.
- Attach Wings: Pin the wings to the sides of the owl body. Sew across the top edge of each wing, then secure them with a couple of hidden stitches from the wrong side (WS) to keep them from flopping.
- Attach Bow: Secure the bow to the owl body (either as a bow tie under the beak or on one of the ears as a cute hair bow).
- Form the Owl Feet: Take your 8-inch orange cords and fold them back and forth to mimic three-toed owl feet. Secure the loops together using orange yarn and a tapestry needle, then sew the feet to the back (WS) of the bottom edge of the owl body.
- Attach Hanging Ties:
- For Wall Mounting: Sew the ends of one 14-inch brown cord to the top corners of the head.
- For Baby Cot: Sew two 14-inch cords to the top corners of the head so they can tie around the rails.
- For Car Seat: Sew two 14-inch cords to the top of the head (to tie around the headrest) and two 27-inch cords (or elastic bands) to the lower sides of the body to secure around the seat back.
- Weave in all remaining loose yarn ends on the wrong side. Give your organizer a light steam blocking to help it hang perfectly flat!
Tips for Success
- Choosing Yarn: 100% mercerized cotton yarn works best for this project. It provides wonderful stitch definition, doesn’t stretch out of shape when pockets are filled, and can easily be wiped clean.
- Tension Check: Keep your stitches relatively snug, especially on the pockets. Tight half double crochet stitches will prevent your items from slipping through or stretching the fabric over time.
- Customizations: Feel free to mix and match colors! This organizer looks fantastic in neutrals for a chic nursery, or bright, rainbow tones for a fun children’s playroom.