Adorable Crochet Seagull Pattern: A Cute Amigurumi Tutorial with a Little Fish
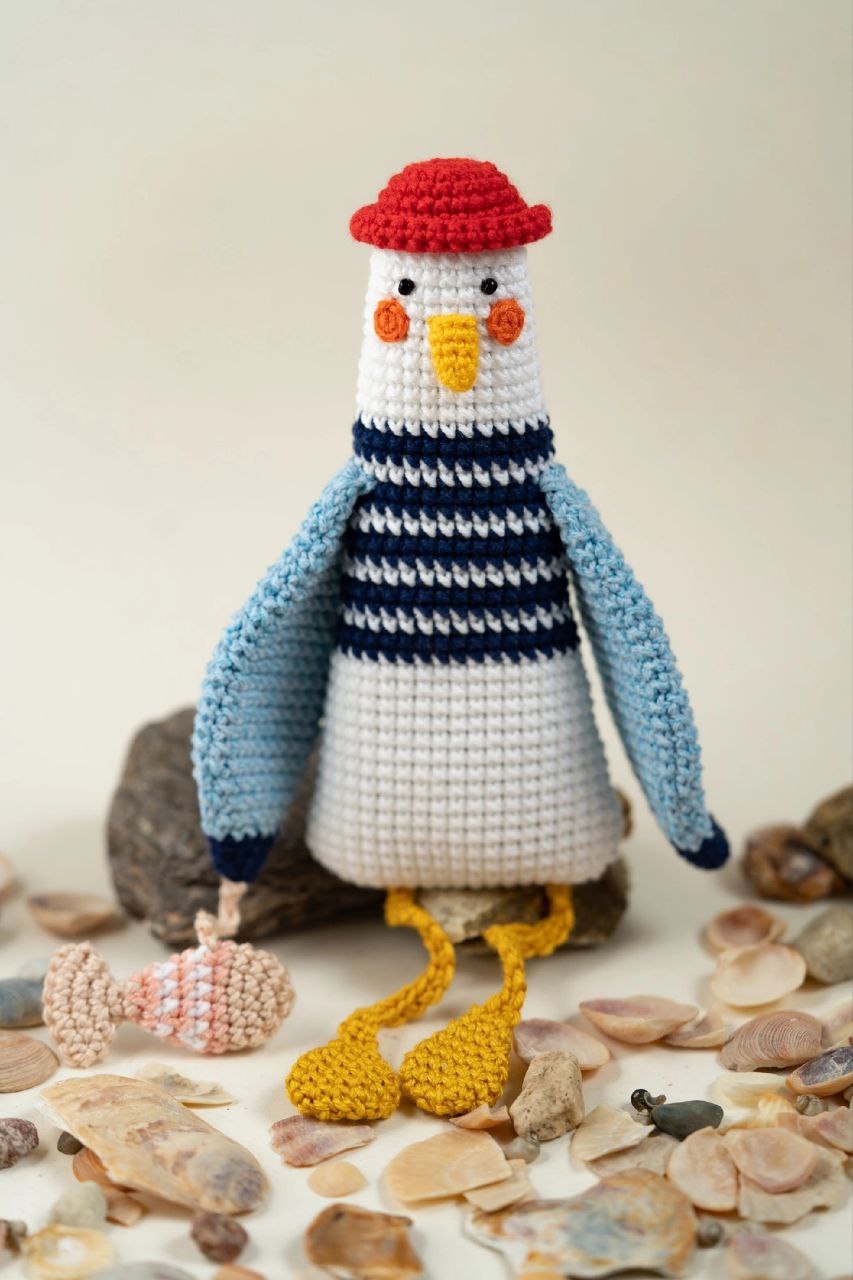
Are you looking for your next seaside-inspired crochet project? This adorable crochet seagull is the perfect companion for your amigurumi collection! Complete with a jaunty little red hat and a tiny, colorful fish, this seagull is as charming as it is fun to make. Whether you are looking to decorate a nursery, create a unique gift, or simply enjoy the process of making something “beachy,” this pattern is a fantastic choice.
This project is designed to be beginner-friendly, guiding you through the creation of several small pieces that come together to form a character full of personality. Once finished, your seagull will stand approximately 7.5 inches tall, making it a wonderful size for display or play.
Materials and Tools Needed
Before you pick up your hook, make sure you have all the supplies ready. Using a similar weight of yarn will ensure your seagull looks just like the one in the photos!
- Yarn: Cotton or cotton-blend yarn works best for amigurumi to keep stitch definition sharp. You will need the following colors:
- White
- Dark Blue
- Light Blue
- Yellow
- Mustard/Gold
- Orange
- Beige/Tan
- Peach/Pink
- Red
- Hooks:
- 2.5mm (or #2) crochet hook
- 2.25mm (or #1.5) crochet hook
- Stuffing: Polyester fiberfill for toy stuffing.
- Eyes: Two 2mm black beads or safety eyes.
- Notions:
- Tapestry needle (for sewing pieces together)
- Black sewing thread
- Fine bead needle
- Stitch markers
Crochet Abbreviations (US Terms)
To make this pattern easy to follow, we are using standard US crochet terms. Please ensure you are familiar with these before starting:
- CH: Chain stitch
- SC: Single crochet
- INC: Increase (2 SC in one stitch)
- DEC: Decrease (2 stitches worked together)
- MR: Magic Ring
- SL ST: Slip stitch
- (*): Indicates the total number of stitches in that specific round.
Step-by-Step Instructions
The Body
We begin the body with white yarn using the 2.5mm hook. This piece forms the foundation of our seagull.
Round 1: Start by making a chain of 15 CH. To work in a round, skip the first chain from the hook and work 13 SC into the next 13 chains. In the very first chain of the initial chain, work 3 SC. Now, turn to work on the other side of the foundation chain; work 13 SC, and finally, work 3 SC into the last chain (the one you marked with a stitch marker). You should have 32 stitches total. (*)
Round 2: 14 SC, INC (3 SC in one stitch), 15 SC, INC (3 SC in one stitch), 1 SC (36). (*)
Round 3: 15 SC, INC (3 SC in one stitch), 17 SC, INC (3 SC in one stitch), 2 SC (40). (*)
Rounds 4-6: SC in each stitch around (40). (*)
Note: From here, the decreases should follow the sides of the body to create the shape.
Round 7: 16 SC, DEC, 18 SC, DEC, 2 SC (38). (*)
Rounds 8-10: SC in each stitch around (38). (*)
Round 11: 15 SC, DEC, 17 SC, DEC, 2 SC (36). (*)
Rounds 12-14: SC in each stitch around (36). (*)
Round 15: 15 SC, DEC, 16 SC, DEC, 1 SC (34). (*)
Round 16: SC in each stitch around (34). (*)
Switch to Dark Blue yarn.
Rounds 17-18: SC in each stitch around (34). (*)
Switch back to White yarn.
Round 19: 14 SC, DEC, 15 SC, DEC, 1 SC (32). (*)
Switch to Dark Blue yarn.
Rounds 20-21: SC in each stitch around (33). (*)
Round 22: SC in each stitch around (32). (*)
Round 23: (14 SC, DEC) repeat twice (30). (*)
Round 24: SC in each stitch around (30). (*)
Switch to White yarn.
Round 25: SC in each stitch around (30). (*)
Switch to Dark Blue yarn.
Round 26: SC in each stitch around (30). (*)
Round 27: (13 SC, DEC) repeat twice, then SL ST (28). (*)
Round 28: SC in each stitch around (28). (*)
Switch to Dark Blue yarn.
Rounds 29-30: SC in each stitch around (28). (*)
Now, begin stuffing the body lightly so it maintains its shape without becoming too stiff. Continue stuffing as you complete the remaining rounds.
Continue with White yarn.
Round 31: (12 SC, DEC) repeat twice (26). (*)
Rounds 32-34: SC in each stitch around (26). (*)
Round 35: (11 SC, DEC) repeat twice, then SL ST (24). (*)
Rounds 36-38: SC in each stitch around (24). (*)
Round 39: (10 SC, DEC) repeat twice (22). (*)
Rounds 40-42: SC in each stitch around (22). (*)
Round 43: (9 SC, DEC) repeat twice (20). (*)
Round 44: (2 SC, DEC) repeat 5 times (15). (*)
Round 45: (1 SC, DEC) repeat 5 times (10). (*)
Fasten off by pulling the yarn through, catching the front loops of the next two stitches to close the opening completely. Secure the thread.
The Red Hat
Using the 2.5mm hook and Red yarn, start by leaving a long tail at the beginning for sewing later.
Round 1: 5 SC in a MR (5). (*)
Round 2: 5 INC (10). (*)
Round 3: (1 SC, INC) repeat 5 times (15). (*)
Round 4: (INC, 2 SC) repeat 5 times (20). (*)
Round 5: (9 SC, INC) repeat 2 times (22). (*)
Round 6: (10 SC, INC) repeat 2 times (24). (*)
Round 7: (11 SC, INC) repeat 2 times (26). (*)
Rounds 8-9: SC in each stitch around (26). (*)
Fasten off, leaving a long tail for sewing.
The Wings (Make 2)
We will work these in two colors. Use the 2.5mm hook.
Round 1: 6 SC in a MR (6). (*)
Round 2: (INC, 2 SC) repeat 2 times (8). (*)
Round 3: (3 SC, INC) repeat 2 times (10). (*)
Round 4: (INC, 4 SC) repeat 2 times (12). (*)
Switch to Light Blue yarn.
Round 5: (5 SC, INC) repeat 2 times (14). (*)
Round 6: (INC, 6 SC) repeat 2 times (16). (*)
Round 7: (7 SC, INC) repeat 2 times (18). (*)
Round 8: (INC, 8 SC) repeat 2 times (20). (*)
Round 9: (9 SC, INC) repeat 2 times (22). (*)
Rounds 10-14: SC in each stitch around (22). (*)
Round 15: (9 SC, DEC) repeat 2 times (20). (*)
Round 16: SC in each stitch around (20). (*)
Round 17: (DEC, 8 SC) repeat 2 times (18). (*)
Round 18: SC in each stitch around (18). (*)
Round 19: (7 SC, DEC) repeat 2 times (16). (*)
Round 20: SC in each stitch around (16). (*)
Round 21: (DEC, 6 SC) repeat 2 times (14). (*)
Round 22: SC in each stitch around (14). (*)
Round 23: (5 SC, DEC) repeat 2 times (12). (*)
Round 24: SC in each stitch around (12). (*)
Round 25: (DEC, 4 SC) repeat 2 times (10). (*)
Round 26: Fold the piece in half and work 8 SC through both layers. Fasten off, leaving a long tail for sewing. Do not stuff the wings.
The Feet (Make 2)
Use Mustard/Gold yarn and the 2.5mm hook.
Round 1: Chain 4. Skip the first chain from the hook and work 2 SC into the second chain. Work 3 SC into the first chain. Work 2 SC on the other side of the foundation chain, and 3 SC into the last chain. (10). (*)
Round 2: 3 SC, INC (3 SC), 4 SC, INC (3 SC), 1 SC (14). (*)
Round 3: SC in each stitch around (14). (*)
Round 4: 4 SC, DEC, 5 SC, DEC, 1 SC (12). (*)
Round 5: (4 SC, DEC) repeat 2 times (10). (*)
Round 6: (3 SC, DEC) repeat 2 times (8). (*)
Round 7: (2 SC, DEC) repeat 2 times (6). (*)
Round 8: Fold in half and work 2 SC through both layers.
Round 9: Chain 16. From the second chain from the hook, work 15 SC along the edge. SL ST into the first SC of Round 8. Fasten off.
The Beak and Cheeks
Beak: Use Yellow yarn and the 2.25mm hook.
Round 1: 6 SC in a MR (6). (*)
Rounds 2-3: SC in each stitch around (6). (*)
Round 4: (2 SC, INC) repeat 2 times (8). (*)
Round 5: SC in each stitch around (8). (*)
Round 6: (4 SC, DEC) repeat 2 times (10). (*)
Round 7: (3 SC, DEC) repeat 2 times (8). (*)
Round 8: (2 SC, DEC) repeat 2 times (6). (*)
Round 9: Fold in half and work 2 SC through both layers. Chain 16, work 15 SC along the edge, SL ST to the first SC of Round 8. Do not stuff. Leave a tail for sewing.
Cheeks (Make 2): Using Orange yarn and the 2.25mm hook, work 6 SC in a MR, SL ST, and fasten off, leaving a tail for sewing.
The Little Fish and String
Fish: Start with Beige yarn and the 2.5mm hook.
Round 1: 6 SC in a MR (6). (*)
Round 2: 6 INC (12). (*)
Rounds 3-4: SC in each stitch around (12). (*)
Round 5: Switch to Pink yarn: 12 SC. (*)
Round 6: Switch to White yarn: 12 SC. (*)
Round 7: Switch to Pink yarn: (4 SC, DEC) repeat 2 times (10). (*)
Round 8: Switch to White yarn: (3 SC, DEC) repeat 2 times (8). (*)
Round 9: Switch to Pink yarn: 8 SC. (*)
Round 10: Switch to White yarn: (2 SC, DEC) repeat 2 times (6). (*)
Round 11: Switch to Beige yarn: (SC, DEC) repeat 2 times (4). (*)
Round 12: 4 INC (8). (*)
Round 13: 8 INC (16). (*)
Round 14: Work 5 SC to reach the end, fold in half, and work 7 SC through both layers. Fasten off.
String: Using Beige yarn and the 2.5mm hook, CH 10. Fasten off, leaving a long tail for sewing.
Finishing
Assembly Guide
Now comes the fun part! Carefully sewing all your pieces together will bring your seagull to life. Use your tapestry needle and matching thread.
- The Hat: Sew the hat onto the head, attaching the first round of the hat to the last round of the body.
- The Beak: Sew the beak onto the face between rounds 37 and 38 of the body.
- The Eyes: Sew the beads/eyes between rounds 39 and 40 of the body. Ensure they are 5 SC apart.
- The Cheeks: Sew the orange cheeks between rounds 35 and 39. Position them one SC away from the beak.
- The Wings: Sew the wings onto the sides of the body between rounds 27 and 28.
- The Feet: Sew the feet to the bottom of the body at the center of the first round. Keep them about 9 SC apart.
- The Fish: Sew the fish string to the fish at Round 6. Then, sew the fish to the wing at the very first round of the wing.
Tips for Success
To ensure your seagull looks professional and polished, keep these tips in mind:
Mind Your Tension: For amigurumi, it is vital to use a hook slightly smaller than what the yarn suggests. This ensures your stitches are tight enough so that the stuffing doesn’t peek through the gaps.
Consistent Decreases: When working decreases, try to use the “invisible decrease” method (working into the front loops only) for a smoother, more seamless look.
Stuffing Strategy: Don’t overstuff! You want the body to be firm and hold its shape, but if you pack it too tightly, it can become lumpy and distort the beautiful shape you’ve worked so hard to create.
Symmetry is Key: When sewing on the eyes, cheeks, and wings, take a moment to step back and check that everything is symmetrical. This makes a huge difference in the character’s “expression.”
Happy hooking, and enjoy your new seaside friend!