Easy Sheep Blanket Block Knitting Pattern: A Cute Farmhouse Decor Tutorial
If you are looking for a cozy, charming project to add to your home decor collection, you have come to the right place. This Sheep Blanket Block is the perfect blend of rustic farmhouse style and beginner-friendly techniques. Whether you are making a single decorative piece for a nursery or knitting dozens of these blocks to join into a massive, heirloom-quality afghan, this pattern is designed to be accessible, fun, and incredibly rewarding.
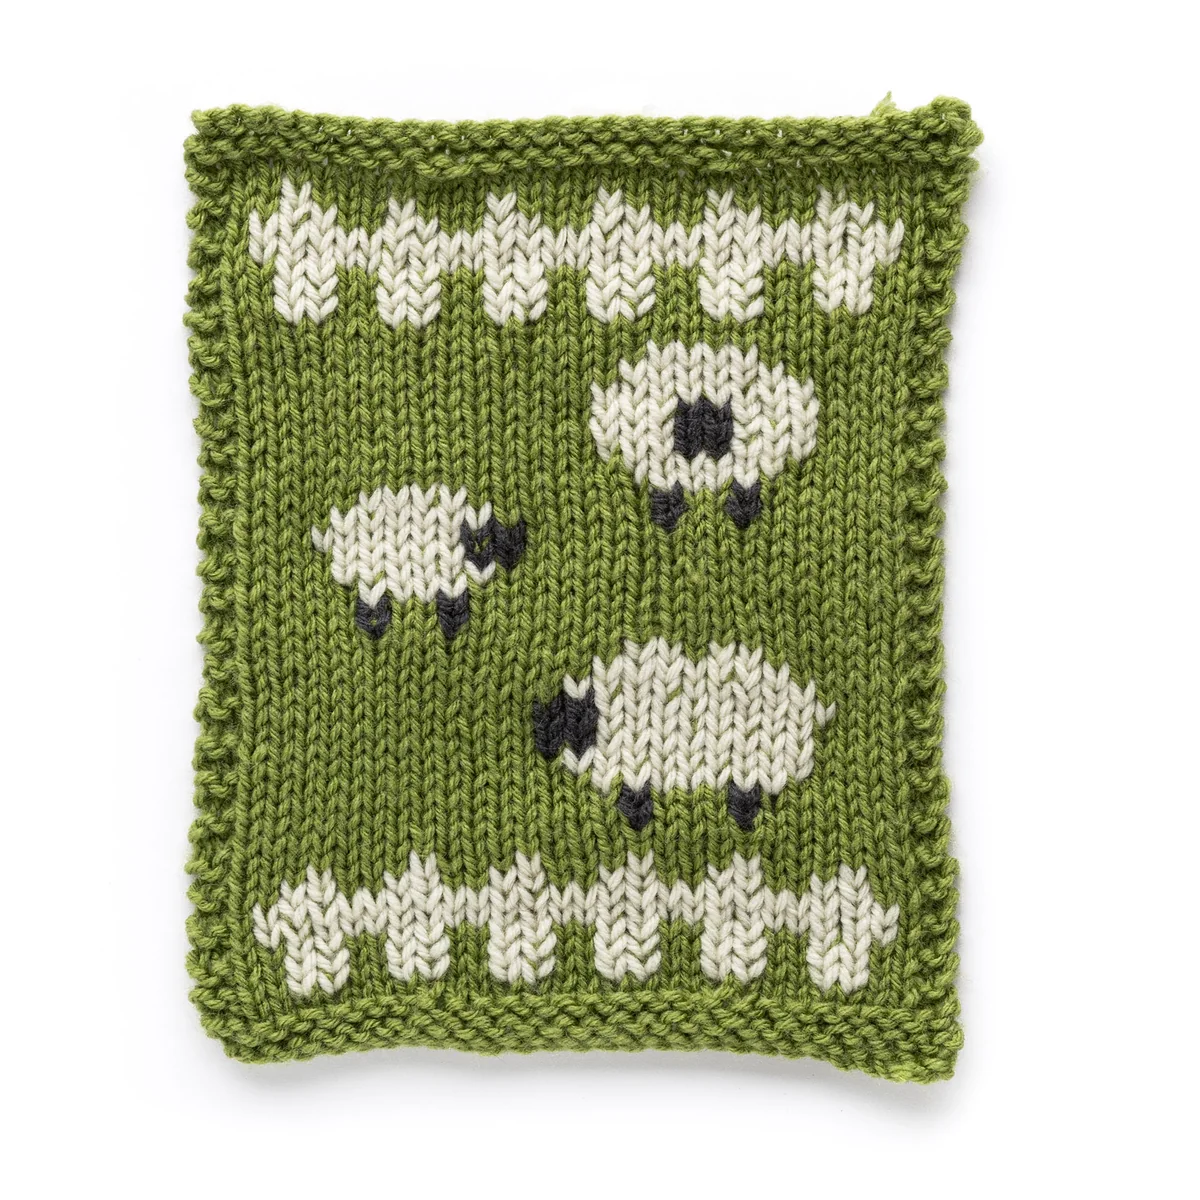
The beauty of this project lies in its simplicity. We start with a classic textured background and use a special embroidery technique called duplicate stitch to bring adorable little sheep and fluffy clouds to life. This method allows you to add intricate colorwork without the complexity of carrying multiple strands of yarn through every row. Grab your needles, pick out your favorite colors, and let’s get started!
Materials and Supplies
To ensure your blanket block turns out perfectly, it is important to use the right weight of yarn. This pattern is designed for medium weight (worsted) yarn, which provides great stitch definition for the sheep details.
- Main Color (MC): Approximately 48 yards of a medium weight yarn (the pattern suggests a soft green like Tea Leaf).
- Contrast Color A: Approximately 14 yards of a light color (such as Aran) for the sheep bodies and clouds.
- Contrast Color B: Approximately 6 yards of a dark color (such as Charcoal) for the sheep’s faces and legs.
- Knitting Needles: US Size 8 (5 mm) knitting needles.
- Yarn Needle: A blunt-tipped tapestry needle for weaving in ends and performing duplicate stitch.
- Scissors: To trim your yarn as you work.
Pro Tip: If you are planning to make a large blanket, try to buy all your Main Color yarn from the same dye lot to ensure the green background remains consistent across all your blocks!
Abbreviations
Before we dive into the instructions, let’s review the standard US knitting abbreviations used in this tutorial:
- Beg: Beginning
- Dec: Decreasing
- Inc: Increasing
- K: Knit
- P: Purl
- Pat: Pattern
- Rem: Remaining
- Rep: Repeat
- RS: Right side
- St(s): Stitch(es)
- Tog: Together
- WS: Wrong side
Pattern Gauge and Finished Size
Achieving the correct gauge is essential if you plan to join these blocks together later. If your stitches are too loose, your blanket will be much larger than intended; if they are too tight, the blanket may shrink.
Gauge: 17 stitches and 23 rows = 4 inches in stocking stitch.
Finished Size: Once completed, your block will measure approximately 7 inches wide by 9 inches tall.
Step-by-Step Knitting Instructions
We will begin by creating the bottom border using garter stitch, which provides a lovely, bumpy texture that prevents the edges of your block from curling. After the border, we will work the main body in stocking stitch.
The Bottom Border
With your Main Color (MC), cast on 28 stitches. We will now work 3 rows in garter stitch to create our base. Please note that the first row you work will be the wrong side (WS) of the fabric.
- Row 1 (WS): Knit all stitches. On this row, increase 2 stitches evenly across the row. You should now have 30 stitches on your needle.
- Row 2 (RS): Knit all stitches.
- Row 3 (WS): Knit 2 stitches, purl across to the last 2 stitches, and knit the remaining 2 stitches.
The Main Body (Stocking Stitch)
Now that our border is established, we will move into the main body of the block using stocking stitch. Stocking stitch is created by knitting on the right side and purling on the wrong side, resulting in a smooth “V” shaped texture.
Rows 4 through 49: Repeat the actions of the last two rows (Row 2 and Row 3). This means you will knit on the Right Side (RS) rows and purl on the Wrong Side (WS) rows. Continue this pattern until you have completed 49 rows total.
The Top Border
To finish the block, we will add a top garter stitch border. This involves decreasing our stitch count to bring the block back to its original width of 28 stitches.
- Final Border Row 1: Knit 2 rows in garter stitch (knit every stitch on both rows). On the first of these two rows, decrease 2 stitches evenly across the row. You should have 28 stitches remaining.
- Final Border Row 2: Knit all stitches.
Cast off your stitches knitwise on the wrong side. You now have your plain background block ready for decoration!
Adding the Details with Duplicate Stitch
This is where the magic happens! The sheep and clouds are not actually knitted into the fabric; instead, they are embroidered on top using a technique called Duplicate Stitch. This makes the pattern look incredibly professional while remaining easy for beginners.
Understanding the Chart
Refer to the pattern chart to guide your embroidery. The chart is a grid where each square represents a stitch on your knitted block.
- Contrast Color A (Light): Used for the sheep bodies and the clouds at the top and bottom.
- Contrast Color B (Dark): Used for the small details like the sheep’s faces and legs.
The chart is centered between your garter stitch borders, so ensure you align your stitches carefully.
Embroidery Tips
To achieve the best results, follow these simple tips:
- Work from Bottom to Top: Always start your embroidery at the lowest point of the design and work your way up. This helps you keep track of your position and prevents the yarn from getting tangled.
- Follow the “V”: Duplicate stitch works by mimicking the look of a knitted stitch. Bring your yarn up through the center of the “V” of the existing stitch, wrap it around the stitch, and pull it back down through the base. This ensures the embroidery looks like part of the knit fabric rather than sitting on top of it.
- Maintain Tension: Do not pull your embroidery yarn too tight, or you will cause the knitted fabric to pucker. Keep it just firm enough to cover the existing stitch.
Finishing Your Block
Once you have completed all the embroidery according to the chart, it is time to tidy up. Use your yarn needle to weave in all the loose ends on the back of the work. Try to weave the ends into the surrounding stitches so they are completely hidden.
For the best results, we highly recommend “blocking” your work. This involves lightly dampening the block and pinning it to its correct dimensions (7″ x 9″) on a flat surface, allowing it to dry completely. Blocking relaxes the stitches and gives your sheep a much cleaner, more professional appearance.
Expert Tips for Success
If this is your first time attempting colorwork or duplicate stitch, don’t worry! Here are a few extra tips to help you succeed:
Count Your Stitches: It is very easy to accidentally add or drop a stitch when working with borders. Periodically count your stitches to ensure you still have 28 or 30 as required by the pattern.
Use the Right Needle: When doing duplicate stitch, make sure your yarn needle is large enough to accommodate your yarn, but not so large that it creates big holes in your knitting.
Embrace Imperfection: If a sheep’s leg looks a little wonky, don’t sweat it! In handmade items, these small “perfect imperfections” are what give the piece its character and charm.
Happy knitting!