Crochet Butterfly Rattle Pattern: A Cute Amigurumi Tutorial
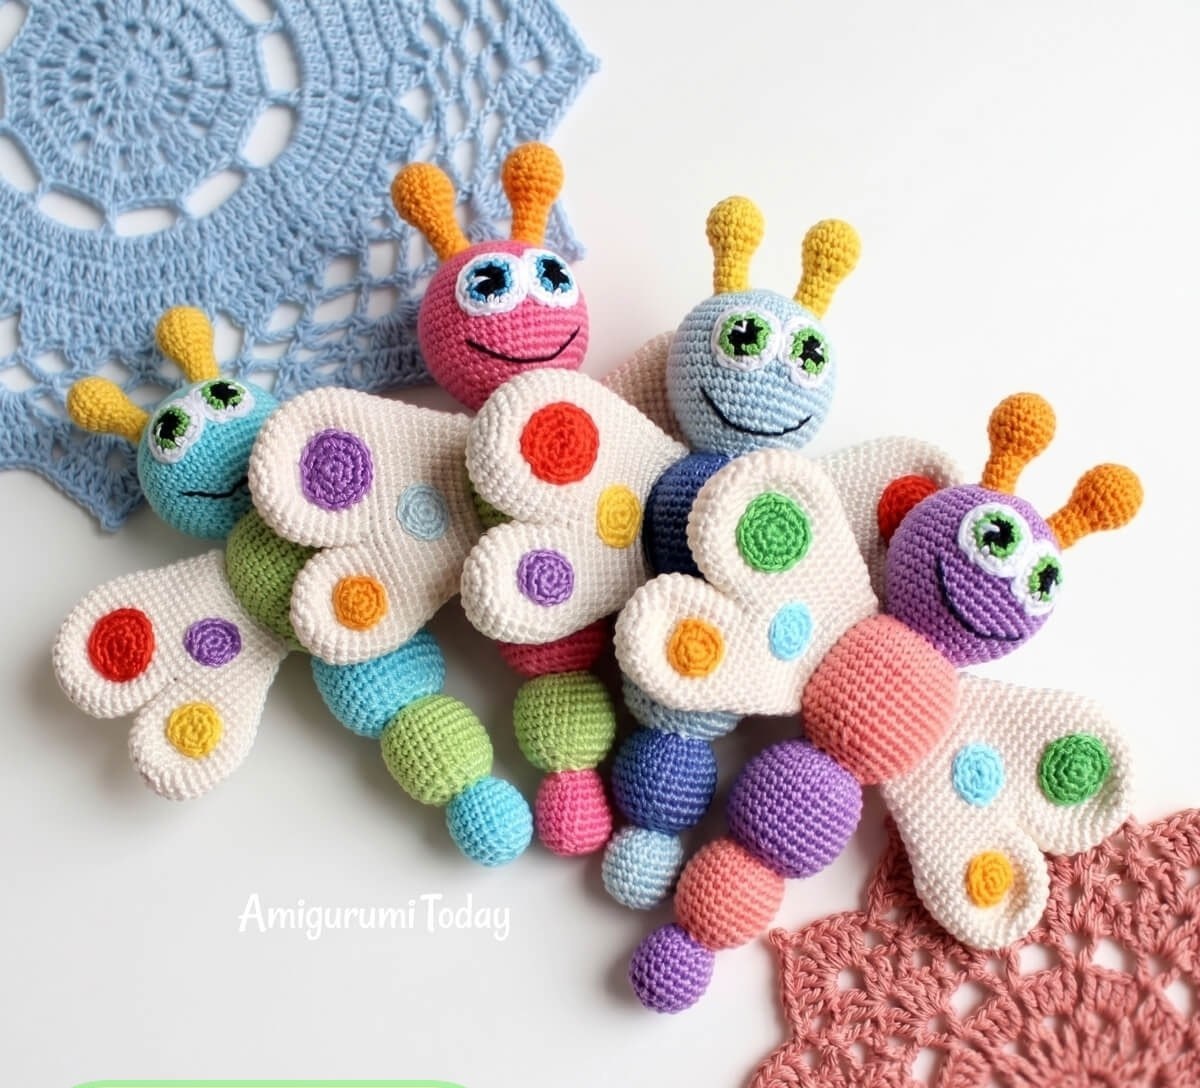
If you are looking for the perfect handmade baby shower gift or a charming addition to a nursery, this crochet butterfly rattle is an absolute delight. This colorful, segmented amigurumi butterfly is not only adorable but also serves as a wonderful sensory toy for little ones. With its bright colors and soft texture, it is designed to capture attention and provide endless entertainment.
This pattern is designed for intermediate crocheters who are comfortable working in a continuous spiral. The finished butterfly stands approximately 6.3 inches tall, making it a perfect size for small hands to grasp. Follow this detailed guide to create your very own whimsical flying friend!
Materials & Abbreviations
To ensure your butterfly turns out looking just like the pictures, gather the following supplies before you begin.
Materials Needed
- Yarn: Cotton yarn (such as Yarn Art Begonia, 100% mercerized cotton). You will need approximately six colors for the butterfly body and three different colors for the eyes.
- Rattle: One small plastic rattle (approximately 1.4 inches in diameter). You can also fill a small plastic bead or capsule with fine beads or granules to create a custom sound.
- Stuffing: High-quality polyester fiberfill (poly-fill).
- Antennae Fill: Two small juniper beads (about 0.3 inches) or extra poly-fill.
- Crochet Hook: 1.75 mm hook (a 2.0 mm hook may also be used).
- Tools: Scissors, a tapestry needle, tweezers, and a thin stick (like a chopstick) to help push stuffing into tight spaces.
Abbreviations (US Terms)
- ch: chain
- sc: single crochet
- sl st: slip stitch
- inc: increase (2 sc in the same stitch)
- dec: decrease (sc 2 stitches together)
- (……)*6: repeat the instructions inside the parentheses 6 times.
- Note: This pattern is worked in a continuous spiral. Do not join rounds with a slip stitch unless otherwise noted.
Step-by-Step Instructions
The Head (First Ball)
Start with your primary color for the head. Work in a continuous spiral.
Round 1: Ch 2, work 6 sc in the 2nd ch from the hook. (6)
Round 2: 6 inc. (12)
Round 3: (1 sc; inc) * 6. (18)
Round 4: (2 sc; inc) * 6. (24)
Round 5: (3 sc; inc) * 6. (30)
Round 6: (4 sc; inc) * 6. (36)
Round 7: (5 sc; inc) * 6. (42)
Rounds 8–17: Work 42 sc in each round for 10 rounds. (42)
Set the head aside for now. We will finish it after the eyes are made.
The Eyes
We will make two eyes using three different colors. You can customize these colors to your liking!
Round 1 (Black): Ch 2, work 6 sc in the 2nd ch from the hook. (6)
Round 2 (Color of choice – Blue, Green, or Brown): 6 inc. (12)
Round 3 (White): (1 sc; inc) * 6. (18)
Fasten off, leaving a long white tail for sewing the eyes to the head and for embroidering the highlights. Tie off the other ends neatly on the back. Repeat for the second eye.
Finishing the Head
Before closing the head, sew the eyes onto the head between rounds 7 and 14. Embroider small white highlights on the eyes for a “sparkle” effect. Insert the rattle into the head and stuff firmly with poly-fill.
Round 18: (5 sc; dec) * 6. (36)
Round 19: (4 sc; dec) * 6. (30)
Round 20: (3 sc; dec) * 6. (24)
Round 21: (2 sc; dec) * 6. (18)
Fasten off and weave in ends.
The Antennae (Make 2)
Round 1: Ch 2, work 6 sc in the 2nd ch from the hook. (6)
Round 2: 6 inc. (12)
Round 3: 1 sc, inc, 5 sc, inc, 4 sc. (14)
Rounds 4–6: 14 sc in each round. (14)
Insert a juniper bead or a small amount of poly-fill into the tip of the antennae.
Round 7: (1 sc; 3 dec) * 2. (8)
Rounds 8–12: 8 sc in each round. (8)
Leave a long tail for sewing to the head.
The Segmented Body
The body is made of five separate spheres connected together. Each sphere should be a different color to create a rainbow effect.
Sphere 1 (Head was Sphere 1, so we move to Sphere 2)
Round 22: (2 sc; inc) * 6. (24)
Round 23: (3 sc; inc) * 6. (30)
Round 24: (4 sc; inc) * 6. (36)
Rounds 25–32: 36 sc in each round. (36)
Round 33: (4 sc; dec) * 6. (30)
Round 34: (3 sc; dec) * 6. (24)
Round 35: (2 sc; dec) * 6. (18)
Round 36: 1 sc, dec, 4 sc, dec, 4 sc, dec, 3 sc. (15)
Sphere 2
Round 37: 1 sc, inc, 4 sc, inc, 4 sc, inc, 3 sc. (18)
Round 38: (2 sc; inc) * 6. (24)
Round 39: (3 sc; inc) * 6. (30)
Stuff Sphere 1 with poly-fill and connect it to Sphere 2.
Rounds 40–46: 30 sc in each round. (30)
Round 47: (2 sc; inc) * 6. (24)
Round 48: (2 sc; dec) * 6. (18)
Round 49: (1 sc; dec) * 6. (12)
Sphere 3
Round 50: (1 sc; inc) * 6. (18)
Round 51: (2 sc; inc) * 6. (24)
Rounds 52–57: 24 sc in each round. (24)
Stuff Sphere 2 with poly-fill.
Round 58: (2 sc; dec) * 6. (18)
Round 59: (1 sc; dec) * 6. (12)
Round 60: (dec; 2 sc) * 3. (9)
Sphere 4
Round 61: (inc; 2 sc) * 3. (12)
Round 62: (1 sc; inc) * 6. (18)
Rounds 63–65: 18 sc in each round. (18)
Stuff Sphere 3 with poly-fill.
Round 66: (1 sc; dec) * 6. (12)
Round 67: 6 dec. (6)
Stuff Sphere 4 with poly-fill and close the opening.
The Wings
The wings are made of two separate pieces that are joined together.
Wing Part 1
Round 1: Ch 2, work 6 sc in 2nd ch from hook. (6)
Round 2: 6 inc. (12)
Round 3: (1 sc; inc) * 6. (18)
Round 4: (2 sc; inc) * 6. (24)
Rounds 5–10: 24 sc in each round. (24)
Fasten off, leaving a small tail.
Wing Part 2
Round 1: Ch 2, work 6 sc in 2nd ch from hook. (6)
Round 2: 6 inc. (12)
Round 3: (1 sc; inc) * 6. (18)
Round 4: (2 sc; inc) * 6. (24)
Round 5: (3 sc; inc) * 6. (30)
Rounds 6–11: 30 sc in each round. (30)
Do NOT fasten off. We will join the pieces now.
Joining the Wings
Place the two pieces together as shown in your reference images.
Round 12: Work 13 sc, then dec (joining to Part 1); work 10 sc; dec (on the side of Part 2); work 9 sc; dec (joining to Part 2); work 12 sc. (This should result in 49 stitches plus 2 unworked stitches between the parts).
Round 13: dec, 23 sc, dec, 21 sc. (47 stitches plus 2 unworked stitches between).
Use the remaining yarn between the pieces to sew the two unworked stitches together to close the gap.
Wing Decoration (Spots)
You will crochet small circles to act as spots on the wings.
Small Spots (Make 4 – Blue and Purple):
Round 1: Ch 2, 6 sc in 2nd ch. (6)
Round 2: 6 inc. (12). Fasten off, leaving a tail for sewing.
Larger Spots (Make 2 – Yellow):
Round 1: Ch 2, 6 sc in 2nd ch. (6)
Round 2: 6 inc. (12)
Round 3: (1 sc; inc) * 6. (18). Fasten off, leaving a tail for sewing.
Sew these spots onto the wings before finishing the wing edges.
Finishing the Wings
Rounds 14–23: Work 27 sc in each round, but include one dec on each side of the row. (27)
Fasten off, leaving a long tail for sewing to the body.
Finishing
The Face
Using black yarn and a tapestry needle, embroider a small, happy smile onto the head, located below the eyes.
Final Assembly
- Attach Antennae: Sew the antennae to the top of the head.
- Attach Wings: Sew the wings to the sides of the first body segment (the head).
- Assemble Body: Sew the five spheres together in order, ensuring they are connected securely.
- Final Check: Make sure all ends are woven in and the rattle is securely positioned inside the head.
Tips
- The Crinkle Effect: If you want your butterfly wings to make a fun crinkling sound, insert a few small pieces of candy wrappers or flower packaging inside the wings before you sew them shut!
- Color Play: Don’t be afraid to experiment. This pattern looks stunning with a wide variety of color combinations.
- Tension: Since this is an amigurumi project, keep your stitches tight to ensure the stuffing doesn’t peek through.