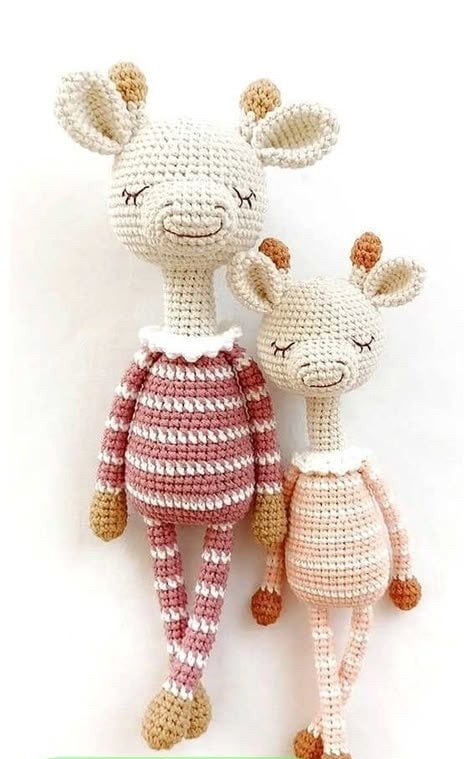
Free Amigurumi Giraffe Crochet Pattern: Create a Cute Handmade Toy
Are you looking for your next adorable crochet project? Whether you want to make a heartwarming baby shower gift, decorate a nursery, or simply add a cute new character to your plushie collection, this free amigurumi giraffe crochet pattern is exactly what you need. With its sweet sleeping expression, long elegant neck, and charming little outfit, this crochet giraffe will bring a smile to anyone’s face.
This tutorial is written using standard US crochet terminology and is perfect for crocheters who have mastered the basic stitches and want to try their hand at amigurumi. The head, neck, and body are worked as one continuous piece, which means less sewing and a much sturdier toy! Grab your hook, choose your favorite yarn colors, and let’s get crafting.
Materials & Abbreviations
Supplies Needed
- Yarn: Sport weight (Category 2) or DK weight (Category 3) cotton/acrylic blend yarn (such as YarnArt Jeans).
- Color A: Beige or Cream (approx. 55 yards) for the head, muzzle, ears, and neck.
- Color B: Orange (approx. 30 yards) for the feet, hands, and horn tips.
- Color C: Pink (approx. 40 yards) for the shirt and arms.
- Color D: Green (approx. 40 yards) for the pants and legs.
- Crochet Hook: 2.5 mm (US B-1 or C-2) crochet hook (or size needed to obtain tight, gap-free stitches).
- Fiberfill: High-quality polyester stuffing.
- Needles & Tools: Tapestry needle for assembly, scissors, and a stitch marker to keep track of your rounds.
- Embroidery Thread: Black or dark brown embroidery floss for the sleeping eyes and eyelashes, and pink thread for the cheeks.
Finished Size
Using sport-weight yarn and a 2.5 mm hook, your finished giraffe will stand approximately 10 to 12 inches tall. You can easily scale this pattern up or down by using thicker or thinner yarn with a matching hook.
Crochet Abbreviations (US Terms)
- ch: chain
- st(s): stitch(es)
- sc: single crochet
- inc: single crochet increase (work 2 single crochets in the same stitch)
- dec: single crochet decrease (invisible decrease recommended)
- MR: magic ring
- […]: repeat instructions within brackets the number of times indicated
- (num): the total number of stitches at the end of the round
Step-by-Step Instructions
Head, Neck, and Body
The main body of our giraffe is worked from the top of the head down to the bottom of the body in one seamless piece. Remember to stuff the piece firmly as you progress, paying extra attention to the neck area so the head remains upright.
Start with Color A (Beige/Cream):
- Round 1: Work 6 sc into a magic ring. (6)
- Round 2: [inc] x 6. (12)
- Round 3: [sc, inc] x 6. (18)
- Round 4: [2 sc, inc] x 6. (24)
- Round 5: [3 sc, inc] x 6. (30)
- Round 6: [4 sc, inc] x 6. (36)
- Rounds 7–8: sc in each st around. (36 for 2 rounds)
- Round 9: [5 sc, inc] x 6. (42)
- Rounds 10–12: sc in each st around. (42 for 3 rounds)
- Round 13: 3 sc, [2 sc, inc] x 12, 3 sc. (54)
- Rounds 14–18: sc in each st around. (54 for 5 rounds)
- Round 19: [7 sc, dec] x 6. (48)
- Round 20: [6 sc, dec] x 6. (42)
- Round 21: [5 sc, dec] x 6. (36)
- Round 22: [4 sc, dec] x 6. (30)
- Round 23: [3 sc, dec] x 6. (24)
- Round 24: [2 sc, dec] x 6. (18)
- Round 25: [sc, dec] x 6. (12)
Continuing to the Neck:
- Rounds 26–33: sc in each st around. (12 for 8 rounds)
Continuing to the Body (Change to Color C – Pink):
- Round 34: [sc, inc] x 6. (18)
- Rounds 35–36: sc in each st around. (18 for 2 rounds)
- Round 37: [2 sc, inc] x 6. (24)
- Rounds 38–39: sc in each st around. (24 for 2 rounds)
- Round 40: [3 sc, inc] x 6. (30)
- Round 41: [4 sc, inc] x 6. (36)
- Rounds 42–48: sc in each st around. (36 for 7 rounds)
- Round 49: [5 sc, inc] x 6. (42)
- Rounds 50–53: sc in each st around. (42 for 4 rounds)
- Round 54: Change to Color D (Green) for the pants. sc in each st around. (42)
- Rounds 55–59: sc in each st around. (42 for 5 rounds)
- Round 60: [5 sc, dec] x 6. (36)
- Round 61: [4 sc, dec] x 6. (30)
- Round 62: [3 sc, dec] x 6. (24)
- Round 63: [2 sc, dec] x 6. (18)
- Round 64: [sc, dec] x 6. (12)
- Round 65: [dec] x 6. (6)
Fasten off, leaving a tail to weave through the front loops of the remaining 6 stitches. Pull tight to close the opening, and weave in your ends.
Horns (Make 2)
These little horns sit on top of the giraffe’s head. We will start with the contrasting orange color and switch to the body color.
Start with Color B (Orange):
- Round 1: Work 6 sc into a magic ring. (6)
- Round 2: [inc] x 6. (12)
- Round 3: [2 sc, inc] x 4. (16)
- Rounds 4–6: sc in each st around. (16 for 3 rounds)
- Round 7: [dec] x 8. (8)
- Round 8: Change to Color A (Beige). sc in each st around. (8)
- Rounds 9–12: sc in each st around. (8 for 4 rounds)
Fasten off, leaving a long tail for sewing. Stuff the bulbous orange part of the horns lightly with fiberfill.
Arms (Make 2)
The arms feature orange hands and pink sleeves. Stuff only the bottom half of the arms so that they lay flat against the body.
Start with Color B (Orange):
- Round 1: Work 6 sc into a magic ring. (6)
- Round 2: [inc] x 6. (12)
- Round 3: [2 sc, inc] x 4. (16)
- Rounds 4–5: sc in each st around. (16 for 2 rounds)
- Round 6: [2 sc, dec] x 4. (12)
- Round 7: [2 sc, dec] x 3. (9)
- Round 8: Change to Color C (Pink). sc in each st around. (9)
- Rounds 9–21: sc in each st around. (9 for 13 rounds)
Fasten off, leaving a long tail for sewing. Flatten the top opening of the arms and sew them shut before attaching them to the body.
Legs (Make 2)
The legs are made similarly to the arms, but we will change to the pants color instead of the shirt color.
Start with Color B (Orange):
- Round 1: Work 6 sc into a magic ring. (6)
- Round 2: [inc] x 6. (12)
- Round 3: [2 sc, inc] x 4. (16)
- Rounds 4–5: sc in each st around. (16 for 2 rounds)
- Round 6: [2 sc, dec] x 4. (12)
- Round 7: [2 sc, dec] x 3. (9)
- Round 8: Change to Color D (Green). sc in each st around. (9)
- Rounds 9–21: sc in each st around. (9 for 13 rounds)
Fasten off, leaving a long tail for sewing. Fill the bottom of the feet with stuffing, keeping the upper legs lightly stuffed or flat so they sit nicely.
Ears (Make 2)
These cute pointed ears do not need to be stuffed.
Use Color A (Beige):
- Round 1: Work 6 sc into a magic ring. (6)
- Round 2: [inc] x 6. (12)
- Round 3: [sc, inc] x 6. (18)
- Rounds 4–6: sc in each st around. (18 for 3 rounds)
- Round 7: [sc, dec] x 6. (12)
- Rounds 8–11: sc in each st around. (12 for 4 rounds)
Fasten off, leaving a long tail. Pinch the bottom base of the ear in half and sew a few stitches across the bottom to secure the folded shape before attaching to the head.
Muzzle
The muzzle is crocheted in an oval shape around a starting foundation chain rather than a classic circular magic ring.
Use Color A (Beige):
- Round 1: ch 6.
- Round 2: Starting in the 2nd ch from the hook, work: 1 inc, sc in the next 3 chains, work 3 sc in the very last chain (this turns your work to the opposite side of the chain). Working back along the bottom loop of the chain: sc in the next 4 chains. (12)
- Round 3: [inc] x 2, sc in the next 3 stitches, [inc] x 3, sc in the next 3 stitches, inc in the last stitch. (18)
- Round 4: sc in the next stitch, inc, sc in the next 3 stitches, [sc, inc] x 3, sc in the next 3 stitches, [sc, inc] x 2. (24)
- Rounds 5–6: sc in each st around. (24 for 2 rounds)
Fasten off, leaving a long tail to sew the muzzle to the head.
Finishing Your Giraffe
Now that all of your elements are crocheted, it is time to bring your giraffe to life! Follow these steps for a clean and professional look:
- Sew on the Muzzle: Pin the muzzle to the lower half of the head, centering it between rounds 13 and 20. Sew it on using the whip stitch, adding a bit of fiberfill stuffing inside the muzzle just before you close the seam to give it a nice 3D shape.
- Embroider the Face: Using your black embroidery thread, sew a curved line for each sleeping eye just above the muzzle. Add a couple of small, delicate eyelashes at the outer corners of the eyes. Use a soft pink thread or a bit of real cosmetic blush to create sweet pink cheeks just under the eyes.
- Attach the Horns and Ears: Position the horns on top of the head (around rounds 3–4). Pin them in place and sew. Place the ears slightly below the horns (around rounds 6–7), angling them slightly downward. Sew them securely.
- Attach the Arms and Legs: Sew the arms to the sides of the body right where the shirt starts (around round 35). Sew the legs to the bottom of the body (around round 60) so that your giraffe can sit comfortably.
- Optional Suspenders: To give your giraffe a cute overall-style look, join Color D (Green) yarn to the top of the pants in the back, chain about 20 to 22 stitches (or enough to comfortably drape over the shoulder to the front), and join to the front of the waist. Repeat for the second strap!
Tips for Perfect Amigurumi
- Invisible Decrease: To prevent gaps in your amigurumi where stuffing might show through, use the “invisible decrease” method. Instead of inserting your hook through both loops, insert it only into the front loops of the next two stitches, yarn over, pull through both front loops, yarn over, and pull through the remaining loops.
- Tension is Key: Ensure your stitches are tight enough that the polyester stuffing won’t peek through, but not so tight that your hands hurt. If you see gaps, try dropping down a hook size.
- Keep the Neck Stiff: Because a giraffe has a long neck and a relatively large head, the neck needs to be packed very firmly. Use the back of a crochet hook or a chopstick to push stuffing deep into the neck cavity. For extra support, you can insert a rolled piece of sturdy felt or a plastic safe-toy skeleton join inside the neck before closing.