Easy Knit Diamond Tuck Block Pattern: A Textured Beginner Tutorial
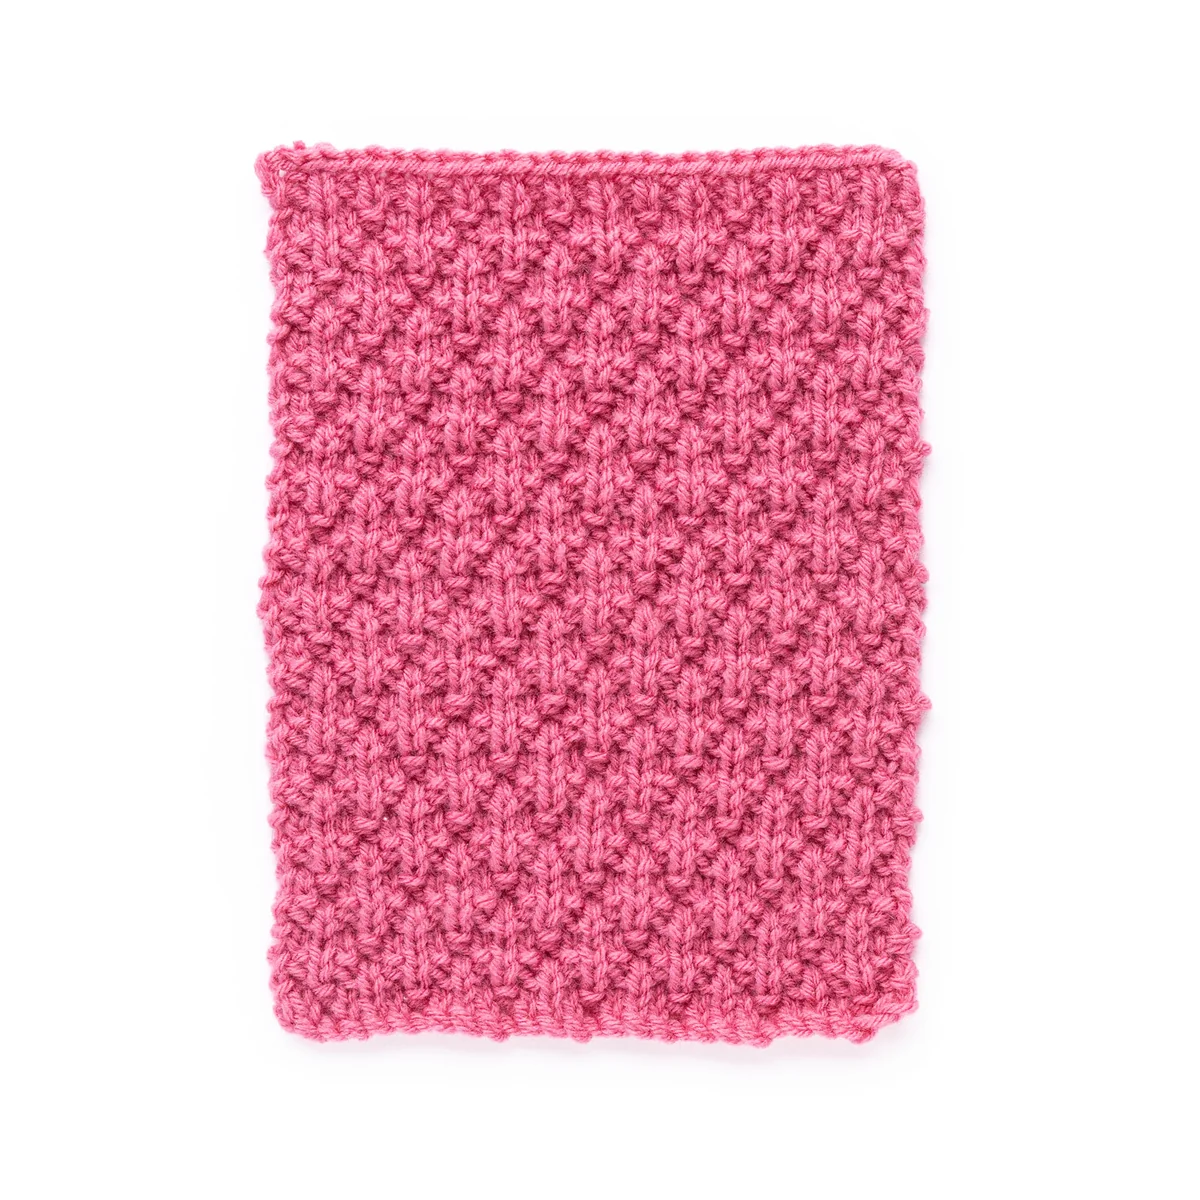
There is something incredibly satisfying about watching a simple set of stitches transform into a beautiful, textured fabric. If you are looking for a project that combines ease of use with a sophisticated, high-end look, the Diamond Tuck Block is the perfect choice. This pattern creates a lovely, rhythmic texture that looks much more complicated than it actually is, making it an absolute favorite for beginner and intermediate knitters alike.
Textured blocks like this one are incredibly versatile. Because they are relatively small, they serve as the perfect building blocks for larger, cozy projects. You can knit multiple blocks in various colors to create a stunning, modern patchwork blanket, or use them to add dimension to throw pillows, floor poufs, or even a decorative wall hanging. In this tutorial, we will walk you through everything you need to know to master this diamond-textured stitch.
Materials & Abbreviations
Before we pick up our needles, let’s make sure you have everything you need. Because this pattern relies on a specific texture, having the right weight of yarn and the correct needle size is key to achieving that professional “diamond” look.
What You Will Need
- Yarn: Medium weight yarn (also known as Category 4). For this project, a standard worsted weight yarn works beautifully. You will need approximately 54 yards per block.
- Knitting Needles: US size 8 (5 mm) knitting needles. Using the correct needle size ensures your gauge stays consistent, which is vital for the pattern’s texture.
- Yarn Needle: A blunt-tipped yarn needle to weave in your ends once the project is complete.
- Measuring Tape: To check your progress and ensure your block reaches the desired dimensions.
Understanding the Gauge
Gauge is the number of stitches and rows per inch of knitted fabric. For this pattern, your goal is to achieve 17 stitches and 23 rows = 4 inches in stocking stitch. If your block looks too loose or too tight, try adjusting your needle size. A consistent gauge ensures that if you make multiple blocks for a blanket, they will all fit together perfectly!
Pattern Abbreviations
To help you navigate the instructions, here is a quick cheat sheet of the terms we will be using. These are standard US knitting terms:
- Approx: Approximately
- K: Knit
- P: Purl
- Pat: Pattern
- Rep: Repeat
- RS: Right Side (the “front” of your work)
- WS: Wrong Side (the “back” of your work)
- St(s): Stitch(es)
Step-by-Step Instructions
This pattern is designed to be worked in a continuous 8-row repeat. Once you learn the rhythm of these eight rows, you will be able to knit as many blocks as you like!
Getting Started
Begin by casting on 29 stitches on your US size 8 needles. Once you have your foundation chain of stitches, you are ready to begin the first row.
The 8-Row Texture Repeat
Follow these steps carefully. Pay close attention to the asterisks (*); these indicate a sequence that you will repeat across the row.
Row 1 (RS): This is your Right Side row. *Knit 2, Purl 1, Knit 1. Repeat everything inside the asterisks from the beginning of the row until you reach the very last stitch. Knit the final stitch.
Row 2 (WS): This is your Wrong Side row. *Purl 2, Knit 1, Purl 1. Repeat from the asterisks until you reach the last stitch. Purl the final stitch.
Row 3: *Knit 1, Purl 1. Repeat from the asterisks until you reach the last stitch. Knit the final stitch.
Row 4: *Purl 1, Knit 1. Repeat from the asterisks until you reach the last stitch. Purl the final stitch.
Row 5: *Purl 1, Knit 3. Repeat from the asterisks until you reach the last stitch. Purl the final stitch.
Row 6: *Knit 1, Purl 3. Repeat from the asterisks until you reach the last stitch. Knit the final stitch.
Row 7: *Knit 1, Purl 1. Repeat from the asterisks until you reach the last stitch. Knit the final stitch.
Row 8: *Purl 1, Knit 1. Repeat from the asterisks until you reach the last stitch. Purl the final stitch.
Continuing the Pattern
After you finish Row 8, you have completed one full pattern repeat. To continue growing your block, simply repeat Rows 1 through 8. Continue this cycle until your block measures approximately 9 inches long. Make sure your final repeat ends on a Wrong Side (WS) row to ensure the texture looks consistent on both sides.
Finishing
Once your block has reached the desired 9-inch length, it is time to secure your hard work!
Casting Off
To finish the edge, cast off your stitches knitwise. This means you will treat the cast-off process as if you are knitting, which creates a tidy, slightly stretchy edge that is perfect for the Right Side (RS) of your work.
Weaving in Ends
Using your yarn needle, thread the remaining tails of your yarn through the fabric and weave them securely through the back of the stitches. This prevents the block from unraveling and gives it a clean, professional finish. For extra security, you can “duplicate stitch” the yarn tail into the existing stitches to hide it completely.
Tips for Success
To ensure your Diamond Tuck Block turns out looking its absolute best, keep these expert tips in mind:
Mind Your Tension
Because this pattern uses frequent shifts between knitting and purling to create the “tuck” effect, it is easy to accidentally pull the yarn too tight. If you find your fabric is becoming puckered, try to relax your hands and maintain a consistent, medium tension. If you are a beginner, don’t worry—your tension will naturally even out as you practice the repeat!
The Power of Blocking
Blocking is the process of wetting your finished knitted piece and pinning it to specific dimensions to dry. For textured patterns like the Diamond Tuck, blocking is highly recommended. It “sets” the stitches, helps the diamond shapes pop, and evens out any slight inconsistencies in your gauge. This simple step is the difference between a “homemade” looking project and a “handmade professional” one.
Yarn Choice Matters
While this pattern works with many types of yarn, a smooth, multi-ply worsted weight yarn will show off the diamond texture most clearly. Avoid extremely “fuzzy” or “eyelash” yarns, as the texture of the yarn might hide the beautiful geometric stitches you’ve worked so hard to create.
Get Creative!
Don’t stop at just one block! Try using different shades of the same color family to create a gradient effect, or use contrasting colors for a bold, modern look. These blocks are the perfect way to use up beautiful scraps of yarn from previous projects.