Adorable Crochet Bunny Pattern: A Step-by-Step Amigurumi Tutorial
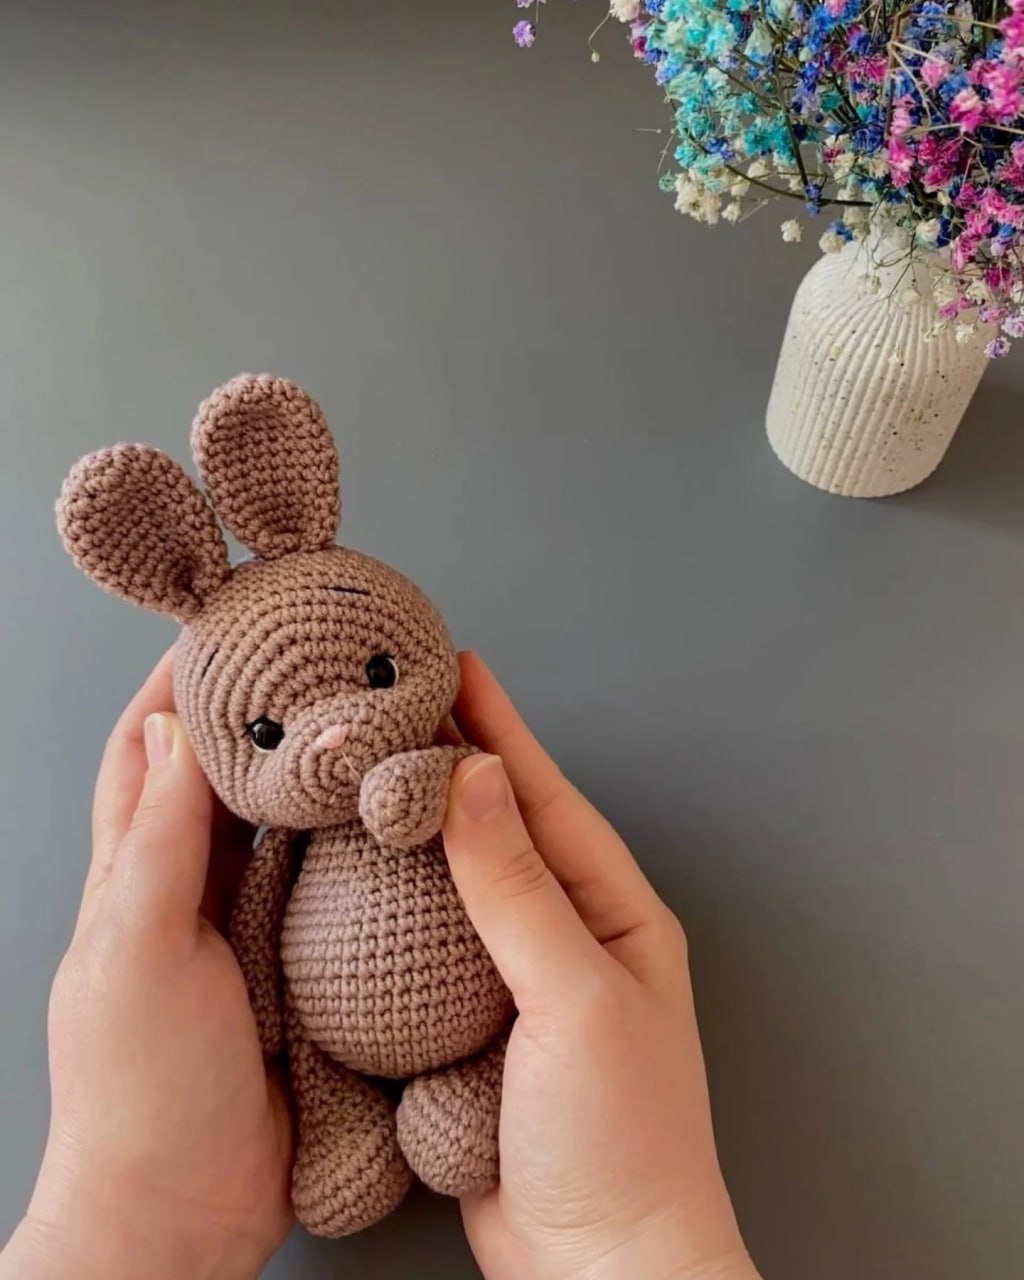
Looking for a cozy, cuddly project to add to your crochet collection? This adorable amigurumi bunny is the perfect companion for beginners and experienced crocheters alike. With its sweet expression and soft shape, this bunny makes a wonderful handmade gift, a nursery decoration, or a cute desk buddy to keep you company while you work.
In this tutorial, we will walk you through the process of creating this little bunny from scratch. We will use basic amigurumi techniques, and I have broken down the instructions into easy-to-follow steps. Whether you are looking to practice your shaping or want to create a professional-looking plushie, this pattern is designed to give you a flawless result every time.
Materials & Abbreviations
Before we dive into the stitches, let’s make sure you have everything you need. To achieve the look in the photos, I recommend using a sport-weight cotton or cotton-blend yarn for a smooth, defined finish.
Supplies Needed
- Yarn: Approximately 100-150 yards of sport-weight yarn in your choice of color (a soft mauve or tan works beautifully).
- Crochet Hook: 2mm hook (or a size that prevents your stuffing from showing through).
- Eyes: 8mm black safety eyes.
- Stuffing: High-quality polyester fiberfill or poly-fill.
- Tools: Stitch marker, yarn needle with a large eye, embroidery scissors, and sewing pins.
- Embroidery Thread: Black thread for the eyebrows and eyelashes, and a light pink thread for the nose.
US Crochet Terms & Abbreviations
- MR: Magic Ring (or Magic Circle)
- sc: Single crochet
- inc: Increase (2 sc in one stitch)
- dec: Decrease (sc 2 stitches together)
- (…) * x: Repeat the sequence inside the parentheses the specified number of times.
- st(s): Stitch(es)
Step-by-Step Instructions
The Head
The head is worked in a continuous spiral. Do not join rounds unless specified. Use your stitch marker to keep track of the start of each round.
- Rnd 1: 6 sc in MR (6)
- Rnd 2: inc * 6 (12)
- Rnd 3: (1 sc, inc) * 6 (18)
- Rnd 4: (2 sc, inc) * 6 (24)
- Rnd 5: sc in each st around (24)
- Rnd 6: sc in each st around (24)
- Rnd 7: 9 sc, inc * 6, 9 sc (30)
- Rnd 8: 9 sc, (1 sc, inc) * 6, 9 sc (36)
- Rnd 9: (5 sc, inc) * 6 (42)
- Rnd 10: (6 sc, inc) * 6 (48)
- Rnd 11: (7 sc, inc) * 6 (54)
- Rnd 12-21: sc in each st around for 10 rounds (54)
Eye Placement: Insert the 8mm safety eyes between rounds 8 and 9. They should be approximately 1.2 inches (about 7-8 stitches) apart to give the bunny its cute, wide-eyed look.
- Rnd 22: (7 sc, dec) * 6 (48)
- Rnd 23: (6 sc, dec) * 6 (42)
- Rnd 24: (5 sc, dec) * 6 (36)
- Rnd 25: (4 sc, dec) * 6 (30)
- Rnd 26: (3 sc, dec) * 6 (24)
Begin stuffing the head firmly with fiberfill.
- Rnd 27: (2 sc, dec) * 6 (18)
- Rnd 28: (1 sc, dec) * 6 (12)
Finish stuffing the head completely. For the final round, perform 5 decreases (dec * 5) and fasten off, leaving a tail to sew the opening closed.
The Ears (Make 2)
- Rnd 1: 6 sc in MR (6)
- Rnd 2: inc * 6 (12)
- Rnd 3: (1 sc, inc) * 6 (18)
- Rnd 4-8: sc in each st around for 5 rounds (18)
- Rnd 9: (4 sc, dec) * 3 (15)
- Rnd 10-13: sc in each st around for 4 rounds (15)
Fasten off. To shape the ears, fold the piece in half and sew the bottom edge closed. Fold it once more to create the signature bunny ear shape and sew along the edge as needed.
The Body
- Rnd 1: 6 sc in MR (6)
- Rnd 2: inc * 6 (12)
- Rnd 3: (1 sc, inc) * 6 (18)
- Rnd 4: (2 sc, inc) * 6 (24)
- Rnd 5: (3 sc, inc) * 6 (30)
- Rnd 6: (4 sc, inc) * 6 (36)
- Rnd 7: (5 sc, inc) * 6 (42)
- Rnd 8: (6 sc, inc) * 6 (48)
- Rnd 9-16: sc in each st around for 8 rounds (48)
- Rnd 17: (6 sc, dec) * 6 (42)
- Rnd 18: (5 sc, dec) * 6 (36)
- Rnd 19: (4 sc, dec) * 6 (30)
- Rnd 20-24: sc in each st around for 5 rounds (30)
- Rnd 25: (3 sc, dec) * 6 (24)
- Rnd 26: (2 sc, dec) * 6 (18)
- Rnd 27: (1 sc, dec) * 6 (12)
- Rnd 28: dec * 5 (7)
Stuff the body firmly as you go. Fasten off and sew the hole closed.
The Arms (Make 2)
- Rnd 1: 6 sc in MR (6)
- Rnd 2: inc * 6 (12)
- Rnd 3-6: sc in each st around for 4 rounds (12)
- Rnd 7: (4 sc, dec) * 2 (10)
- Rnd 8-19: sc in each st around for 12 rounds (10)
Fold the arm in half and sc across both layers to close the end. Stuff the arms very lightly so they remain flexible.
The Legs (Make 2)
- Rnd 1: 6 sc in MR (6)
- Rnd 2: inc * 6 (12)
- Rnd 3: (1 sc, inc) * 6 (18)
- Rnd 4: (2 sc, inc) * 6 (24)
- Rnd 5: (3 sc, inc) * 6 (30)
- Rnd 6-7: sc in each st around for 2 rounds (30)
- Rnd 8: 9 sc, dec * 6, 9 sc (24)
- Rnd 9: 9 sc, dec * 3, 9 sc (21)
- Rnd 10: 7 sc, dec * 4, 6 sc (17)
- Rnd 11: 7 sc, dec * 2, 6 sc (15)
- Rnd 12: 7 sc, dec * 1, 6 sc (14)
- Rnd 13-18: sc in each st around for 6 rounds (14)
Work 2 additional sc into the final round. Stuff only the bottom portion of the leg to create a flat foot. Fold the leg in half and sc across both layers to close.
The Tail
- Rnd 1: 6 sc in MR (6)
- Rnd 2: inc * 6 (12)
Fasten off, leaving a long tail for sewing.
Finishing & Assembly
Now comes the magic part where your bunny comes to life! Follow these steps to assemble your pieces:
Facial Details
To give your bunny more expression, use your yarn needle to gently pull the safety eyes inward toward the center of the head. This creates a small indentation that makes the face look more three-dimensional. Embroider small, curved eyebrows and delicate eyelashes using black thread. Finally, use pink thread to stitch a small V-shape for the nose right between the eyes.
Sewing the Parts
- Body and Head: Sew the head securely to the top of the body.
- Ears: Attach the ears to the center top of the head, positioning them between rounds 14 and 15.
- Limbs: Sew the arms to the upper sides of the body and the legs to the bottom, ensuring the bunny can sit upright.
- Tail: Sew the small pom-pom tail to the back of the body.
Tips for a Perfect Bunny
To make your amigurumi bunny look professional, keep these tips in mind:
- Tension is Key: Keep your stitches tight. If you see gaps where the stuffing is peeking through, try dropping down a hook size.
- Use a Stitch Marker: Because we are working in spirals, it is very easy to lose the start of the round. A scrap piece of contrasting yarn works great as a marker.
- Symmetrical Sewing: Use sewing pins to mark exactly where the arms and legs will go before you start sewing. This ensures your bunny isn’t lopsided.
- Customization: Feel free to experiment with colors! A pastel pink or a creamy white can change the whole vibe of the toy.