Adorable Crochet Rabbit Pattern: Step-by-Step Amigurumi Bunny Tutorial
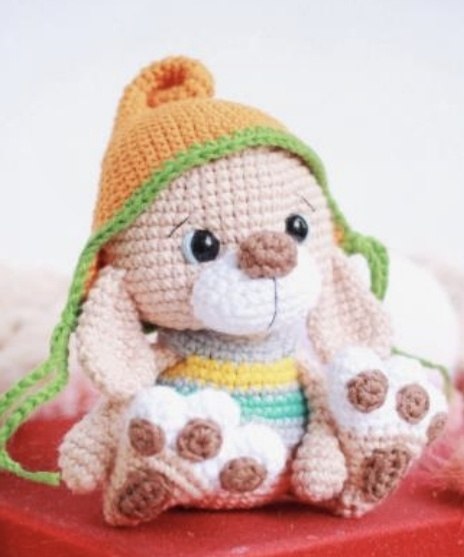
If you are looking for a charming new project to add to your amigurumi collection, this little crochet rabbit is the perfect choice. With its sweet expression and cozy little outfit, this bunny is a wonderful project for intermediate beginners. In this detailed guide, we will walk you through every stitch to create your own cuddly companion.
The finished rabbit stands approximately 4.3 inches tall, making it a perfect size for a desk buddy or a handmade gift. Let’s dive into the materials and instructions!
Materials & Abbreviations
Materials Needed
- Yarn: 100% Cotton sport weight yarn (such as Alize Bella). You will need small amounts of the following colors:
- Main Color (Beige/Tan)
- White
- Brown
- Grey
- Yellow
- Turquoise
- Blue
- Orange
- Green
- Crochet Hook: 2.3 mm
- Eyes: 8 mm safety eyes
- Stuffing: Polyester fiberfill
- Tools: Sewing needle, embroidery thread (black, white, brown), pins, and scissors.
Abbreviations (US Terms)
- ch: chain
- sc: single crochet
- inc: increase (2 sc in one stitch)
- dec: decrease (sc 2 together)
- sl st: slip stitch
- MR: magic ring
- st(s): stitch(es)
- R: round
Step-by-Step Instructions
The Arms (Make 2)
Using the main color:
- R1: Ch 2, 6 sc in 2nd ch from hook (6)
- R2: inc x 6 (12)
- R3: (3 sc, inc) x 3 (15)
- R4: 15 sc (15)
- R5: (3 sc, dec) x 3 (12)
- R6: (2 sc, dec) x 3 (9). Stuff the hand lightly.
- R7: (1 sc, dec) x 2, 3 sc (7)
- R8-15: 7 sc for 8 rounds (7)
- R16: dec x 3. Sl st and fasten off.
The Paws & Feet (Make 2)
We begin by creating the individual toes in white yarn.
Toe #1
- R1: Ch 2, 6 sc in 2nd ch (6)
- R2: (1 sc, 2 inc) x 2 (10)
- R3-4: 10 sc. Sl st and fasten off.
Toe #2
- R1: Ch 2, 6 sc in 2nd ch (6)
- R2: (2 sc, inc) x 2 (8)
- R3: 8 sc. Sl st and fasten off.
Toe #3
- R1: Ch 2, 6 sc in 2nd ch (6)
- R2: inc, 5 sc (7). Do not fasten off.
Joining the Toes
Working in white, join the three toes together into one paw:
- R1: Work 4 sc around Toe #2, 10 sc around Toe #1, 4 sc around Toe #2, and 7 sc around Toe #3 (25)
- R2: 25 sc (25)
- R3: (dec, 2 sc) x 2, dec x 2, (2 sc, dec) x 3, 1 sc (18)
Change to main color:
- R4-5: 18 sc for 2 rounds (18). Stuff the paw.
- R6: (1 sc, dec) x 6 (12)
- R7-8: 12 sc for 2 rounds (12)
- R9: (2 sc, dec) x 3 (9)
- R10: 9 sc (9)
- R11: (1 sc, dec) x 3 (6)
- R12: dec x 3. Sl st and fasten off.
The Leg Bases (Make 2)
Using main color:
- R1: Ch 2, 6 sc in 2nd ch (6)
- R2: (inc, 2 sc) x 2 (8)
- R3: (inc, 3 sc) x 2 (10)
- R4: (inc, 4 sc) x 2 (12)
- R5: 12 sc (12)
- R6: (inc, 3 sc) x 3 (15)
- R7: 15 sc (15)
- R8: (inc, 4 sc) x 3 (18)
- R9: (1 sc, dec) x 6 (12). Stuff lightly and flatten the shape.
- R10: dec x 6 (6). Sl st and fasten off.
Paw Pads (Details)
Crochet these small circles and sew them to the bottom of the paws:
- Toe #1: 7 sc in MR. Sl st, fasten off. (Brown)
- Toe #2: 6 sc in MR. Sl st, fasten off. (Brown)
- Toe #3: 5 sc in MR. Sl st, fasten off. (Brown)
- Sole: Ch 4. Starting in 2nd ch: inc, 1 sc, 4 sc in last st, 1 sc, inc (10). Sl st, fasten off. (Brown)
The Body
Using main color. Stuff as you go:
- R1: Ch 2, 6 sc in 2nd ch (6)
- R2: inc x 6 (12)
- R3: (1 sc, inc) x 6 (18)
- R4: (2 sc, inc) x 6 (24)
- R5: (3 sc, inc) x 6 (30)
- R6: (4 sc, inc) x 6 (36)
- R7: (5 sc, inc) x 6 (42)
- R8-12: 42 sc for 5 rounds (42)
- R13: (5 sc, dec) x 6 (36)
- R14: 36 sc (36)
- R15: (4 sc, dec) x 6 (30)
- R16-17: 30 sc for 2 rounds (30)
- R18: (3 sc, dec) x 6 (24)
- R19: 24 sc (24)
- R20: (2 sc, dec) x 6 (18)
- R21-23: 18 sc for 3 rounds (18). Sl st and fasten off.
The Head
Using main color. Stuff firmly as you go:
- R1: Ch 2, 6 sc in 2nd ch (6)
- R2: inc x 6 (12)
- R3: (1 sc, inc) x 6 (18)
- R4: (2 sc, inc) x 6 (24)
- R5: (3 sc, inc) x 6 (30)
- R6: 30 sc (30)
- R7: (4 sc, inc) x 6 (36)
- R8: 36 sc (36)
- R9: (5 sc, inc) x 6 (42)
- R10-11: 42 sc for 2 rounds (42)
- R12: (6 sc, inc) x 6 (48)
- R13: 48 sc (48)
- R14: (7 sc, inc) x 6 (54)
- R15-18: 54 sc for 4 rounds (54)
- R19: (7 sc, dec) x 6 (48)
- R20: 48 sc (48)
Eyes: Place safety eyes between R15 and R16, leaving 7 stitches between them.
- R21: (6 sc, dec) x 6 (42)
- R22: (5 sc, dec) x 6 (36)
- R23: (4 sc, dec) x 6 (30)
- R24: (3 sc, dec) x 6 (24)
- R25: (2 sc, dec) x 6 (18). Sl st and fasten off.
The Muzzle, Nose, and Ears
Muzzle (White)
- R1: Ch 7. Starting in 2nd ch: 5 sc, 3 sc in last st, work along other side of chain: 4 sc, inc (14)
- R2: inc, 4 sc, (inc) x 3, 4 sc, (inc) x 2 (20)
- R3: 1 sc, (inc, 4 sc) x 3, inc, 3 sc (24)
- R4-5: 24 sc for 2 rounds. Sl st and fasten off. Stuff and sew to head between R16 and R23.
Nose (Brown)
- R1: Ch 2, 6 sc in 2nd ch (6)
- R2: inc x 6 (12)
- R3: (1 sc, dec) x 4 (8). Sl st and fasten off. Stuff and shape into an oval.
Ears (Make 2 – Main Color)
- R1: Ch 2, 6 sc in 2nd ch (6)
- R2: inc x 6 (12)
- R3: 12 sc (12)
- R4: (1 sc, inc) x 6 (18)
- R5: 18 sc (18)
- R6: (1 sc, dec) x 6 (12)
- R7-10: 12 sc for 4 rounds (12)
- R11: (2 sc, dec) x 3 (9)
- R12: 9 sc. Sl st and fasten off. Fold in half and sew between R16-20 of the head.
The Tail (White)
- R1: Working in back loops only: Ch 2, 6 sc in 2nd ch (6)
- R2: inc x 6 (12)
- R3-4: 12 sc for 2 rounds. Sl st and fasten off.
- Detail: Working into the front loops of R1, ch 5, sl st into the next loop. Repeat around to create a ruffled effect. Stuff slightly and sew to the center of the body.
The Clothing (Small Shirt)
Using grey yarn:
- R1: Ch 24, join with sl st to form a ring = 24 sc. Ch 1, work in spirals. (24)
- R2: (3 sc, inc) x 6 (30)
Change to yellow:
- R3: 6 sc, ch 5, skip 5 sts, 1 sc, inc, 4 sc, inc, 1 sc, ch 5, skip 5 sts, 6 sc (32)
- R4: 6 sc, 5 sc in the ch-5 loop, 10 sc, 5 sc in the ch-5 loop, 6 sc (32)
Change back to grey:
- R5: (5 sc, inc) x 2, 8 sc, (inc, 5 sc) x 2 (36)
Change to turquoise:
- R6: (5 sc, inc) x 6 (42)
- R7: (6 sc, inc) x 6 (48)
Change back to grey:
- R8-9: 48 sc for 2 rounds. Sl st and fasten off.
The Hat (Orange)
- R1: Ch 2, 5 sc in 2nd ch (5)
- R2: 5 sc (5)
- R3: inc, 4 sc (6)
- R4-6: 6 sc for 3 rounds (6)
- R7: inc, 5 sc (7)
- R8: 3 sc, inc, 3 sc (8)
- R9: (3 sc, inc) x 2 (10)
- R10: 10 sc (10)
- R11: (4 sc, inc) x 2 (12)
- R12-13: 12 sc for 2 rounds (12)
- R14: (3 sc, inc) x 3 (15)
- R15: 15 sc (15)
- R16: (4 sc, inc) x 3 (18)
- R17: 18 sc (18)
- R18: (2 sc, inc) x 6 (24)
- R19: 24 sc (24)
- R20: (3 sc, inc) x 6 (30)
- R21: (4 sc, inc) x 6 (36)
- R22: (5 sc, inc) x 6 (42)
- R23: 42 sc (42)
- R24: (6 sc, inc) x 6 (48)
- R25-28: 48 sc for 4 rounds (48)
- R29: (7 sc, inc) x 6 (54)
- R30: 54 sc (54)
- R31: 14 sc, ch 1, turn. (31)
- R32: 28 sc, ch 1, turn. (32)
- R33-35: 28 sc for 3 rounds. Sl st and fasten off.
Finishing the Hat: Switch to green yarn and sc around the entire edge of the hat, adding an increase at the corners of the ear-flaps. For the ties, ch 35 in green and attach one to each side of the hat.
Finishing
Now it is time to assemble your bunny!
- Attach the Head: Sew the head securely to the body.
- Attach the Arms: Sew the arms approximately 2-3 rounds down from the neck, leaving a gap of 6-7 stitches between them.
- Attach the Legs: Sew the leg bases to the body around rounds 5-11. Ensure the paws are facing forward.
- Detail the Face: Embroider a small line across the muzzle and a pair of tiny brows using black thread to give your bunny a sweet expression.
- Dress Up: Slide the shirt onto the body and place the hat on the head.
Tips for Success
- Tension: Keep your stitches tight, especially when working with cotton yarn, to ensure the stuffing doesn’t peek through.
- Symmetry: Use pins to place the ears and arms before sewing them on. This ensures your bunny looks balanced.
- Stuffing: Use a chopstick or a crochet hook to push stuffing into small areas like the nose and fingertips.
- Customization: Feel free to change the colors of the shirt and hat to create a unique look for your bunny!