How to Crochet a Cute Plush Crocodile: Step-by-Step Amigurumi Tutorial
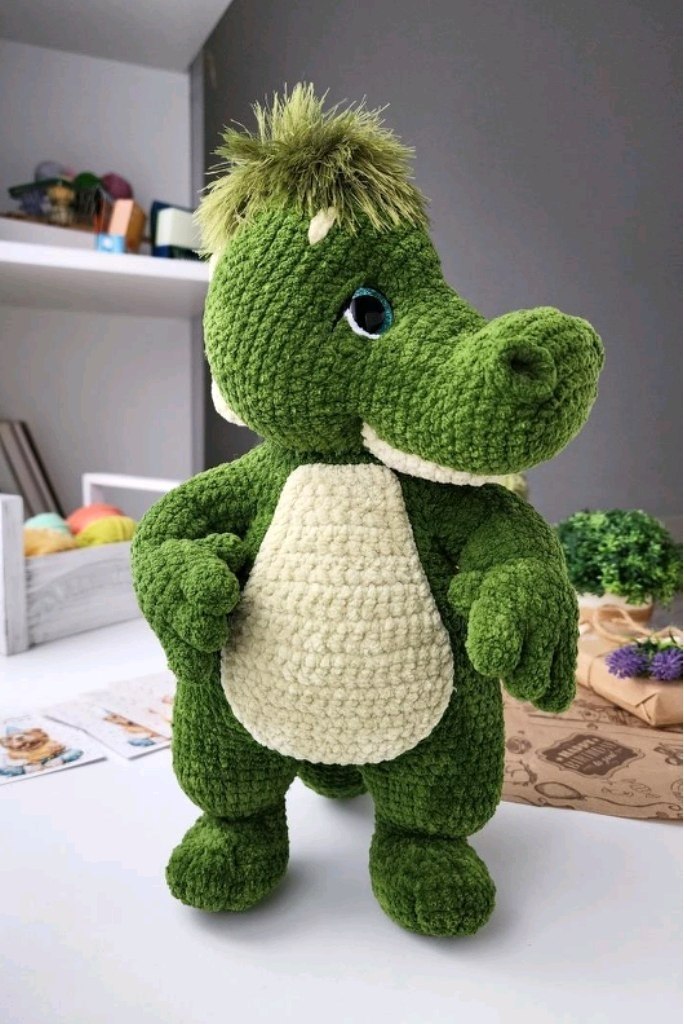
If you are looking for a project that results in an incredibly huggable, soft, and charming companion, this plush crocodile is the perfect choice. Using chunky velvet or chenille yarn, this amigurumi creates a high-texture toy that is as satisfying to make as it is to cuddle. Whether you are a seasoned pro or a beginner looking to level up your skills, this guide will walk you through every stitch.
The secret to this crocodile’s personality lies in the “sculpting” process—using a needle and thread to pull the face into a sweet, expressive shape. We will cover everything from the wired arms for poseability to the fuzzy hair that gives him a quirky look. Let’s grab our hooks and get started!
Materials & Abbreviations
Materials Needed
- Main Yarn: Green plush/chenille yarn (approx. 200 yards/7 oz).
- Accent Yarn: Pistachio or light green plush yarn (approx. 100 yards/3.5 oz) for the belly and lower jaw.
- Hair Yarn: Green specialty “fuzzy” or “single” yarn (approx. 70 yards).
- Detail Yarn: Small amounts of white plush yarn (eye whites) and black cotton yarn (eyelashes and toes).
- Crochet Hooks: 3.5mm (for the body) and 2.5mm (for the hair).
- Eyes: 20mm safety eyes (trapezoidal or glitter style).
- Stuffing: High-quality polyester fiberfill.
- Structure: One 50mm head joint (disk and pin) and approximately 16 inches of 1mm floral wire.
- Tools: Large-eye tapestry needle, stitch markers, scissors, and fabric glue.
Abbreviations (US Terms)
- MR: Magic Ring
- ch: Chain
- sc: Single crochet
- inc: Increase (2 sc in one stitch)
- dec: Decrease (sc 2 together)
- hdc: Half double crochet
- dc: Double crochet
- sl st: Slip stitch
- FLO: Front loop only
- BLO: Back loop only
- (…) * n: Repeat the sequence inside the parentheses n times.
Step-by-Step Instructions
Note: All parts except the legs and head are worked in a continuous spiral. Do not join rounds unless specified. Use a stitch marker to keep track of the start of each row.
The Arms
We start by creating the fingers and then joining them to form the hand.
Fingers
- Small Finger (Make 1):
- R1: 6 sc in MR (6)
- R2: 6 sc (6). Sl st, fasten off and leave a tail.
- Large Fingers (Make 3):
- R1: 6 sc in MR (6)
- R2-3: 6 sc (6).
- For two fingers: sl st, fasten off. For the third: do not fasten off; we will use this to join the hand.
The Hand and Arm
- R4 (Joining): Work 3 sc around the third finger, 3 sc around the second, 6 sc around the first, 3 sc around the second, and 3 sc around the third = 18 sc.
- R5-6: 18 sc (18).
- Joining Small Finger:
- Right Arm: R7: 6 sc, 3 sc joined with small finger, 9 sc (18). R8: 6 sc, 3 sc around the outer side of small finger, 9 sc (18).
- Left Arm: R7: 9 sc, 3 sc joined with small finger, 6 sc (18). R8: 9 sc, 3 sc around the outer side of small finger, 6 sc (18).
- R9: (dec, 1 sc) * 6 = 12 sc.
- R10: (1 sc, inc) * 6 = 18 sc.
- R11-14: 18 sc (18). Stuff the fingers and palm firmly.
- R15-16: 6 sc, 6 sl st (these should run along the side of the arm), 6 sc = 18 sc.
- R17-20: 18 sc (18). Sl st, fasten off.
The Tail
- R1: 6 sc in MR (6)
- R2: (1 sc, inc) * 3 = 9 sc.
- R3: (inc, 2 sc) * 3 = 12 sc.
- R4: 12 sc (12).
- R5: (3 sc, inc) * 3 = 15 sc.
- Creating the Folds:
- R6: 5 sc, 5 sc FLO, 5 sc (15).
- R7: 15 sc (15).
- R8: 5 sc, 5 sc worked into the BLO of R6, 5 sc (15).
- Expanding the Tail:
- R9: 2 sc, inc, (4 sc, inc) * 2, 2 sc = 18 sc.
- R10: (5 sc, inc) * 3 = 21 sc.
- R11: 7 sc, 7 sc FLO, 7 sc (21).
- R12: 21 sc (21).
- R13: 7 sc, 7 sc worked into BLO of R11, 7 sc (21).
- R14: 3 sc, inc, (6 sc, inc) * 2, 3 sc = 24 sc.
- R15: (7 sc, inc) * 3 = 27 sc.
- R16: 7 sc, 13 sc FLO, 7 sc (27).
- R17: 27 sc (27).
- R18: 7 sc, 13 sc worked into BLO of R16, 7 sc (27).
- R19: 4 sc, inc, (8 sc, inc) * 2, 4 sc = 30 sc.
- R20: 30 sc (30).
- R21: 7 sc, 16 sc FLO, 7 sc (30).
- R22: 30 sc (30).
- R23: 7 sc, 16 sc worked into BLO of R21, 7 sc (30).
- R24: 30 sc (30).
- Work about 7 more sc, then sl st to ensure the end is on the side of the tail. Fasten off.
Legs and Body
The Legs
- R1: Ch 7, starting from 2nd ch: inc, 4 sc, 4 sc in one stitch, 4 sc, inc = 16 sc.
- R2: 2 inc, 4 sc, 4 inc, 4 sc, 2 inc = 24 sc.
- R3: 1 sc, inc, 8 sc, 4 inc, 8 sc, inc, 1 sc = 30 sc.
- R4-5: 30 sc (30).
- R6: 9 sc, 6 dec, 9 sc = 24 sc.
- R7: 6 sc, 6 dec, 6 sc = 18 sc.
- R8: 6 sc, 3 dec, 6 sc = 15 sc.
- R9: 15 sc (15).
- R10: 6 sc, 3 inc, 6 sc = 18 sc.
- R11: 6 sc, 6 inc, 6 sc = 24 sc.
- R12: 24 sc (24).
- R13: (3 sc, inc) * 6 = 30 sc.
- R14: 30 sc (30).
- R15: 12 sc, 3 dec, 12 sc = 27 sc.
Fasten off the first leg. For the second leg, do not fasten off.
Joining Legs and Body
- R16 (Joining): 6 sc around the second leg, ch 3, join to the first leg, 27 sc around first leg, 3 sc across the chain, 27 sc around the second leg, 3 sc across the second chain = 60 sc.
- R17: (27 sc, 3 inc) * 2 = 66 sc.
- R18: 27 sc, 6 inc, 33 sc = 72 sc.
- Joining the Tail (R19): 62 sc, 10 sc joined together with the tail = 72 sc.
- R20: 4 sc joined with tail, 58 sc, 8 sc around the outer edge of the tail = 71 sc.
- R21: 8 sc around the outer edge of the tail, 66 sc = 74 sc.
- R22-23: 74 sc (74).
- R24: 18 sc, dec, 34 sc, dec, 18 sc = 72 sc.
- R25: 5 sc, dec, (10 sc, dec) * 5, 5 sc = 66 sc.
- R26: 66 sc (66).
- R27: (dec, 9 sc) * 6 = 60 sc.
- R28: 60 sc (60).
- R29: 4 sc, dec, (8 sc, dec) * 5, 4 sc = 54 sc.
- R30: 54 sc (54).
- R31: (dec, 7 sc) * 6 = 48 sc.
- R32: 48 sc (48).
- R33: 3 sc, dec, (6 sc, dec) * 5, 3 sc = 42 sc.
Joining Arms
- R34: 7 sc, 8 sc joined with left arm, 12 sc, 8 sc joined with right arm, 7 sc = 42 sc.
- R35: 7 sc, 10 sc around outer arm, 12 sc, 10 sc around outer arm, 7 sc = 46 sc.
- R36-37: 46 sc (46).
- R38: 8 sc, dec, 4 sc, dec, 14 sc, dec, 4 sc, dec, 8 sc = 42 sc.
- R39: (dec, 5 sc) * 6 = 36 sc.
- R40: 2 sc, dec, (4 sc, dec) * 5, 2 sc = 30 sc.
- R41: 30 sc (30).
- R42: (dec, 3 sc) * 6 = 24 sc.
- R43: (1 sc, dec) * 8 = 16 sc.
- R44: 8 dec = 8 sc.
The Head
Lower Jaw (Pistachio Color)
- R1: Ch 6, starting from 2nd ch: inc, 3 sc, 4 sc in one stitch, 3 sc, inc = 14 sc.
- R2: inc, 5 sc, 2 inc, 5 sc, inc = 18 sc.
- R3: 18 sc (18).
- R4: (inc, 8 sc) * 2 = 20 sc.
- R5-8: 20 sc (20).
Fold the jaw in half and sc through both layers for 10 stitches. Fasten off.
Main Head (Main Green Color)
- R1: Ch 10, starting from 2nd ch: inc, 7 sc, 4 sc in one stitch, 7 sc, inc = 22 sc.
- R2: 2 inc, 7 sc, 4 inc, 7 sc, 2 inc = 30 sc.
- R3: 1 sc, (1 sc, inc) * 6, 17 sc = 36 sc.
- R4: 2 sc, (inc, 2 sc) * 6, 16 sc = 42 sc.
- R5-6: 42 sc (42).
- R7: 3 sc, (dec, 2 sc) * 6, 15 sc = 36 sc.
- R8: 1 sc, (1 sc, dec) * 6, 17 sc = 30 sc.
- R9: 30 sc (30).
- R10: 4 sc, (inc, 2 sc) * 2, inc, 19 sc = 33 sc.
- R11: 33 sc (33).
- R12: 6 sc, (inc, 2 sc) * 2, inc, 20 sc = 36 sc.
- R13: 36 sc (36).
- R14: 8 sc, (inc, 2 sc) * 2, inc, 21 sc = 39 sc.
- Joining Lower Jaw (R15): 10 sc, (inc, 2 sc) * 2, inc, 11 sc, 10 sc joined with lower jaw, 1 sc = 42 sc.
- Cheek Shaping (R16): 1 sc, (inc hdc, 1 hdc) * 2, inc hdc, 3 sc, (inc, 1 sc) * 6, 3 sc, (inc hdc, 1 hdc) * 2, inc hdc, 13 sc = 54 sc.
- R17: 2 sc, (inc, 1 sc) * 2, inc, 28 sc, (inc, 1 sc) * 2, inc, 14 sc = 60 sc.
- R18-24: 60 sc (60).
Eye Placement: Insert safety eyes between R16 and R17, approximately 18 stitches apart.
- R25: 4 sc, dec, (8 sc, dec) * 5, 4 sc = 54 sc.
- R26: (dec, 7 sc) * 6 = 48 sc.
- R27: 3 sc, dec, (6 sc, dec) * 5, 3 sc = 42 sc.
- R28: (dec, 5 sc) * 6 = 36 sc.
- R29: 2 sc, dec, (4 sc, dec) * 5, 2 sc = 30 sc.
- R30: (dec, 3 sc) * 6 = 24 sc.
- R31: 1 sc, dec, (2 sc, dec) * 5, 1 sc = 18 sc.
- R32: (dec, 1 sc) * 6 = 12 sc.
- R33: 6 dec = 6 sc.
Finishing
Assembly & Structure
- Armoring: Fold the floral wire in half and wrap the long end with fabric tape. Insert it into the arm so it stops at the palm, then stuff the arm around the wire.
- Neck Joint: Insert the head joint pin into the neck. Place the 50mm disk inside the head, secure the pin with pliers, and then join the head to the body.
- The Belly: Use the pistachio yarn to crochet a flat oval using turned rows:
- R1: Ch 7, 6 sc, ch 1, turn.
- R2: 6 sc, ch 1, turn.
- R3: 1 sc, inc, 2 sc, inc, 1 sc (8), ch 1, turn.
- R4: 8 sc, ch 1, turn.
- R5: inc, 6 sc, inc (10), ch 1, turn.
- R6: 10 sc, ch 1, turn.
- R7: 3 sc, inc, 2 sc, inc, 3 sc (12), ch 1, turn.
- R8: 12 sc, ch 1, turn.
- R9: 1 sc, inc, 8 sc, inc, 1 sc (14), ch 1, turn.
- R10: 14 sc, ch 1, turn.
- R11: 5 sc, inc, 2 sc, inc, 5 sc (16), ch 1, turn.
- R12-15: 16 sc, ch 1, turn.
- R16: skip 1, 13 sc, dec (14).
- R17: skip 1, 11 sc, dec (12).
- R18: skip 1, 9 sc, dec (10).
- R19: skip 1, 7 sc, dec (8).
- Ch 1, then work a round of sc around the entire edge, placing 2 sc in the corners. Sew to the body.
Facial Details & Sculpting
- Muzzle: Use a long needle and main color yarn. Pull thread from the bridge of the nose down toward the jaw to create a concave snout.
- Eyes: Pull thread from the corners of the mouth to the outer and inner corners of the eyes to create depth.
- Embroidery:
- Sew white plush yarn for the eye whites.
- Use black cotton yarn for eyelashes.
- Sew pistachio-colored eyebrows three rows above the eyes.
- Nostrils: Crochet small sc loops directly onto the snout.
Tips for Success
- Working with Plush Yarn: Because the stitches are hidden by the fluff, using a stitch marker is non-negotiable. If you lose your place, gently feel for the “V” of the stitch.
- Stuffing: Stuff the body firmly, especially the hips and belly, to ensure the crocodile holds its shape and doesn’t sag.
- Tension: Keep your tension tight so the stuffing doesn’t peek through the holes, but not so tight that the piece becomes stiff.
- Sculpting: When doing the “utyažka” (sculpting), do it in small increments. Pull a little, check the mirror, and adjust before tightening the knot.