How to Crochet a Cute Amigurumi Puppy: Free Step-by-Step Pattern
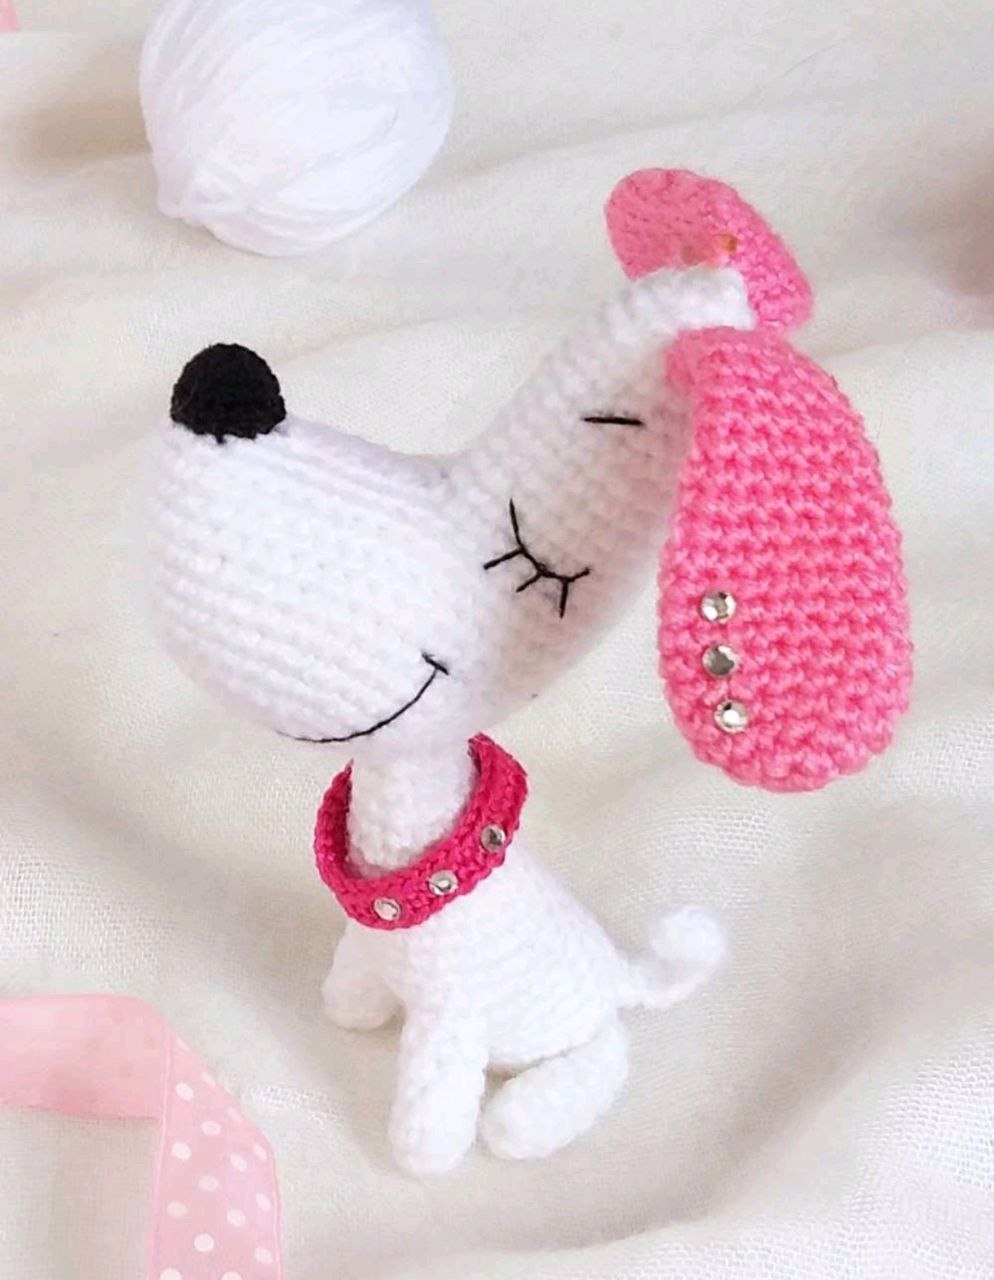
Looking for a delightful project to brighten up your crochet nook? This adorable amigurumi puppy is the perfect blend of cozy and cute. Whether you are looking to create a unique handmade gift or want to add a charming companion to your plushie collection, this puppy is a wonderful choice. With its floppy ears and sweet expression, this little pup is sure to be a favorite.
This pattern is designed to be beginner-friendly, though it does include some clever techniques—like using a wire frame—to help your puppy sit upright and hold its head high. Let’s dive into the materials and get started on your new best friend!
Materials & Abbreviations
To create this puppy, you will need the following supplies. We recommend using a wool-acrylic blend for a soft feel and good stitch definition.
Materials Needed
- Main Color Yarn: Approximately 100-150 yards of a medium-weight wool/acrylic blend (the puppy in the sample is white).
- Accent Yarn: A small amount of black yarn for the nose.
- Crochet Hook: 1.25mm (or a size that keeps your stitches tight so the stuffing doesn’t show).
- Stuffing: High-quality polyester fiberfill.
- Eyes: 6mm black beads or plastic safety eyes.
- Embroidery Thread: Black cotton thread or embroidery floss for the mouth and eyebrows.
- Wire: A piece of 1-1.5mm craft wire, approximately 6 inches long.
- Tools: Yarn needle, scissors, stitch markers, and a pair of pliers.
Abbreviations (US Terms)
- MR: Magic Ring
- sc: Single crochet
- inc: Increase (two single crochet stitches in the same stitch)
- dec: Decrease (sc two stitches together through the front loops)
- ch: Chain
- hdc: Half double crochet
- sl st: Slip stitch
- st(s): Stitch(es)
- ( ) * N: Repeat the instructions inside the parentheses N times
Note: This pattern is worked in continuous spirals. Do not join rounds with a slip stitch unless specified. Use a stitch marker to keep track of the start of each round.
Step-by-Step Instructions
The Head
The head is worked from the nose area upward, creating a distinct snout shape.
- Round 1: 7 sc in MR (7)
- Round 2: (inc) * 7 (14)
- Round 3: (1 sc, inc) * 7 (21)
- Round 4: (2 sc, inc) * 7 (28)
- Round 5: (3 sc, inc) * 7 (35)
- Round 6: (4 sc, inc) * 7 (42)
- Rounds 7-15: sc in each st around (42)
- Round 16: 20 sc, skip 21 sts, 1 sc (21)
- Rounds 17-18: sc in each st around (21)
- Round 19: 9 sc, dec, 10 sc (20)
- Rounds 20-21: sc in each st around (20)
- Round 22: 5 sc, dec, 6 sc, dec, 5 sc (18)
- Round 23: sc in each st around (18)
- Round 24: 7 sc, dec, 7 sc, dec (16)
- Round 25: sc in each st around (16)
- Round 26: 8 sc, dec, 6 sc (15)
- Round 27: (3 sc, dec) * 3 (12)
- Round 28: (2 sc, dec) * 3 (9)
- Round 29: 3 dec. Fasten off and weave in the ends.
Stuffing the Head: Stuff the head moderately. Start with the crown and then fill the snout area. Using a yarn needle and a piece of matching thread, sew the opening of the snout closed, starting from the bridge of the nose. Stop about 1/4 inch (7-8mm) before the very tip of the nose. Add a bit more stuffing through this small hole to give the muzzle a rounded look.
The Paws (Make 4)
- Round 1: 6 sc in MR (6)
- Rounds 2-6: sc in each st around (6)
Fasten off. For the two back paws, leave a long tail (about 8 inches) for sewing the legs to the body.
The Body
- Round 1: 6 sc in MR (6)
- Round 2: (inc) * 6 (12)
- Round 3: (1 sc, inc) * 6 (18)
- Rounds 4-7: sc in each st around (18)
- Round 8: 6 sc, 2 sc inside the inner side of the left front paw, 2 sc, 2 sc inside the inner side of the right front paw, 6 sc (18)
- Round 9: 6 sc, 4 sc across the top of the left paw, 2 inc, 4 sc across the top of the right paw, 6 sc (24)
- Round 10: sc in each st around (24)
Stop here to firmly stuff the front paws and the bottom of the body.
- Round 11: (6 sc, dec) * 3 (21)
- Round 12: sc in each st around (21)
- Round 13: (5 sc, dec) * 3 (18)
- Round 14: sc in each st around (18)
- Round 15: (4 sc, dec) * 3 (15)
- Rounds 16-17: sc in each st around (15)
- Round 18: (3 sc, dec) * 3 (12)
- Round 19: sc in each st around (12)
- Round 20: (2 sc, dec) * 3 (9)
- Round 21: sc in each st around (9)
Fasten off, leaving a 6-8 inch tail for sewing to the head.
The Ears (Make 2)
- Round 1: 7 sc in MR (7)
- Round 2: (inc) * 7 (14)
- Round 3: (6 sc, inc) * 2 (16). Place a marker here; this is the outer edge of the ear.
- Rounds 4-10: sc in each st around (16)
- Round 11: 8 sc, dec, 6 sc (15)
- Round 12: dec, 13 sc (14)
- Round 13: sc in each st around (14)
- Round 14: 7 sc, dec, 5 sc (13)
- Round 15: dec, 11 sc (12)
- Round 16: sc in each st around (12)
- Round 17: 3 sc, dec, 4 sc, dec, 1 sc (10)
- Round 18: sc in each st around (10)
- Round 19: 2 sc, dec, 3 sc, dec, 1 sc (8)
- Round 20: 7 sc, sl st. Fasten off, leaving 6-8 inches for sewing.
The Tail
- Chain 11. Starting in the second chain from the hook: sl st, 2 sc, 2 hdc, 2 hdc in the next stitch, 2 hdc, 2 sc. Fasten off, leaving a tail for sewing.
The Nose
- Round 1: 6 sc in MR (6)
- Round 2: (inc) * 6 (12)
- Round 3: (3 sc, inc) * 3 (15)
- Round 4: sc in each st around (15)
Fasten off, leaving a tail for sewing.
Finishing & Assembly
Structuring the Body
To make the puppy poseable, take your 6-inch wire and bend one end into a small loop for safety. Insert the wire through the neck opening and push it down toward the bottom of the body. Fill the neck and body with stuffing around the wire.
Attaching the Head
Locate the attachment point on the head (approximately between rounds 7 and 8 from the start). Use a thick knitting needle or crochet hook to gently widen the hole. Push the wire from the body up through this point and out through the top of the head. Sew the body securely to the head.
Adding the Face
- Eyes: Position the eyes and sew them in. To give the puppy a more realistic, deep-set look, sew from the neck area to the eye and pull slightly to create a dimple.
- Nose: Stuff the nose piece slightly and sew it over the opening at the end of the snout.
- Smile: Using black embroidery thread, stitch a sweet smile starting around round 10 of the head. Stitch small eyebrows above the eyes for extra personality.
Final Details
- Back Legs: Stuff the back paws about 2/3 full. Fold the leg in half and sew it to the lower body, pressing it flat against the body for a seated look.
- Tail: Sew the tail to the back of the body.
- Ears: Sew the ears approximately 4-5 rounds below the top of the head.
- Wire Tip: If you are making a keychain, use pliers to create a loop at the top of the wire. Otherwise, trim the excess wire and cover the end with a bit of glue or yarn for safety.
Tips for Success
- Tight Stitches: If you see stuffing poking through, try dropping down a hook size (e.g., from 1.5mm to 1.25mm).
- Wire Safety: Always ensure the wire ends are bent or capped so they don’t poke through the crochet fabric.
- Customization: Feel free to experiment with colors! A brown puppy with a pink collar or a grey puppy with a blue ribbon looks just as cute.
- Stuffing: Use a chopstick or a long crochet hook to push stuffing into the narrow parts of the snout and paws.