How to Crochet a Cute Sleeping Duckling: A Step-by-Step Amigurumi Tutorial
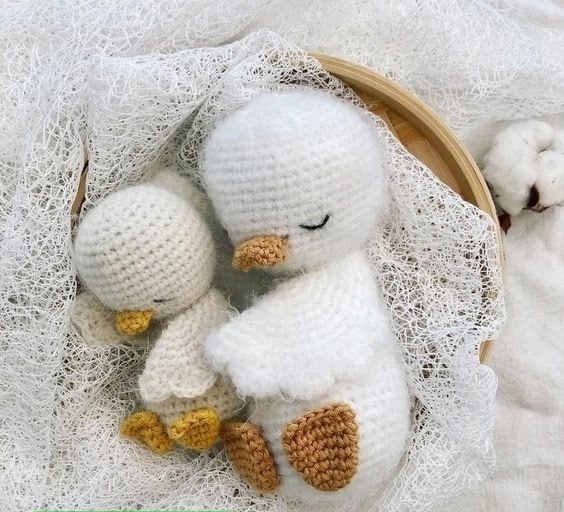
There is nothing quite as heartwarming as a tiny, sleepy animal. If you are looking for a quick, adorable project to brighten your home or to gift to a loved one, this sleeping duckling amigurumi is the perfect choice. This little duckling measures approximately 4 inches tall, making it a wonderful addition to a nursery shelf or a desk companion.
In this tutorial, we will walk you through the process of creating this charming character from scratch. Whether you are a seasoned amigurumi artist or a beginner looking to practice your shaping techniques, this pattern is designed to be accessible and fun. We will be working with beautiful, fuzzy angora yarn to give our duckling that extra dose of “aww” factor!
Materials & Abbreviations
Before we pick up our hooks, let’s make sure you have everything you need. Because this project uses specialty yarn, pay close attention to the material notes below.
Materials Needed
- Angora Yarn: Approximately 1 ball (skein). Note that angora is a very delicate, fragile fiber. You may need to adjust your tension as you go. Safety Note: Due to the nature of angora fibers, this toy is not recommended for infants or very young children.
- Yellow Cotton Yarn: A small amount of yellow cotton (such as Ricorumi) for the beak and the feet.
- Black Embroidery Thread: For stitching the sleeping eyes.
- Fiberfill: High-quality stuffing to shape the duckling.
- Crochet Hook: 2.5 mm (approximately a B-1 hook).
Abbreviations (US Terms)
All instructions are worked in continuous spiral rounds, which is the standard method for amigurumi to avoid visible seams.
- MR: Magic Ring
- ch: chain
- sc: single crochet
- inc: increase (2 sc in the same stitch)
- dec: decrease (sc 2 stitches together)
- dc: double crochet
- sl st: slip stitch
Step-by-Step Instructions
The Head and Body
The head and body are worked as one continuous piece to create a seamless, professional look. We will start with the body and work our way up to the head.
- 6 sc in MR (6)
- 6 inc (12)
- (1 sc, 1 inc) x 6 (18)
- 1 sc, 1 inc, (2 sc, 1 inc) x 5, 1 sc (24)
- (3 sc, 1 inc) x 6 (30)
- 6-10. 30 sc (5 rows)
- 6 sc, (1 dec, 1 sc) x 6, 6 sc (24)
- 12-13. 24 sc (2 rows)
- 3 sc, (1 dec, 1 sc) x 6, 3 sc (18). Stop here to stuff the body firmly.
- 15-16. 18 sc (2 rows)
- (1 sc, 1 dec) x 6 (12)
- 3 sc, 6 sc in the back loops only, 3 sc (12)
- 12 sc
- sl st in every stitch and in the 6 front loops of row 18. Note: This step creates the tilt of the head. Work these stitches loosely to make the next row easier to crochet.
Continuing the Head
Now that we have created the neck tilt, we will expand the stitches to form the rounded head.
- 12 inc (24)
- (3 sc, 1 inc) x 6 (30)
- 2 sc, (1 inc, 4 sc) x 5, 1 inc, 2 sc (36)
- 24-31. 36 sc (8 rows)
- (4 sc, 1 dec) x 6 (30)
- 30 sc
- (3 sc, 1 dec) x 6 (24)
- (2 sc, 1 dec) x 6 (18). Stop here to stuff the head firmly.
- (1 sc, 1 dec) x 6 (12)
- 6 dec (6). Fasten off and weave in the end to close the hole.
The Wings (Make 2)
The wings add a lovely touch of detail to the sides of the body.
- 6 sc in MR (or ch 2, then 6 sc in the 2nd ch from the hook)
- 6 inc (12)
- (1 sc, 1 inc) x 6 (18)
- 1 sc, 1 inc, (2 sc, 1 inc) x 5, 1 sc (24)
- (3 sc, 1 inc) x 6 (30)
Fold the circle in half and work 15 sc through both layers at once to flatten it. Then, follow this final decorative edge:
- ch 2, 2 dc in the starting loop, skip 1 st, sl st, skip 1 st, (5 dc in one stitch, skip 1 st, sl st, skip 1 st) x 3, sl st in the very last stitch.
Fasten off, leaving a long tail for sewing the wings to the sides of the body near the neck area.
The Feet (Make 2)
Use your yellow cotton yarn for these small details.
- 4 sc in MR (4)
- (1 sc, 1 inc) x 2 (6)
- (1 sc, 1 inc) x 3 (9)
- 4-5. 9 sc (2 rows)
Fold the foot in half and close the opening by working 4 sc through both sides. Fasten off, leaving a long tail. Do not stuff the feet.
The Beak
Using yellow cotton yarn, we will create a small, pointed beak.
- ch 4. Starting from the 2nd ch from your hook: 2 sc, 1 inc. On the opposite side of the chain, work 2 sc, 1 inc (8)
- (3 sc, 1 inc) x 2 (10)
Fasten off, leaving a tail for sewing. Attach the beak between rows 23 and 25 of the body.
Finishing
The assembly is the final step in bringing your duckling to life!
Embroidering the Eyes
To give your duckling its sleepy expression, use your black embroidery thread. Stitch the eyes onto the head on rows 24 and 25. Position them approximately 6 stitches apart to ensure a symmetrical and peaceful look.
Assembly Guide
- Wings: Sew the wings to the sides of the body, positioned right at the neck.
- Feet: Sew the feet to the bottom of the body between rows 4 and 8. Space them about 3 or 4 stitches apart.
- Beak: Sew the beak firmly between rows 23 and 25.
Tips for Success
Working with Angora
Angora is a dream to work with because of its incredible fluffiness, but it can be tricky. Because the fibers are so fine, they can easily slip off your hook. If you find your stitches are becoming uneven, try to maintain a consistent, slightly relaxed tension. Avoid pulling the yarn too tightly.
Achieving Maximum Fluffiness
For a truly professional, “fuzzy” look, you can use a specialized pet brush or a small wire brush to gently brush the surface of the finished duckling. This will lift the angora fibers and give the toy a soft, cloud-like appearance. Just be gentle so you don’t distort the crochet stitches underneath!
Stuffing Technique
When stuffing amigurumi, it is best to add the fiberfill in small clumps rather than one large piece. This allows you to push the stuffing into all the corners of the head and body, preventing lumps and ensuring a smooth, round shape.