DIY Crochet Lynx Amigurumi Pattern: A Step-by-Step Tutorial
Introduction
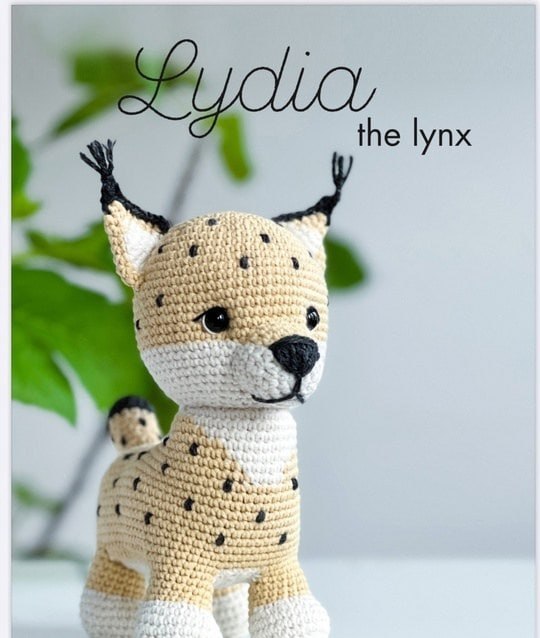
Are you looking for your next adorable crochet project? There is nothing quite as charming as an amigurumi animal, and this woodland lynx is no exception! With its oversized ears, cute spots, and sweet expression, this little lynx makes for a perfect nursery decoration, a unique gift for animal lovers, or a standout addition to your own crochet collection.
This pattern is designed to be beginner-friendly, though you should be comfortable with basic amigurumi techniques like working in continuous rounds and using a magic ring. We will walk through every step, from shaping the head to the delicate embroidery of those signature spots. By the time you are finished, you will have a sturdy, approximately 9-inch tall lynx friend ready to call its own!
Materials & Abbreviations
To ensure your lynx turns out looking professional, I recommend using a slightly smaller hook than suggested by your yarn label. This helps keep your stitches tight so the stuffing doesn’t peek through.
Materials Needed
- Yarn: DK weight cotton/acrylic blend yarn. You will need:
- Light Yellow (a “Tortilla” or tan shade)
- White (a “Lace” or bright white shade)
- Dark Grey or Black (a wool-blend works great here for a textured look)
- Crochet Hook: 2.5 mm
- Safety Eyes: 11 mm
- Stuffing: Polyester fiberfill
- Tools: Stitch markers (at least 4), scissors, and a large embroidery needle
Abbreviations (US Terms)
- ch: chain
- slst: slip stitch
- sc: single crochet
- inc: increase (2 sc in the same stitch)
- dec: decrease (sc 2 stitches together)
- hdc: half double crochet
- hdc-inc: increase (2 hdc in the same stitch)
- dc: double crochet
- st(s): stitch(es)
- rnd: round(s)
- […] x X: repeat the instructions inside the brackets X times
- (..): total number of stitches in the round or row
Step-by-Step Instructions
The Head
Start with your Light Yellow yarn. Working in a continuous spiral:
- Rnd 1: 6 sc in a magic ring (6)
- Rnd 2: [inc] x 6 (12)
- Rnd 3: [1 sc, inc] x 6 (18)
- Rnd 4: 1 sc, inc, [2 sc, inc] x 5, 1 sc (24)
- Rnd 5: [3 sc, inc] x 6 (30)
- Rnd 6: 2 sc, inc, [4 sc, inc] x 5, 2 sc (36)
- Rnd 7: [5 sc, inc] x 6 (42)
- Rnd 8: 3 sc, inc, [6 sc, inc] x 5, 3 sc (48)
- Rnd 9: 48 sc (48)
- Rnd 10: [7 sc, inc] x 6 (54)
- Rnd 11: 54 sc (54)
- Rnd 12: 4 sc, inc, [8 sc, inc] x 5, 4 sc (60)
- Rnd 13-20: 60 sc (8 rounds) (60)
Change to White yarn.
- Rnd 21-22: 60 sc (2 rounds) (60)
Eye Placement: Before continuing, place your 11 mm safety eyes between rounds 18 and 19. Ensure there are 12 stitches between the eyes. Once placed, continue with the following:
- Rnd 23: 4 sc, dec, [8 sc, dec] x 5, 4 sc (54)
- Rnd 24: 54 sc (54)
- Rnd 25: [7 sc, dec] x 6 (48)
- Rnd 26: 48 sc (48)
- Rnd 27: 3 sc, dec, [6 sc, dec] x 5, 3 sc (42)
- Rnd 28: [5 sc, dec] x 6 (36)
- Rnd 29: 2 sc, dec, [4 sc, dec] x 5, 2 sc (30)
- Rnd 30: [3 sc, dec] x 6 (24)
- Rnd 31: [2 sc, dec] x 6 (18)
- Rnd 32: [1 sc, dec] x 6 (12)
- Rnd 33: [dec] x 6 (6)
Fasten off, leave a tail, and stuff the head firmly. To give the eyes depth, you can embroider a small line of black yarn through the eye or add small white eyelashes later.
The Muzzle
Start with White yarn:
- Rnd 1: 6 sc in a magic ring (6)
- Rnd 2: [inc] x 6 (12)
- Rnd 3: [inc] x 2, 1 sc, hdc-inc, 1 hdc, 4 sc, 1 hdc, hdc-inc, 1 sc (16)
- Rnd 4: 1 sc, [inc] x 2, 2 sc, 1 hdc, hdc-inc, 1 hdc, 4 sc, 1 hdc, hdc-inc, 1 hdc, 1 sc (20)
Change to Light Yellow yarn.
- Rnd 5: 8 sc, [inc] x 2, 6 sc, [inc] x 2, 2 sc (24)
- Rnd 6: 11 sc, 8 sc, 5 sc (24)
- Rnd 7: 11 sc, 9 sc, 4 sc (24)
Slst in the next stitch, fasten off, and leave a long tail of both colors for sewing. To finish the muzzle, embroider a black nose using the dark grey yarn by working in a “V” shape above the magic ring and creating two small strokes on top.
The Tail
Start with Dark Grey yarn:
- Rnd 1: 6 sc in a magic ring (6)
- Rnd 2: [inc] x 6 (12)
- Rnd 3: [3 sc, inc] x 3 (15)
- Rnd 4-5: 15 sc (2 rounds) (15)
Change to Light Yellow yarn. Fasten off the dark grey, leaving a tail for the spots.
- Rnd 6-7: 15 sc (2 rounds) (15)
- Rnd 8: 4 sc, [inc] x 2, 5 sc, [dec] x 2 (15)
- Rnd 9: [3 sc, dec] x 3 (12)
- Rnd 10: 4 sc, inc, 5 sc, dec (12)
- Rnd 11: 12 sc (12)
Fasten off, leaving a long tail for sewing. Stuff with filling. You can add the dark spots using the embroidery method described in the tips section.
The Ears
The ears are worked in two parts: the base shape and the black decorative edge. Do not stuff the ears.
Right Ear
Start with Light Yellow:
- Rnd 1: 4 sc in a magic ring (4)
- Rnd 2: [1 sc, inc] x 2 (6)
- Rnd 3: [2 sc, inc] x 2 (8)
Change to White yarn.
- Rnd 4: 1 sc, 1 sc, inc, 3 sc, inc, inc (11)
- Rnd 5: 2 sc, 1 sc, inc, 4 sc, inc, inc, 1 sc (14)
- Rnd 6: 2 sc, 2 sc, inc, 5 sc, inc, inc, 2 sc (17)
- Rnd 7: 2 sc, 3 sc, inc, 6 sc, inc, inc, 3 sc (20)
- Rnd 8: 3 sc, 12 sc, skip the rest of the stitches (15)
Fasten off. To add the black edge, join Dark Grey yarn to the straight edge. Work 7 sc up the side, make 4 ch, work into the second ch from hook (2 sc, 1 hdc), and slst back into the ear. Finish by making a Lark’s head knot at the top with two strands of dark yarn for the tuft.
Repeat the same steps for the Left Ear, adjusting the color placement slightly to match the pattern images.
The Body
Start with White yarn. Leave a long tail at the beginning for sewing to the head.
- Foundation: 36 ch. Join with a slst to the first ch (ensure the chain isn’t twisted). Work in a spiral.
- Rnd 1: 36 sc (36)
Change to Light Yellow yarn.
- Rnd 2: 10 sc, 16 sc, 10 sc (36)
- Rnd 3: Starting on the 2nd ch from hook: inc, 9 sc, back to base, 12 sc, 12 sc, 12 sc, continue on backside of ch, 9 sc, inc (58)
- Rnd 4: [inc] x 2, 8 sc, dec, 13 sc, 9 sc, 12 sc, dec, 8 sc, [inc] x 2 (60)
- Rnd 5: [1 sc, inc] x 2, 23 sc, 7 sc, 22 sc, [1 sc, inc] x 2 (64)
- Rnd 6: [2 sc, inc] x 2, 24 sc, 5 sc, 23 sc, [2 sc, inc] x 2 (68)
- Rnd 7: [inc, 2 sc] x 3, 24 sc, 4 sc, 25 sc, [inc, 2 sc] x 2 (73)
Change to White yarn. Fasten off and tie it inside.
- Rnd 8-17: 73 sc (10 rounds) (73)
Change back to Light Yellow yarn.
- Rnd 18: 12 sc (12)
Continue working the underside in rows using White yarn for Rnds 2-5, then Light Yellow for the rest of the body shaping as per the pattern.
The Legs
You will make four legs (A, B, C, and D). All legs follow a similar structure: start with Light Yellow, work several rounds, change to White for the “paws,” and finish with a decrease section.
- Leg A (Left Back): Join at the 65th stitch of the body. Work 9 ch + 9 sc. Finish with White for the bottom section.
- Leg B (Right Back): Join at the 7th stitch of the body. Work 9 sc + 9 ch. Finish with White.
- Leg C (Right Front): Join at the 29th stitch of the body. Work 9 sc + 9 ch. Finish with White.
- Leg D (Left Front): Join at the 44th stitch of the body. Work 9 sc + 9 ch. Finish with White.
Finishing
Assembly is where your lynx truly comes to life! Follow this order for the best results:
- Muzzle: Sew the muzzle to the head, centered between the eyes (rounds 19-27). Ensure the Light Yellow sections align.
- Head: Attach the head to the neck at round 29. You can tilt the head for a more lifelike look.
- Ears: Bend the ears slightly to give them a natural curve. Sew them between rounds 7 and 14 of the head.
- Tail: Attach the tail to the back of the body between rounds 4 and 7.
- Legs & Underside: Sew the four legs to the body and attach the underside piece, ensuring all seams are secure and stuffed firmly.
Tips
How to Add Signature Spots
To get those perfect little black spots, use the embroidery method:
- Insert your needle into a visible hole between stitches.
- Pull through, but leave a small yarn tail on the inside.
- Pull the yarn through the stitch twice to make the spot appear thicker and more defined.
- Repeat for all spots, then pull the yarn tails through to the inside and tie a secure double knot.
- Use your scissors to trim the excess and your needle to tuck the knot neatly into the hole.
Pro Crochet Tips
- Tension is Key: When making amigurumi, keep your tension tight to prevent stuffing from showing.
- Stitch Markers: Never crochet without a stitch marker! It is very easy to lose your place when working in continuous spirals.
- Stuffing: Stuff the body and head firmly, but avoid overstuffing the neck area, as it might make the head sit awkwardly.
- Yarn Tails: Always leave long tails for joining pieces; it is much easier to sew with a long tail than to try and join with a short one.