DIY Blue Angel Cat Crochet Pattern: A Cute Amigurumi Tutorial
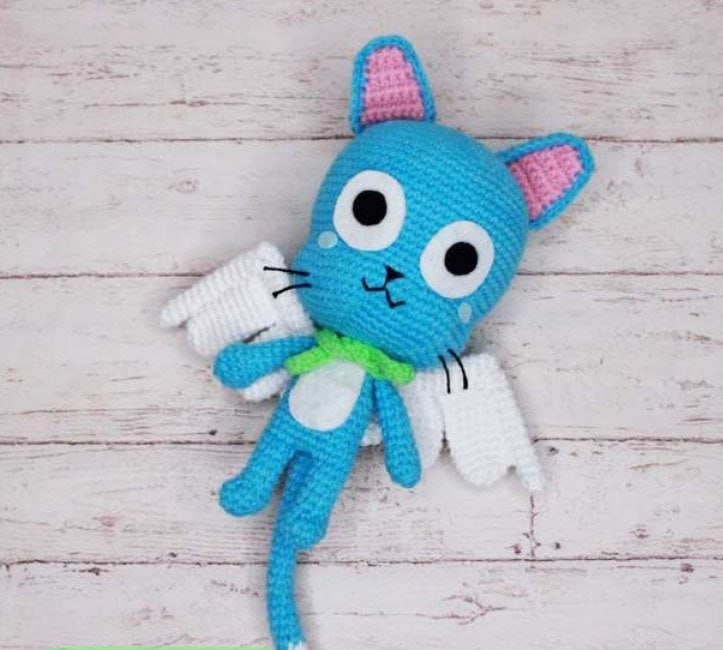
Are you looking for a charming new project to add to your crochet collection? This adorable Blue Angel Cat amigurumi is the perfect blend of sweet and whimsical. With its bright blue fur, tiny white wings, and even a little green bag, this little character is sure to bring a smile to anyone’s face. Whether you are making a nursery decoration, a unique gift, or a new friend for your shelf, this step-by-step guide will walk you through the entire process.
This pattern is designed for intermediate beginners—if you are comfortable with basic stitches and working in the round, you are going to love this project! Grab your favorite blue yarn and let’s start creating this magical little kitty.
Materials and Abbreviations
Materials List
To ensure your angel cat turns out looking just like the pictures, try to gather the following supplies before you begin:
- Yarn: Medium weight yarn (cotton or acrylic works best for amigurumi). You will need:
- Blue (Main body color)
- Light Green (For the little bag)
- Pink (For the inner ears)
- White (For the wings, tail tip, and belly)
- Crochet Hook: 2mm to 2.5mm (or a size that produces tight, dense stitches to prevent stuffing from showing through).
- Stuffing: Polyfill or fiberfill.
- Felt: Small scraps of white, black, and blue felt for the eyes, cheeks, and belly.
- Embroidery Floss: Black for the facial features and whiskers.
- Tools: A tapestry needle, sharp scissors, and stitch markers.
Crochet Abbreviations
Please note that this pattern uses standard US crochet terminology. All stitch counts are provided in brackets [ ] at the end of each round.
- MR: Magic Ring
- ch: Chain
- sc: Single crochet
- inc: Increase (2 sc in the same stitch)
- dec: Decrease (sc 2 together)
- dc: Double crochet
- sl st: Slip stitch
- st(s): Stitch(es)
Step-by-Step Instructions
Creating the Head
We begin by working in continuous rounds. Remember to use a stitch marker to keep track of your progress.
R1: 6 sc in a magic ring [6]
R2: 6 inc [12]
R3: (1 sc, inc) x 6 [18]
R4: (2 sc, inc) x 6 [24]
R5: (3 sc, inc) x 6 [30]
R6: (4 sc, inc) x 6 [36]
R7: (5 sc, inc) x 6 [42]
R8: (6 sc, inc) x 6 [48]
R9: (7 sc, inc) x 6 [54]
R10: (8 sc, inc) x 6 [60]
R11: (9 sc, inc) x 6 [66]
R12-23: 66 sc around [66]
R24: 17 sc, (1 dec, 4 sc) x 2, 1 dec, 5 sc, (1 dec, 4 sc) x 2, 1 dec, 16 sc [60]
R25: 16 sc, (dec, 3 sc) x 2, 1 dec, 4 sc, (dec, 3 sc) x 2, 1 dec, 16 sc [54]
R26: 16 sc, (inc, 3 sc) x 2, 1 inc, 4 sc, (inc, 3 sc) x 2, 1 inc, 16 sc [60]
R27: 17 sc, (1 inc, 4 sc) x 2, 1 inc, 5 sc, (1 inc, 4 sc) x 2, 1 inc, 17 sc [66]
R28-29: 66 sc around [66]
R30: (9 sc, dec) x 6 [60]
R31: (8 sc, dec) x 6 [54]
Stop here to begin stuffing the head firmly.
R32: (7 sc, dec) x 6 [48]
R33: (6 sc, dec) x 6 [42]
R34: (5 sc, dec) x 6 [36]
R35: (4 sc, dec) x 6 [30]
R36: (3 sc, dec) x 6 [24]
R37: (2 sc, dec) x 6 [18]
R38: (1 sc, dec) x 6 [12]
Fasten off, leaving a tail for sewing.
Making the Ears
You will need to make two ears. Each ear consists of two identical triangles—one in pink and one in blue—joined together.
Ear Pattern:
R1: Ch 9 plus 1 ch for height. Turn and work in the 2nd ch from the hook: 9 sc [9]
R2: 1 ch, 1 dec, 5 sc, 1 dec [7]
R3-4: 1 ch, 7 sc [7]
R5: 1 ch, 1 dec, 3 sc, 1 dec [5]
R6-7: 1 ch, 5 sc [5]
R8: 1 ch, 1 dec, 1 sc, 1 dec [3]
Assembly: Crochet one triangle in pink and one in blue. Do not fasten off the blue piece. Place the two pieces together and crochet sc around the entire edge through both layers. When you reach the corners, work 2 sc into a single stitch to help the ear hold its shape. Fasten off, leaving a long tail for sewing.
Facial Details and Decoration
The face is what gives our cat its personality! Follow these steps to assemble the face:
- Eyes & Cheeks: Using your felt, cut out the eyes and cheeks. For the eyes, aim for a shape roughly 7 stitches wide and 9 rows long. You can draw them on paper first to create a template. Glue or sew them onto the head. Pro-tip: The bottom of the eyes should sit on Row 25 of the head.
- Muzzle & Brows: Using black embroidery floss, stitch the nose, mouth, and eyebrows onto the face.
- Whiskers: Use the floss to add a few delicate whiskers on either side of the muzzle.
- Attachment: Sew the ears to the top of the head, slightly folding the base as shown in the photos to give them a natural look.
Crafting the Body
We start the body from the legs to ensure a sturdy base.
Legs:
R1: 6 sc in a magic ring [6]
R2: 6 inc [12]
R3-4: 12 sc around [12]
R5: 3 dec, 6 sc [9]
R6-9: 9 sc around [9]
Fasten off on the first leg. Do not fasten off on the second leg!
Joining the Legs (R10): 6 sc on the first leg, ch 3, insert hook into the first stitch of the first leg’s last round, 9 sc along the side of the first leg, 3 sc along the chain, and 3 sc on the second leg [24].
R11-18: 24 sc around [24]
R19: (2 sc, dec) x 6 [18]
R20-22: 18 sc around [18]
Fasten off, leaving a long tail. To create toes, use a needle to pull the yarn through the bottom of the feet, creating two small indents (tugs). Finally, cut a small piece of white felt for the belly and glue or sew it to the front of the body.
Arms and Tail
Arms (Make 2):
R1: 6 sc in a magic ring [6]
R2: 6 inc [12]
R3-4: 12 sc around [12]
R5: (1 sc, dec) x 4 [8]
R6-13: 8 sc around [8]
Fold the arm in half and crochet sc through both sides. Add two small indents at the bottom for toes. Sew the arms to the body near the penultimate row.
Tail:
Start with white yarn.
R1: 4 sc in a magic ring [4]
R2: (1 sc, inc) x 2 [8]
R3-8: 8 sc around [8]
Stuff the tail as you go.
Switch to blue yarn.
R9-30: 8 sc around [8]
Fasten off, leaving a tail for sewing, and attach to Row 12 of the body.
Designing the Wings
The wings are made of five separate pieces worked in white yarn. These will be layered to create a feathered effect.
- Part 1: R1: 6 sc in MR; R2-13: 12 sc [12].
- Part 2: R1: 6 sc in MR; R2-18: 12 sc [12].
- Part 3: R1: 6 sc in MR; R2: 6 inc; R3-11: 12 sc [12].
- Part 4: R1: 6 sc in MR; R2: 6 inc; R3-8: 12 sc [12].
- Part 5: R1: 6 sc in MR; R2: 6 inc; R3-5: 12 sc [12].
Assembly: Fold Part 5 in half and crochet 6 sc through both sides. Next, crochet through the sides of Part 4 and attach it to Part 5. Do the same with Part 3. For the top section, sew Part 1 to Part 2. Finally, sew the 3-4-5 group to Part 2. Once the two wing halves are assembled, sew them onto the cat’s back. You can even attach a small brooch pin to the center if you want to wear your cat on your clothes!
The Little Green Bag
Every angel needs a little something to carry! We’ll make a tiny green bag.
R1: 6 sc in a magic ring [6]
R2: 6 inc [12]
R3: (1 sc, inc) x 6 [18]
R4: (2 sc, inc) x 6 [24]
R5: (3 sc, inc) x 6 [30]
R6: (4 sc, inc) x 6 [36]
R7-11: 36 sc around [36]
Fold the corners inward and crochet sc through both layers to create the bag shape. For the handle, insert your hook into one side and ch 21. Turn and work 20 sc into the 2nd ch from the hook. Repeat this on the other side. Fasten off and hide your yarn tails.
Finishing
To finish your project, go through and ensure all your yarn tails are securely woven into the body of the cat so they aren’t visible. Give your angel cat a little squeeze to make sure the stuffing is distributed evenly. Your beautiful, handmade amigurumi is complete!
Tips
- Tension is Key: When making amigurumi, try to keep your stitches tight. This prevents the white stuffing from peeking through the blue yarn.
- Use Stitch Markers: Since amigurumi is worked in a continuous spiral, it is very easy to lose your place. Always use a marker at the start of your round.
- Stuffing Strategy: Don’t wait until the very end to stuff. Add stuffing gradually as you work through the rows to ensure the shape remains consistent and doesn’t get lumpy.
- Felt Precision: When cutting your felt eyes, using a stencil or a piece of paper can help you get perfectly symmetrical shapes every time.