How to Crochet a Mini Mario Amigurumi: A Step-by-Step Tutorial
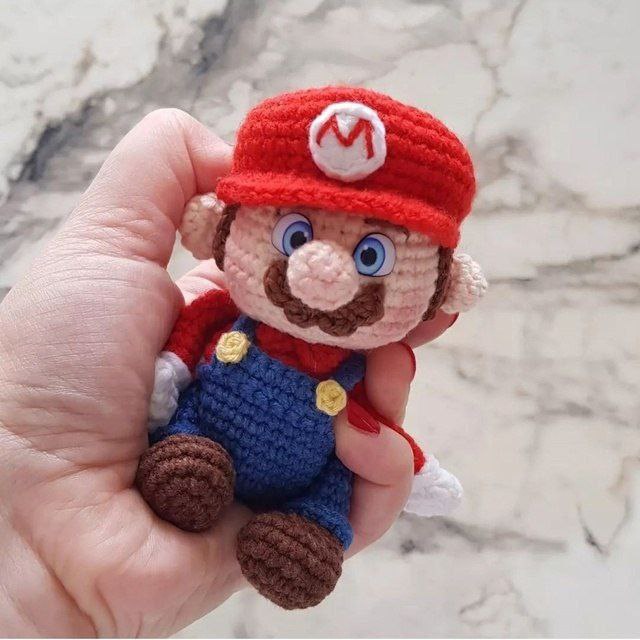
Bring the Mushroom Kingdom to life with this adorable Mini Mario crochet pattern! Whether you are a seasoned amigurumi artist or a beginner looking for a fun project, this detailed guide will help you create your very own pocket-sized Mario. This project is perfect for gaming enthusiasts, gift-givers, or anyone who loves a cute, handmade companion.
In this tutorial, we will walk through each part of Mario—from his iconic red cap and blue overalls to his famous mustache. Grab your hook and yarn, and let’s get started!
Materials & Abbreviations
To ensure your Mini Mario looks just like the photos, you will need the following materials. We recommend using a cotton or cotton-blend yarn for a clean, defined stitch.
Materials Needed
- Yarn: Medium weight (4) or Fingering weight (1) cotton yarn in the following colors:
- Blue (for overalls)
- Red (for hat and shirt)
- Beige/Skin tone (for head, nose, and ears)
- Brown (for hair, shoes, and mustache)
- White (for gloves and hat logo)
- Yellow (a small amount for buttons)
- Crochet Hook: 2.0mm (or a size that keeps your stitches tight so stuffing doesn’t show)
- Eyes: 6mm safety eyes and 8mm glue-on eyes (or you can embroider them)
- Filling: Polyester fiberfill stuffing
- Tools: Yarn needle, stitch markers, pins, and scissors
- Embroidery Thread: Dark blue and white for the eye details
US Crochet Abbreviations
- MR: Magic Ring
- sc: Single crochet
- inc: Increase (2 sc in one stitch)
- dec: Decrease (sc 2 together)
- ch: Chain
- sl st: Slip stitch
- hdc: Half double crochet
- dc: Double crochet
- BLO: Back loop only
- FLO: Front loop only
- st: Stitch
Step-by-Step Instructions
The Head
Use beige yarn.
- Round 1: 6 sc in MR (6)
- Round 2: 6 inc (12)
- Round 3: (1 sc, inc) * 6 (18)
- Round 4: (2 sc, inc) * 6 (24)
- Round 5: (3 sc, inc) * 6 (30)
- Round 6: (4 sc, inc) * 6 (36)
- Rounds 7-9: sc in each st around (36)
- Round 10: 17 sc, ch 1, skip 1 st, 4 sc, ch 1, skip 1 st, 13 sc (36)
- Round 11: 13 sc, (inc, 1 sc) * 2, inc, 4 sc, (inc, 1 sc) * 2, inc, 9 sc (42)
- Rounds 12-14: sc in each st around (42)
Note: Insert your safety eyes into the holes created in Round 10. If using glue-on eyes, skip the holes in Round 10 and glue them between Rounds 9 and 10.
- Round 15: (5 sc, dec) * 6 (36)
- Round 16: (4 sc, dec) * 6 (30)
- Round 17: (3 sc, dec) * 6 (24)
- Round 18: (2 sc, dec) * 6 (18)
Fasten off, leaving a long tail for sewing. Stuff the head firmly. Use white and dark blue embroidery thread to add the white of the eyes and the blue irises.
Ears and Nose (Make 3)
Use beige yarn.
- Round 1: 5 sc in MR (5)
- Round 2: 5 inc (10)
- Round 3: sc in each st around (10)
- Round 4: 5 dec (5)
Fasten off, leaving a long tail. Stuff one piece for the nose and leave the others lightly stuffed or flat for the ears. Sew the nose to the center of the face and the ears to the sides. Embroider eyebrows above the eyes.
Facial Hair and Hair Details
- Hair (Make 5): Use brown yarn. Ch 26. Starting from the 2nd ch from hook, work 25 sc. Fasten off.
- Sideburns (Make 2): Use brown yarn. Ch 7. Starting from 2nd ch from hook: sl st, 5 sc. Fasten off.
- Mustache: Use brown yarn. Ch 10. Starting from 3rd ch from hook: (hdc, ch 1, sl st, ch 1) * 4. Fasten off and sew below the nose.
The Iconic Red Cap
Use red yarn.
- Round 1: 6 sc in MR (6)
- Round 2: 6 inc (12)
- Round 3: (1 sc, inc) * 6 (18)
- Round 4: (2 sc, inc) * 6 (24)
- Round 5: (3 sc, inc) * 6 (30)
- Round 6: (4 sc, inc) * 6 (36)
- Round 7: (5 sc, inc) * 6 (42)
- Round 8: (6 sc, inc) * 6 (48)
- Rounds 9-11: sc in each st around (48)
- Round 12: (dec, 5 sc) * 4, dec, 17 sc (43)
- Round 13: (dec, 4 sc) * 4, dec, 17 sc (38)
- Round 14 (The Brim): 2 sl st, 2 sc, 2 inc-hdc, 2 inc-dc, 2 dc, inc-dc, 2 dc, 2 inc-dc, 2 inc-hdc, 2 sc, 2 sl st.
Fasten off and sew the edges of the brim to the base of the cap. For the Logo: Using white yarn, make a MR, ch 2, work 10 hdc, and sl st to the first stitch. Sew to the front of the cap and embroider a red “M” in the center.
The Body
Start with blue yarn.
- Round 1: 6 sc in MR (6)
- Round 2: 6 inc (12)
- Round 3: (1 sc, inc) * 6 (18)
- Round 4: (2 sc, inc) * 6 (24)
- Round 5: (3 sc, inc) * 6 (30)
- Round 6: (4 sc, inc) * 6 (36)
- Rounds 7-10: sc in each st around (36)
Switch to red yarn.
- Round 11: BLO sc in each st around (36)
- Round 12: sc in each st around (36)
- Round 13: 4 sc, (dec, 2 sc) * 5, dec, 10 sc (30)
- Round 14: (8 sc, dec) * 3 (27)
- Round 15: (7 sc, dec) * 3 (24)
- Round 16: (6 sc, dec) * 3 (21)
- Round 17: (5 sc, dec) * 3 (18)
Switch to beige yarn.
- Round 18: BLO sc in each st around (18)
Fasten off and stuff the body firmly.
Clothing Details
- Collar: Using red yarn, attach to the FLO of Round 17. Work: 7 sc, hdc, dc, ch 2, sl st, ch 2, dc, hdc, 6 sc. Fasten off and sew to the body.
- Overalls Front: Using blue yarn, attach to the FLO of Round 10 (starting from the back). Work 12 sl st, ch 1, (7 sc, ch 1, turn) * 3. Then 2 sl st along the side, and 17 sl st along the FLO of Round 10. Fasten off.
Arms and Legs
Arms (Make 2): Use white yarn.
- Round 1: 6 sc in MR (6)
- Round 2: 6 inc (12)
- Round 3: sc in each st around (12)
- Round 4: 5 sc, 3 dc in one st, 6 sc (12)
- Round 5: 4 sc, 3 dec, 2 sc (9)
Switch to red yarn.
- Round 6: BLO sc in each st around (9)
- Rounds 7-11: sc in each st around (9)
- Round 12: dec, 7 sc (8)
- Round 13: dec, 6 sc (7)
- Round 14: dec, 5 sc (6)
Fasten off and close the hole. To finish the cuff, work a row of sc in the FLO of Round 5 using white yarn.
Legs (Make 2): Use brown yarn.
- Round 1: Ch 4, starting from 2nd ch: inc, sc, 3 sc in last st, 2 sc along other side of chain (8)
- Round 2: 2 inc, sc, 3 inc, sc, inc (14)
- Round 3: 2 inc, (1 sc, inc) * 3, (inc, 1 sc) * 3 (22)
- Rounds 4-5: sc in each st around (22)
- Round 6: 7 sc, decrease 3 stitches together 4 times, 3 sc (14)
- Round 7: 7 sc, 2 dec, 3 sc (12)
- Round 8: sc in each st around (12)
Switch to blue yarn.
- Round 9: BLO sc in each st around (12)
- Rounds 10-14: sc in each st around (12). Stuff lightly.
- Round 15: 6 dec (6)
Fasten off and close. Work a row of sc in the FLO of Round 8 using blue yarn to create the shoe line.
Finishing
Now comes the most exciting part: assembling your Mario!
- Legs: Sew the legs to the body about 2 rounds below the waist.
- Arms: Sew the arms to the body 1 round below the collar.
- Straps: Join blue yarn to the back of the overalls. Ch 13, sl st to the corner of the front bib, and work 13 sc back to the body. Repeat for the second strap.
- Buttons: Using yellow yarn, work 5 sc in a MR for each button. Sew them to the front of the straps.
- Head: Sew the head to the body, adding extra stuffing into the neck area to make sure he stays upright.
- Hat & Hair: Place the hat on the head so it sits 5 rounds above the back of the head and 1 round above the eyebrows. Sew in place. Roll the brown hair strips into spirals and sew them to the sides of the head. Finally, attach the sideburns just below the hat.
Tips for Success
- Tight Tension: Amigurumi requires tight stitches to prevent the stuffing from leaking. If you see holes, try dropping down a hook size.
- Use Stitch Markers: Since most of this pattern is worked in continuous rounds (spirals), a stitch marker is essential to keep track of your beginning and end of each round.
- Taming the Hair: When rolling the hair spirals, you can use a tiny bit of fabric glue or a few hidden stitches to keep the curl permanent.
- Customizing: Feel free to change the yarn colors to create Luigi or other characters using this same basic base!