Cute Crochet Clown Doll Pattern: Step-by-Step Amigurumi Tutorial
Introduction
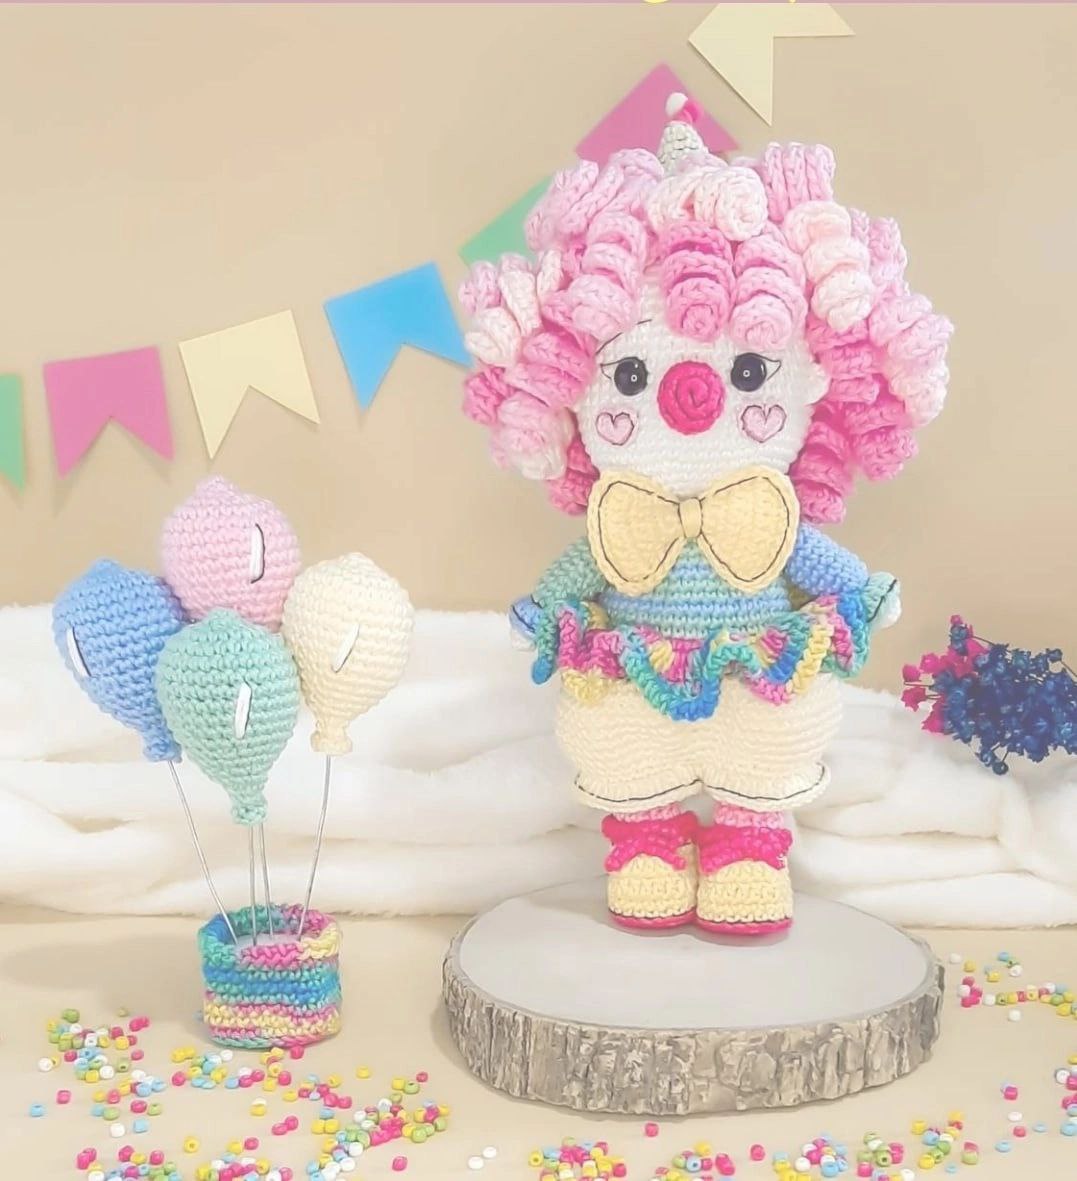
Are you looking to add a whimsical, handmade touch to your crochet collection? This adorable amigurumi clown doll is the perfect project! With her colorful pastel ruffles, oversized bow tie, bouncy curly hair, and sweet heart-shaped cheeks, she makes a wonderful gift, nursery decoration, or keepsake toy.
Standing at approximately 10 inches tall (12 inches including her festive party hat), this pattern is wonderful for intermediate crocheters or ambitious beginners looking to try new techniques like color changing, working in the third loop, and making perfect spirals. Let’s grab our hooks and bring this cute little clown to life!
Materials & Abbreviations
Materials Needed
- Yarn: Sport weight (or DK weight) cotton/acrylic blend yarn in the following colors:
- Light Pink (Body stripe, shoes, and hair)
- Bright Pink (Leg stripes and hair accents)
- Light Cream/Beige (Hair accents)
- Cherry Red (Nose and shoe accents)
- Soft Yellow (Neck bow)
- Sunny Yellow (Shoe body)
- Sky Blue (Sleeves and shirt stripe)
- Mint Green (Sleeves and shirt stripe)
- Variegated Pastel/Rainbow (Skirt)
- Off-White (Skin tone and pants)
- Embroidery Floss: Black (for eyes and details) and Candy Pink (for cheek hearts).
- Crochet Hooks: US Size B-1 (2.0 mm) hook for the main body; US Size 4 Steel Hook (1.75 mm) for the delicate cheek hearts.
- Safety Eyes: One pair of 12 mm safety eyes.
- Stuffing: Premium polyester fiberfill.
- Neck Support: A firm plastic roll or a fabric-wrapped wooden dowel to keep the head upright under the weight of the hair.
- Notions: Tapestry needle, embroidery needle, scissors, pins, and pink beads for the optional shoe bows.
Crochet Abbreviations (US Terms)
- MR: Magic Ring
- ch: Chain
- sc: Single Crochet
- hdc: Half Double Crochet
- dc: Double Crochet
- sl st: Slip Stitch
- inc: Increase (work 2 single crochets into the same stitch)
- dec: Decrease (single crochet two stitches together using the invisible decrease method)
- BLO: Back Loop Only
- FLO: Front Loop Only
- sc3lp: Single crochet in the third loop (used to create defined ridges on soles)
- Rnd(s): Round(s)
- Row(s): Row(s)
- St(s): Stitch(es)
Special Stitch: Single Crochet in the Third Loop (sc3lp)
To give the doll’s shoes and feet a highly defined, sturdy base, we will work some rounds into the third loop. Look at the back/wrong side of your work, just below the back loop. You will find a horizontal bar (the third loop). Inserting your hook here and pulling up a loop leaves both the front and back loops of the previous round completely untouched, creating a perfect right-angle fold for a clean, flat sole.
Step-by-Step Instructions
Arms (Make 2)
Note: Stuff the arms very lightly as you work, leaving the top 1 inch completely unstuffed so they lay flat against the body.
Start with Off-White yarn:
- Rnd 1: 6 sc in MR (6)
- Rnds 2-4: Sc in each st around (6)
Fasten off the Off-White yarn.
For the Right Arm, join Mint Green yarn.
For the Left Arm, join Sky Blue yarn.
- Rnd 5: Working in BLO, inc in each of the 6 sts (12)
- Rnds 6-13: Sc in each st around (12) – 8 rounds total
- Rnd 14: (1 sc, 1 dec) x 4 (8)
- Rnd 15: (2 sc, 1 dec) x 2 (6)
Fasten off, leaving a long tail for sewing.
Sleeve Ruffles:
For the Right Arm sleeve ruffle, join Sky Blue yarn.
For the Left Arm sleeve ruffle, join Mint Green yarn.
Hold the arm upside down (hand pointing upwards) and insert your hook into one of the exposed front loops of Rnd 5. Ch 2, then work:
- Rnd 1: FLO 2 dc in each loop around (12 dc)
Fasten off and weave in your ends.
Legs & Feet (Make 2)
Start with Light Pink yarn:
- Rnd 1: Ch 6. Starting in the second ch from hook, work: 4 sc, 3 sc in the last ch. Rotate to work along the opposite side of the chain: 3 sc, 1 inc in the first chain (12)
- Rnd 2: 1 inc, 3 sc, 3 inc, 3 sc, 2 inc (18)
- Rnd 3: 18 sc3lp (sc in the third loop only) (18)
- Rnds 4-5: Sc in each st around (18)
- Rnd 6: 5 sc, 4 dec, 5 sc (14)
- Rnd 7: 5 sc, 2 dec, 5 sc (12)
The legs are worked in alternating color stripes of Bright Pink and Light Pink. Ensure you keep your increases aligned on the outside of each leg to form correct calf shapes. Stuff the legs firmly as you go.
Left Leg Construction:
Change to Bright Pink yarn:
- Rnd 8: Sc in each st around (12)
Change to Light Pink yarn:
- Rnd 9: 3 sc, 1 inc, 8 sc (13)
Change to Bright Pink yarn:
- Rnd 10: Sc in each st around (13)
Change to Light Pink yarn:
- Rnd 11: 4 sc, 1 inc, 8 sc (14)
Change to Bright Pink yarn:
- Rnd 12: Sc in each st around (14)
Change to Light Pink yarn:
- Rnd 13: 5 sc, 1 inc, 8 sc (15)
Change to Bright Pink yarn:
- Rnd 14: Sc in each st around (15)
Change to Light Pink yarn:
- Rnd 15: 6 sc, 1 inc, 8 sc (16)
Change to Bright Pink yarn:
- Rnd 16: Sc in each st around (16)
Change to Light Pink yarn:
- Rnd 17: 7 sc, 1 inc, 8 sc (17)
Change to Bright Pink yarn:
- Rnd 18: Sc in each st around (17)
Change to Light Pink yarn:
- Rnd 19: 8 sc, 1 inc, 8 sc (18)
Change to Bright Pink yarn:
- Rnd 20: Sc in each st around (18)
- Rnd 21: 1 sc. Fasten off and cut the yarn.
Right Leg Construction:
Change to Bright Pink yarn:
- Rnd 8: Sc in each st around (12)
Change to Light Pink yarn:
- Rnd 9: 9 sc, 1 inc, 2 sc (13)
Change to Bright Pink yarn:
- Rnd 10: Sc in each st around (13)
Change to Light Pink yarn:
- Rnd 11: 10 sc, 1 inc, 2 sc (14)
Change to Bright Pink yarn:
- Rnd 12: Sc in each st around (14)
Change to Light Pink yarn:
- Rnd 13: 11 sc, 1 inc, 2 sc (15)
Change to Bright Pink yarn:
- Rnd 14: Sc in each st around (15)
Change to Light Pink yarn:
- Rnd 15: 12 sc, 1 inc, 2 sc (16)
Change to Bright Pink yarn:
- Rnd 16: Sc in each st around (16)
Change to Light Pink yarn:
- Rnd 17: 13 sc, 1 inc, 2 sc (17)
Change to Bright Pink yarn:
- Rnd 18: Sc in each st around (17)
Change to Light Pink yarn:
- Rnd 19: 14 sc, 1 inc, 2 sc (18). Fasten off Light Pink.
Change to Bright Pink yarn:
- Rnd 20: Sc in each st around (18)
- Rnd 21: Work 7 sc (to bring your yarn to the exact inner side of the thigh). Do not cut the yarn; we will join the legs next!
Joining the Legs & Crocheting the Body
With the Bright Pink yarn still attached to the Right Leg, ch 3, then join with an sc to the inner-middle stitch of the Left Leg. This joins both legs together. Ensure the toes are aligned nicely and point forward.
- Rnd 22: Work 18 sc around the Left Leg, 3 sc along the side of the ch-3, 18 sc around the Right Leg, and 3 sc along the remaining side of the ch-3 (42)
- Rnd 23: (6 sc, 1 inc) x 6 (48)
- Rnds 24-26: Sc in each st around (48)
- Rnd 27: 10 sc, 1 dec, 22 sc, 1 dec, 12 sc (46)
- Rnd 28: Sc in each st around (46)
- Rnd 29: 10 sc, 1 dec, 21 sc, 1 dec, 11 sc (44). Fasten off the Bright Pink yarn.
Change to Mint Green yarn:
- Rnd 30: Working in BLO, sc in each st around (44)
- Rnd 31: 9 sc, 1 dec, 21 sc, 1 dec, 10 sc (42)
Change to Sky Blue yarn:
- Rnd 32: Sc in each st around (42)
Change to Mint Green yarn:
- Rnd 33: 9 sc, 1 dec, 20 sc, 1 dec, 9 sc (40)
- Rnd 34: Sc in each st around (40)
Change to Sky Blue yarn:
- Rnd 35: 9 sc, 1 dec, 19 sc, 1 dec, 8 sc (38)
Change to Mint Green yarn:
- Rnd 36: Sc in each st around (38)
- Rnd 37: 9 sc, 1 dec, 18 sc, 1 dec, 7 sc (36)
Change to Sky Blue yarn:
- Rnd 38: (4 sc, 1 dec) x 6 (30). Fasten off the Sky Blue. Insert your neck support roll and stuff the body firmly.
Change to Mint Green yarn:
- Rnd 39: (3 sc, 1 dec) x 6 (24)
- Rnd 40: (2 sc, 1 dec) x 6 (18). Fasten off Mint Green.
Change to Off-White yarn:
- Rnd 41: Working in BLO, (1 sc, 1 dec) x 6 (12)
- Rnds 42-43: Sc in each st around (12) – 2 rounds of neck. Do not fasten off.
The Doll’s Head
Continue working in Off-White yarn directly from the neck:
- Rnd 44: Inc in each of the 12 sts (24)
- Rnd 45: (3 sc, 1 inc) x 6 (30)
- Rnd 46: (4 sc, 1 inc) x 6 (36)
- Rnd 47: (5 sc, 1 inc) x 6 (42)
- Rnd 48: (6 sc, 1 inc) x 6 (48)
- Rnd 49: (7 sc, 1 inc) x 6 (54)
- Rnds 50-63: Sc in each st around (54) – 14 rounds total
Safety Eyes Placement: Insert the 12 mm safety eyes between Rnds 56 and 57. Leave 9 stitches of space between the insert shafts, which will result in 7 visible stitches between the eyes once they are locked in.
- Rnd 64: (7 sc, 1 dec) x 6 (48)
- Rnd 65: (6 sc, 1 dec) x 6 (42)
- Rnd 66: (5 sc, 1 dec) x 6 (36)
- Rnd 67: (4 sc, 1 dec) x 6 (30)
- Rnd 68: (3 sc, 1 dec) x 6 (24)
- Rnd 69: (2 sc, 1 dec) x 6 (18)
- Rnd 70: (1 sc, 1 dec) x 6 (12)
- Rnd 71: 6 dec (6)
Fasten off, weave the tail through the front loops of the final 6 stitches, pull tight to close, and hide your yarn tail inside the head.
Nose & Cute Ears
The Clown Nose
Using Cherry Red yarn:
- Rnd 1: 6 sc in MR (6)
- Rnd 2: Inc in each st around (12)
- Rnds 3-4: Sc in each st around (12)
- Rnd 5: 6 dec (6)
Stuff very lightly, pull closed, and sew centered between the eyes between Rnds 54 and 55.
Ears (Make 2)
Using Off-White yarn:
- Row 1: 4 sc in MR. Do not join the ring or close it into a full circle. Fasten off, leaving a sewing tail.
Sew the semi-circular ears to the sides of the head between Rnds 53 and 56, roughly 6 stitches away from the eyes.
Mini Cheek Hearts (Make 2)
Using a double strand of Candy Pink embroidery floss (or very fine crochet thread) and a 1.75 mm hook:
- Rnd 1: Into a Magic Ring, work: ch 2, 2 dc, 1 hdc, 1 sc, 1 hdc, 1 sc, 1 hdc, 2 dc, ch 2. Join with a sl st to the center of the ring. Pull the MR tight to form the perfect mini heart.
Fasten off and sew or fabric glue one heart to each cheek, positioned just under the eyes and spaced 4 stitches away from the nose.
Pastel Rainbow Skirt
Hold the doll upright and insert your hook into one of the exposed front loops of Rnd 30 on the body using Variegated Pastel/Rainbow yarn:
- Rnd 1: FLO sc in each st around, join with a sl st to the first sc, ch 3 (44)
- Rnd 2: Work 3 dc in each st around (132 dc), join with a sl st, ch 3
- Rnd 3: Dc in each st around (132 dc), join with a sl st
- Rnd 4: Working in BLO, (1 sl st, ch 1) in each st around. Fasten off and weave in ends.
Cream Bloomers (Bermuda Shorts)
Using Custard Cream yarn, ch 50. Slip stitch to the first chain to make a large ring, making sure the chain is not twisted.
- Rnd 1: Sc in each ch around (50)
- Rnd 2: Sc in each st around (50)
- Rnd 3: (9 sc, 1 inc) x 5 (55)
- Rnd 4: (4 sc, 1 inc) x 11 (66)
- Rnds 5-8: Sc in each st around (66) – 4 rounds total
- Rnd 9: (9 sc, 1 dec) x 6 (60)
- Rnd 10: (8 sc, 1 dec) x 6 (54)
- Rnd 11: (7 sc, 1 dec) x 6 (48)
Work 3 additional single crochets so your working yarn is exactly at the back center of the bloomers. We will now split the work to create two pant legs (each leg uses 24 stitches).
First Leg:
- Rnd 12: 10 sc, 3 dec, 8 sc (21). Sl st to the first stitch of Rnd 12 to close the leg opening.
- Rnd 13: Ch 2, work 21 dc-inc (work 2 dc in each stitch) (42). Fasten off.
Second Leg:
Reattach Custard Cream yarn to the first free stitch on the opposite side of the leg split:
- Rnd 12: 10 sc, 3 dec, 8 sc (21). Sl st to the first stitch of this leg to close.
- Rnd 13: Ch 2, work 21 dc-inc (work 2 dc in each stitch) (42). Fasten off and weave in all ends.
Sunny Yellow Neck Bow
Using Soft Yellow yarn:
Part 1:
- Row 1: Ch 4, start in 2nd ch: 3 sc (3), ch 1, turn.
- Row 2: 1 inc, 1 sc, 1 inc (5), ch 1, turn.
- Row 3: Sc across (5), ch 1, turn.
- Row 4: 1 inc, 3 sc, 1 inc (7), ch 1, turn.
- Row 5: Sc across (7), ch 1, turn.
- Row 6: 1 inc, 5 sc, 1 inc (9), ch 1, turn.
- Row 7: Sc across (9). Fasten off.
Part 2:
Turn the piece over and attach your Soft Yellow yarn to the initial starting chain at Row 1 of Part 1. We will crochet a mirror image in the opposite direction:
- Row 1: 3 sc across (3), ch 1, turn.
- Row 2: 1 inc, 1 sc, 1 inc (5), ch 1, turn.
- Row 3: Sc across (5), ch 1, turn.
- Row 4: 1 inc, 3 sc, 1 inc (7), ch 1, turn.
- Row 5: Sc across (7), ch 1, turn.
- Row 6: 1 inc, 5 sc, 1 inc (9), ch 1, turn.
- Row 7: Sc across (9). Do not fasten off.
To finish the bow, single crochet all the way around the entire outer perimeter of both joined parts to make a clean, rounded edge. Put 3 sc in the furthest outer corners to keep them flat. Fasten off.
Center Band: Take a long strand of yellow yarn and wrap it firmly around the thin center of your bow multiple times until you form a nice, rounded middle knot. Knot securely on the back, leaving tails to attach the bow around the doll’s neck.
Clown Shoes (Make 2) & Beaded Bows
Shoe Base
Using Cherry Red yarn:
- Rnd 1: Ch 6. Start in 2nd ch: 4 sc, 3 sc in last ch. Rotate to work along the opposite side of the chain: 3 sc, 1 inc (12)
- Rnd 2: 1 inc, 3 sc, 3 inc, 3 sc, 2 inc (18)
- Rnd 3: 1 inc, 3 sc, 3 hdc-inc, 3 sc, 2 inc (24)
- Rnd 4: 1 sc, 1 inc, 4 sc, 1 hdc-inc, 4 dc-inc, 1 hdc-inc, 3 sc, 1 inc, 1 sc, 1 inc (33)
Change to Sunny Yellow yarn:
- Rnd 5: Working in BLO, sc3lp in each st around (33)
- Rnd 6: Sc in each st around (33)
- Rnd 7: 10 sc, 9 dc, 14 sc (33)
- Rnd 8: 11 sc, 7 dc, 15 sc (33)
- Rnd 9: 10 sc, 5 dec, 13 sc (28)
- Rnd 10: 11 sc, 2 dec, 13 sc (26). Fasten off Sunny Yellow.
Change to Cherry Red yarn:
- Rnd 11: Sc in each st around (26)
- Rnd 12: (1 sl st, ch 1) in each st around. Fasten off.
DIY Beaded Shoe Bows
- String 17 bright pink beads onto a piece of pink sewing thread, leaving a long tail on each side.
- Separate 8 beads to the left side and 8 beads to the right side, leaving 1 bead isolated in the middle.
- Thread the right tail through the center bead from right to left. Thread the left tail through the center bead from left to right. Tie a small knot. This forms the two bow loops!
- On one remaining tail thread, string 5 more beads. Skip the outermost bead, and thread your needle back down through the other 4 beads to create one bow tail.
- Repeat on the opposite side to make the second tail. Knot securely and sew the bow onto the front of the shoe.
Curly Clown Wig
Using Light Pink yarn:
- Rnd 1: 6 sc in MR (6)
- Rnd 2: Inc in each st around (12)
- Rnd 3: (1 sc, 1 inc) x 6 (18)
- Rnd 4: (2 sc, 1 inc) x 6 (24)
- Rnd 5: (3 sc, 1 inc) x 6 (30)
- Rnd 6: Working in BLO, (4 sc, 1 inc) x 6 (36)
- Rnd 7: (5 sc, 1 inc) x 6 (42)
- Rnd 8: (6 sc, 1 inc) x 6 (48)
- Rnd 9: Working in BLO, (7 sc, 1 inc) x 6 (54)
- Rnd 10: Sc in each st around (54)
Crocheting the Spiral Curls:
To create bouncy spiral curls, we will work in two rounds. Decreasing your hook size slightly or keeping loose tension will make the spirals extra bouncy!
- Rnd 10 Curls (27 curls total): We will alternate colors across this round. Use Bright Pink, Light Pink, and Light Cream/Beige yarn.
Join yarn to a stitch on Rnd 10: *Ch 20. Starting in 3rd ch from hook, work 3 hdc into each chain space back to the start (54 hdc total inside your spiral). Skip 1 stitch on Rnd 10, sl st to the next stitch.* Repeat from * to * all the way around Rnd 10, changing colors as you go. Fasten off and weave in ends. - Rnd 9 Curls (24 curls total): Join Light Pink yarn to one of the exposed front loops of Rnd 9:
*Ch 20. Starting in 3rd ch from hook, work 3 hdc into each chain space back to the base (54 hdc). Skip 1 loop on Rnd 9, sl st to the next loop.* Repeat from * to * all the way around. Fasten off.
Miniature Party Hat
Using Custard Cream yarn:
- Rnd 1: 6 sc in MR (6)
- Rnd 2: Sc in each st around (6)
- Rnd 3: Inc in each st around (12)
- Rnds 4-5: Sc in each st around (12)
- Rnd 6: (1 sc, 1 inc) x 6 (18)
- Rnds 7-8: Sc in each st around (18)
- Rnd 9: (2 sc, 1 inc) x 6 (24)
- Rnds 10-12: Sc in each st around (24)
- Rnd 13: (3 sc, 1 inc) x 6 (30)
- Rnds 14-16: Sc in each st around (30)
- Rnd 17: Working in FLO, (1 sl st, ch 1) in each st around.
Fasten off, leaving a long sewing tail. Stuff the party hat lightly before sewing.
Finishing & Assembly
Now that all of your elements are complete, let’s assemble this adorable clown doll!
1. Hair and Hat Attachment
Place the curly wig cap onto the head so it is tilted slightly back, covering from Rnd 63 downwards. Ensure the front curls framework sits nicely above the eyebrows and ears without covering the eyes. Pin securely, then sew or fabric glue the cap in place. Sew the stuffed miniature party hat onto the crown of the hair cap, and glue a small pink pompom to the very top tip of the hat.
2. Face Embroidery
Using black embroidery floss, outline the top curve of the safety eyes to create eyelashes. Add simple angled eyebrows above the eyes on Rnd 59 (spaced 6 stitches apart). Use a thin white strand of yarn to embroider a bright waterline directly beneath the safety eyes.
3. Limbs, Bloomers, and Collar
Slide the bloomers over the legs and up to the waist. Sew the arms securely to the sides of the body between Rnds 38 and 39. Tie the Soft Yellow neck bow securely around her neck to hide the transition area. Put on her sweet red-soled shoes, and your adorable amigurumi clown girl is complete!
Amigurumi Tips for Success
- Use Neck Support: Bouncy, spiral curly hair is heavy! A sturdy neck support insert (like a thick, wrapped plastic core or craft dowel) is essential to keep the doll’s head from drooping.
- Stitch Tension: Keep your main body stitches tight to prevent your fiberfill stuffing from showing through. If you naturally have looser stitch tension, drop down a hook size.
- Fun Customization: Bring your clown to life with fun extras! You can add cute pastel buttons to her shirt front, craft tiny balloons on wires to sit beside her, or add faux cosmetic eyelashes behind her safety eyes for a dramatic theatrical look.