How to Crochet a Cute Heart Elephant: Free Amigurumi Pattern
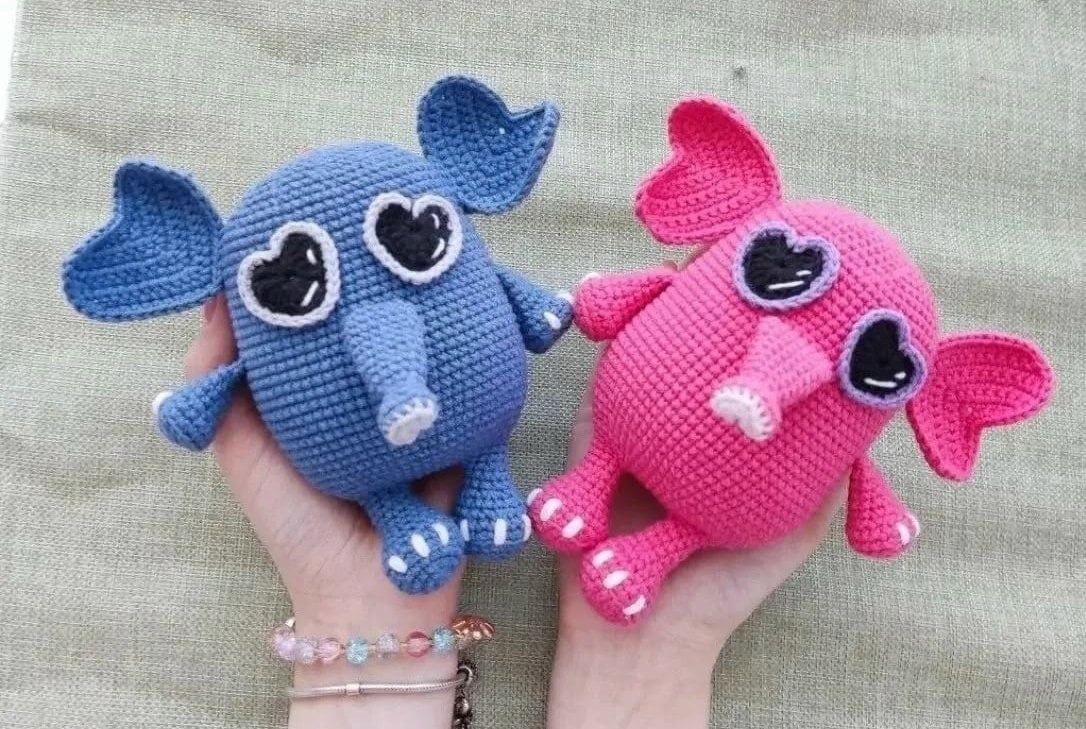
Looking for a project that is equal parts adorable and heartwarming? This little Heart Elephant is the perfect addition to your amigurumi collection. With its oversized heart-shaped eyes and chunky body, it makes a wonderful gift for a loved one or a sweet nursery decoration. Whether you are an experienced crocheter or a beginner looking to expand your skills, this detailed tutorial will guide you through every stitch.
This pattern uses a “spiral” method, meaning we don’t join rounds with a slip stitch unless specifically mentioned. This creates a seamless, smooth look for your plushie. Let’s dive into the magic of creating your own little heart-themed friend!
Materials & Abbreviations
To get started, gather the following materials. To achieve the look in the photos, a sport-weight cotton blend yarn is recommended.
Materials Needed
- Yarn: Sport weight yarn (such as Gazzal Jeans or a similar cotton/acrylic blend). You will need one main color for the body and a few contrasting colors for the eyes and accents.
- Crochet Hook: 2.0 mm hook.
- Stuffing: High-quality polyester fiberfill.
- Tools: A long yarn needle for sewing, sewing pins (preferably with colored heads), scissors, and a pair of tweezers or a stuffing tool.
- Markers: A stitch marker or a scrap piece of contrasting yarn to track the beginning of your rounds.
US Crochet Terms & Abbreviations
- MR: Magic Ring
- sc: Single Crochet
- inc: Increase (2 sc in one stitch)
- dec: Decrease (sc 2 together)
- hdc: Half Double Crochet
- dc: Double Crochet
- tr: Treble Crochet
- sl st: Slip Stitch
- ch: Chain
- BLO: Back Loop Only
- FLO: Front Loop Only
- ( ) * x: Repeat the instructions inside the parentheses the specified number of times.
Step-by-Step Instructions
The Trunk
The trunk is worked in a round to create a tapered tube.
Magic Ring: Ch 2, 1 dc, 1 hdc, 1 sc, ch 1, 1 hdc, ch 1, 1 sc, 1 hdc, 1 dc, ch 2. Pull the ring tight. Do not join the ring with a slip stitch.
- Round 1: Working into the back loops starting from the center, crochet 12 sc.
- Round 2: 12 sc.
- Round 3: (dec, 1 sc) * 4 (8 sts).
- Round 4: 8 sc.
- Round 5: (1 sc, inc) * 4 (12 sts).
- Rounds 6-8: 12 sc.
- Round 9: 3 sc, inc, 4 sc, inc, 3 sc (14 sts).
- Rounds 10-11: 14 sc.
- Round 12: 3 sc, inc, 6 sc, inc, 3 sc (16 sts).
- Round 13: 16 sc.
- Round 14: 13 sc.
Fasten off, leaving a long tail for sewing.
The Ears
The ears are worked in rows. Use a turning chain at the end of each row.
- Foundation: Ch 8.
- Row 1: inc, 2 sc, 3 sc in the next stitch, 2 sc, inc, ch 1, turn.
- Row 2: inc, 4 sc, 3 sc in the next stitch, 4 sc, inc, ch 1, turn.
- Row 3: inc, 6 sc, 3 sc in the next stitch, 6 sc, inc, ch 1, turn.
- Row 4: 9 sc, 3 sc in the next stitch, 9 sc, ch 1, turn.
- Rows 5-7: Skip 1 st, 9 sc, 3 sc in the next stitch, 8 sc, dec, ch 1, turn.
Now, do not turn the piece. Work a border of sc around the edge to give the ear a clean finish. You can use a contrasting color here if you like!
- Row 8 (Border): 4 sc, inc, 8 sc, inc, 3 sc. Join with a sl st.
Fasten off and leave a tail of about 3-4 inches for sewing.
The Heart Eyes
These are the signature feature of the elephant! Work these in a magic ring using black or white yarn.
Magic Ring: Ch 3, 2 tr, 2 tr, 1 dc, 1 dc, 2 tr, ch 1, 2 tr, 1 dc, 1 dc, 2 tr, 2 tr, ch 3. Pull the ring tight to close the center hole completely.
Border: Using a contrasting color, work a round of sc into the BLO (back loops only) all the way around the heart.
The Arms
Make two arms.
- MR: 6 sc.
- Round 1: 6 inc (12 sts).
- Round 2: (1 sc, inc) * 6 (18 sts).
- Round 3: 17 sc, sl st.
- Round 4: BLO 18 sc.
- Rounds 5-6: 18 sc.
- Round 7: (1 sc, dec) * 6 (12 sts).
- Rounds 8-9: 12 sc.
- Round 10: (4 sc, dec) * 2 (10 sts).
- Rounds 11-12: 10 sc.
Lightly stuff the arms, keeping the base flat. Fold the piece in half and crochet 5 sc across both halves to close the end. Fasten off securely.
The Legs
Make two legs.
- MR: 6 sc.
- Round 1: 6 inc (12 sts).
- Round 2: (1 sc, inc) * 6 (18 sts).
- Round 3: (5 sc, inc) * 3, join with sl st (21 sts).
- Round 4: BLO 21 sc.
- Round 5: 21 sc.
- Round 6: (5 sc, dec) * 3 (18 sts).
- Round 7: 18 sc.
- Round 8: (1 sc, dec) * 6 (12 sts).
- Rounds 9-10: 12 sc.
- Round 11: (2 sc, dec) * 3 (9 sts).
Fasten off the first leg. Do NOT cut the yarn on the second leg, as we will use it to start the body.
The Body
The body is worked by joining the legs and growing into a sphere.
- Setup: Ch 6.
- Round 1: Working around the first leg: 9 sc, across the chain: inc, 4 sc, inc; around the second leg: 9 sc, inc, 4 sc, inc, 9 sc, inc, 6 sc, inc, 9 sc (Total 36 sts).
- Round 2: 36 sc.
- Round 3: inc, 6 sc, (inc, 4 sc) * 3, (4 sc, inc) * 2, 4 sc, 5 sc (Place marker here to divide the body in half).
- Round 4: 3 sc, inc, (6 sc, inc) * 5, 3 sc (48 sts).
- Round 5: 48 sc.
- Round 6: (7 sc, inc) * 6 (54 sts).
- Round 7: 4 sc, inc, (8 sc, inc) * 5, 4 sc (60 sts).
- Round 8: (9 sc, inc) * 6 (66 sts).
- Rounds 9-20: 66 sc.
- Round 21 (Joining Arms): 14 sc, join arm (5 sc around arm), 28 sc, join arm (5 sc around arm), 14 sc.
- Rounds 22-23: 66 sc.
- Round 24 (Joining Trunk): 29 sc, join trunk (8 sc together with the trunk on the inside), 29 sc.
- Round 25: 29 sc, 8 sc around the remaining trunk stitches, 29 sc.
- Rounds 26-33: 66 sc.
Stuff the body firmly, but press it down slightly with your hand to make it a bit flat rather than a perfect ball. This gives the elephant a “bean” shape.
- Round 34: (9 sc, dec) * 6 (60 sts).
- Round 35: 4 sc, dec, (8 sc, dec) * 5, 4 sc (54 sts).
- Round 36: (7 sc, dec) * 6 (48 sts).
- Round 37: 3 sc, dec, (6 sc, dec) * 5, 3 sc (42 sts).
- Round 38: (5 sc, dec) * 6 (36 sts).
- Round 39: 2 sc, dec, (4 sc, dec) * 5, 2 sc (30 sts).
- Round 40: (3 sc, dec) * 6 (24 sts).
- Round 41: 1 sc, dec, (2 sc, dec) * 5, 1 sc (18 sts).
- Round 42: (dec, 1 sc) * 6 (12 sts).
- Round 43: dec * 6 (6 sts).
Fasten off and weave in your ends.
Finishing
Now it is time to bring your elephant to life with the final details!
- Eyes: Sew or glue the heart eyes at the same level as the trunk. Space them about 6-8 sc apart at the bottom and 3-4 sc apart at the top. Use white thread to embroider small “glimmer” dots on the eyes for extra cuteness.
- Paws: Use white yarn to embroider three small vertical stitches (claws/nails) on each arm (spaced 2 sc apart) and each leg (spaced 3 sc apart).
- Tail: On the back of the body (about 9-10 rounds up from the bottom), crochet the following: 5 sl st, turn, ch 1, (dec, 1 sc, dec), turn, ch 1, 1 sc. Fasten off and hide the yarn.
- Ears: Sew the ears to the sides of the head.
Tips for Success
- Consistent Tension: Keep your stitches tight so the stuffing doesn’t peek through. If you see gaps, try dropping down a hook size.
- The “Bean” Shape: When stuffing the body, remember to flatten it slightly against a table. This prevents the elephant from looking like a ball and gives it a more professional plushie look.
- Marker Use: Don’t forget your stitch marker! Since this is worked in a spiral, it is very easy to lose your place.
- Symmetry: When sewing the eyes and ears, use pins to position them first. Step back and look at your work from a distance to ensure everything is symmetrical before you start sewing.