How to Crochet an Adorable Amigurumi Bear: A Step-by-Step Tutorial
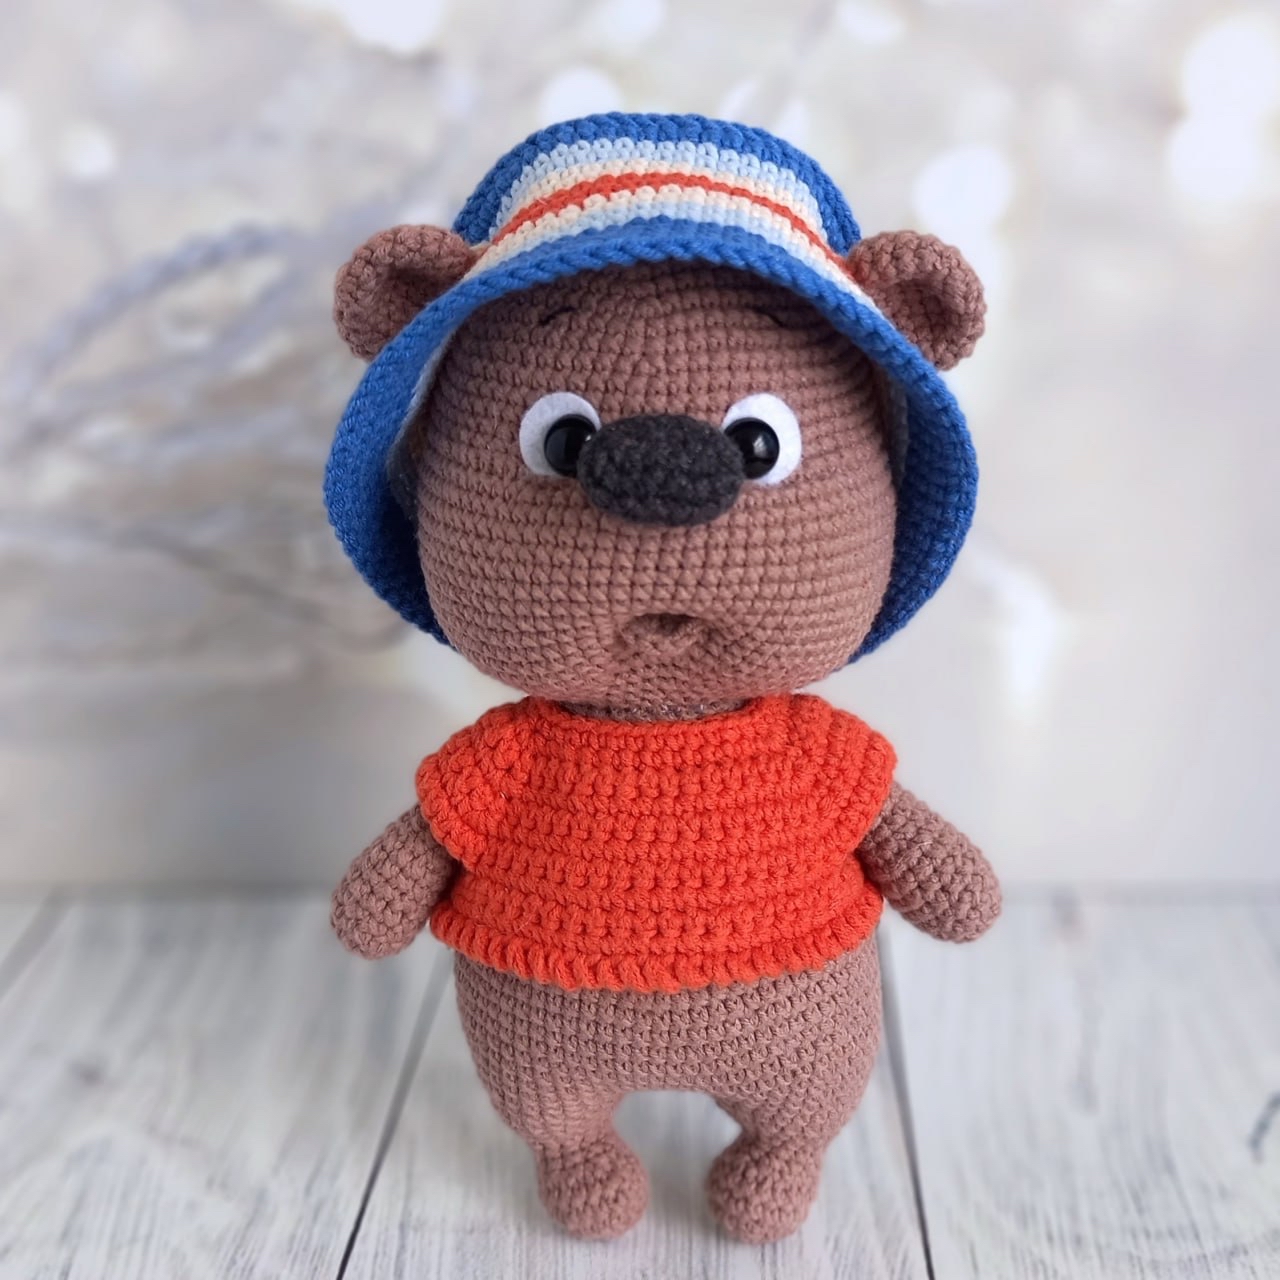
If you are looking for your next cozy crochet project, look no further! This chunky, wide-nosed little bear is absolutely irresistible. With its oversized features and cute little outfit, this amigurumi bear makes the perfect nursery decoration or a handmade gift for a little one. This tutorial will guide you through creating this charming character from scratch, including his tiny arms, sturdy legs, and even his stylish bucket hat and shirt.
This pattern is designed to be beginner-friendly, focusing on standard amigurumi techniques. By the end of this guide, you will have a finished bear standing approximately 7.5 to 8 inches tall. Let’s grab our hooks and get started!
Materials & Abbreviations
To ensure your bear turns out looking just like the photos, I recommend using a smooth, medium-weight cotton or cotton-blend yarn. This helps define your stitches and prevents the stuffing from peeking through.
What You Will Need
- Yarn: Medium weight (worsted) yarn in your choice of colors. You will need a main color for the body, a dark color for the nose, and various colors for the hat and shirt.
- Crochet Hook: A hook appropriate for your yarn weight (typically 3.25mm to 4.0mm).
- Safety Eyes: 10mm safety eyes (or beads/buttons if you prefer to sew them).
- Felt: Small white felt circles (about 0.6 inches in diameter) for the eye whites.
- Stuffing: Polyester fiberfill.
- Embroidery Thread: A thin black or dark brown thread for the facial details.
- Other Tools: A tapestry needle, scissors, stitch markers, and pins.
Abbreviations (US Terms)
Please note that all instructions are written in US crochet terms.
- MR: Magic Ring
- sc: single crochet
- ch: chain
- st: stitch
- inc: increase (2 sc in one stitch)
- dec: decrease (sc two stitches together)
- sl st: slip stitch
- (…) * X: repeat the instructions inside the parentheses X times
- The number after the symbol: Represents the total number of stitches at the end of the round.
Step-by-Step Instructions
Note: Most parts of the bear are worked in a continuous spiral. Use a stitch marker to keep track of the beginning of each round.
The Upper Arms (Make 2)
Start with a Magic Ring and work as follows:
- Round 1: 7 sc in MR = 7
- Round 2: 7 inc = 14
- Rounds 3-8: 14 sc
- Round 9: 5 sc, 2 dec, 5 sc = 12
- Rounds 10-17: 12 sc
Leave a long tail for sewing. Stuff only the bottom portion of the arms lightly. Fold them in half and sc through both layers (about 6 sc) to close the top. These will be sewn into the body later.
The Nose
Chain 5. Starting from the second chain from the hook:
- Round 1: inc, 2 sc, 4 sc in one stitch, 2 sc, inc = 12
- Round 2: 2 inc, 2 sc, 4 inc, 2 sc, 2 inc = 20
- Rounds 3-4: 20 sc
- Round 5: 10 dec
Fasten off, leaving a tail. You may lightly stuff the nose now or later.
The Head
The head is a large sphere that incorporates the nose during the process.
- Round 1: 6 sc in MR = 6
- Round 2: 6 inc = 12
- Round 3: (1 sc, inc) * 6 = 18
- Round 4: (2 sc, inc) * 6 = 24
- Round 5: (3 sc, inc) * 6 = 30
- Round 6: (4 sc, inc) * 6 = 36
- Round 7: (5 sc, inc) * 6 = 42
- Round 8: (6 sc, inc) * 6 = 48
- Round 9: (7 sc, inc) * 6 = 54
- Round 10: (8 sc, inc) * 6 = 60
- Rounds 11-12: 60 sc
- Round 13: (9 sc, inc) * 6 = 66
- Rounds 14-18: 66 sc
Incorporating the Nose and Eyes
In Round 19, you will weave the nose into the head. This adds that unique, wide-eyed look.
- Round 19: 19 sc, (1 sc, inc) * 6, 5 sc (work into the stitches of the nose), (inc, 1 sc) * 6, 18 sc = 78
- Round 20: 37 sc, 5 sc (working into the remaining nose stitches), 36 sc = 78
- Rounds 21-30: 78 sc
Eye Placement: Between rounds 17 and 18, insert your safety eyes. They should be approximately 8 stitches apart and centered relative to the nose. To create the eye whites, cut small felt circles, make tiny perpendicular slits in them, and secure them behind the eyes.
Continue with the decreases to close the head:
- Round 31: (11 sc, dec) * 6 = 72
- Round 32: (7 sc, dec) * 8 = 64
- Round 33: (6 sc, dec) * 8 = 56
- Round 34: (5 sc, dec) * 8 = 48
- Round 35: (4 sc, dec) * 8 = 40
- Round 36: (3 sc, dec) * 8 = 32
- Round 37: (2 sc, dec) * 8 = 24
Stuff the head firmly. Leave a long tail for sewing to the body.
The Lower Legs (Make 2)
These legs are designed to give the bear a slightly wide, “waddling” stance.
- Round 1: 6 sc in MR = 6
- Round 2: 6 inc = 12
- Round 3: (1 sc, inc) * 6 = 18
- Rounds 4-5: 18 sc
- Round 6: 3 sc, 6 dec, 3 sc = 12
- Rounds 7-8: 12 sc
- Round 9: (1 sc, inc) * 6 = 18
- Round 10: 18 sc
- Round 11: (2 sc, inc) * 6 = 24
- Round 12: 24 sc
The Connection: To get the wide stance, do not sew the legs directly to the body. Instead, join them with a chain. Connect the first leg to the second using a small chain, then adjust the distance between them to create the desired “waddle” look. Use extra stitches to secure the connection points so the legs sit symmetrically.
The Body
Start by joining the legs with a chain of 3. Work around the legs and the chain to create a continuous round.
- Round 1: 24 sc around the first leg, 3 sc across the chain, 24 sc around the second leg, 3 sc across the chain = 54
- Round 2: (8 sc, inc) * 6 = 60
- Round 3: 60 sc
- Round 4: (9 sc, inc) * 6 = 66
- Rounds 5-8: 66 sc
- Round 9: 66 sc (Optionally, work a small tail here by chaining 5 and working back through the stitches).
- Round 10: 66 sc
- Round 11: 66 sc
- Round 12: (9 sc, dec) * 6 = 60
- Round 13: 60 sc
- Round 14: (8 sc, dec) * 6 = 54
- Round 15: 54 sc
- Round 16: (7 sc, dec) * 6 = 48
- Round 17: 48 sc
- Round 18: (6 sc, dec) * 6 = 42
- Round 19: 42 sc
- Round 20: (5 sc, dec) * 6 = 36
- Rounds 21-23: 36 sc
Attaching Arms: In Round 24, work the arms into the sides of the body. For example: 8 sc, 6 sc (incorporating the arm), 12 sc, 6 sc (incorporating the second arm), 4 sc = 36.
- Round 25: 36 sc
- Round 26: (4 sc, dec) * 6 = 30
- Round 27: (3 sc, dec) * 6 = 24
Stuff the body firmly and leave a long tail to sew it to the head.
The Ears (Make 2)
- Round 1: 6 sc in MR = 6
- Round 2: 6 inc = 12
- Round 3: (1 sc, inc) * 6 = 18
- Round 4: (2 sc, inc) * 6 = 24
- Rounds 5-6: 24 sc
- Round 7: (2 sc, dec) * 6 = 18
- Round 8: (1 sc, dec) * 6 = 12
- Round 9: 1 sc, fold the ear in half and sc through both layers for 6 sc.
Sew the ears onto the head between rounds 10 and 11, approximately 16 stitches away from the center of the face on each side.
Finishing
Face Sculpting
To give your bear character, we will “sculpt” the face to create eye indentations and a mouth shape.
- Mark 6 points on the face with pins. Place two points near the inner corners of the eyes, two near the outer corners, and two below the nose to form the mouth.
- Thread a needle with sturdy black thread.
- Insert the needle at point 1 (inner eye corner), pull through to point 2 (outer eye corner). Then go from point 3 to point 6 (the mouth area).
- Pull the thread tight to create the eye socket, knot it, and hide the tail.
- Continue this “looping” pattern to create the mouth indentation. Secure with a bit of clear glue if needed for extra durability.
The Lower Lip
To add a cute little pout, crochet a tiny semi-circle. Chain 6, then work sc around the edge to create a small shape. Sew this just below the sculpted mouth area. For extra detail, you can embroider thin eyebrows with black thread.
The Outfit (Hat and Shirt)
The hat is worked from the top down in a spiral. For the bucket hat, work a magic ring and increase through several rounds until you reach the desired width. To create the “brim,” you can work into the back loops only or use a specific stitch to create a flared effect. The shirt is worked in rows (not rounds). Use a turning chain at the end of each row and work back and forth, creating armholes by skipping stitches in the middle of certain rows.
Tips
- Tension is Key: When stuffing, make sure to pack the stuffing tightly into the neck area when sewing the head to the body. This prevents the “floppy head” look.
- Mark Your Rounds: Since amigurumi is worked in a spiral, always use a stitch marker. It is very easy to lose your place!
- Customization: Don’t be afraid to play with colors. A striped hat or a patterned shirt can completely change the personality of your bear.
- Safety First: If making this for a baby, consider embroidering the eyes instead of using plastic safety eyes to prevent choking hazards.