How to Crochet an Adorable Tiny Bear Keychain: A Beginner-Friendly Amigurumi Tutorial
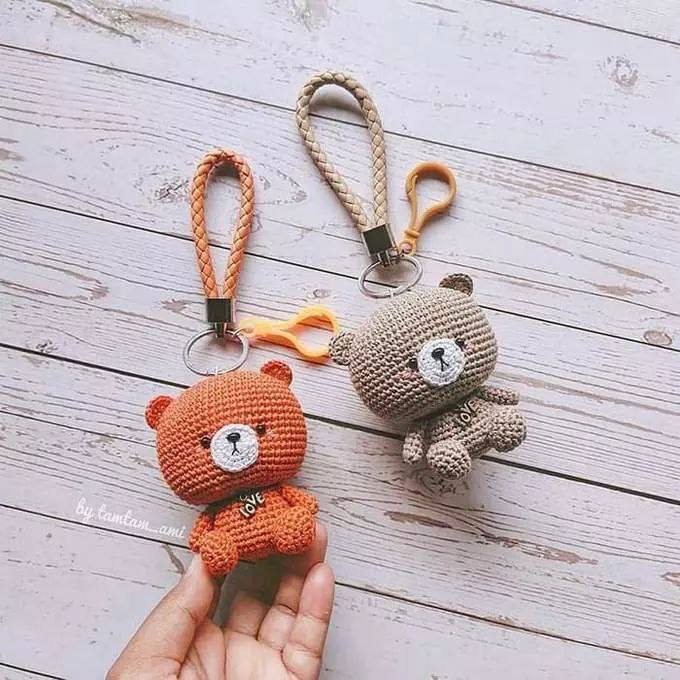
Are you looking for a quick, adorable, and useful crochet project? Look no further! These tiny crochet bear keychains are the perfect addition to your accessory collection. Whether you want to decorate your keys, add some personality to your backpack, or create handmade gifts for friends and family, these little bears are absolutely irresistible.
This pattern is designed with beginners in mind. While it uses amigurumi techniques, the shapes are simple, and the stitches are repetitive, making it a great way to practice your tension and shaping skills. You can customize these bears by using different colors—try a classic brown, a soft cream, or even bright neon colors for a modern look!
Materials & Abbreviations
Before we dive into the stitches, let’s make sure you have everything you need on your crochet hook. Because these bears are small, using a smaller hook is essential to ensure your stuffing doesn’t peek through the stitches.
What You Will Need
- Yarn: A fine weight yarn works best. You can use cotton yarn for a more defined stitch look, or a soft mohair blend for a fuzzy, cuddly texture.
- Crochet Hook: A 1.25 mm (or approximately B-1) crochet hook.
- Safety Eyes or Beads: Small black beads or safety eyes to give your bear its personality.
- Nose: A small plastic nose or black embroidery thread/floss to sew a nose.
- Embroidery Thread: Black yarn or embroidery floss for the facial details (mouth and whiskers) and pink yarn for adorable rosy cheeks.
- Stuffing: Polyester fiberfill (standard toy stuffing) to make the bears plump.
- Keychain Hardware: Metal split rings, lobster clasps, or braided cord loops to turn your bear into a keychain.
- Other Tools: A tapestry needle (for sewing pieces together), scissors, and stitch markers.
Abbreviations (US Terms)
This pattern uses standard United States crochet terminology. Please ensure you are using US terms to avoid confusion with UK terms.
- MR: Magic Ring (or Magic Circle)
- ch: Chain
- sc: Single crochet
- inc: Increase (2 sc in the same stitch)
- dec: Decrease (sc 2 stitches together)
- sl st: Slip stitch
- st(s): Stitch(es)
- (…, inc) * n: Repeat the instructions inside the parentheses n times.
Step-by-Step Instructions
Follow these instructions carefully. If you are a total beginner, I recommend practicing your magic ring and single crochet stitches on a scrap piece of yarn first!
The Head
The head is worked in an oval shape to create a rounded, slightly elongated look. Start with 12 ch. You will work on both sides of the foundation chain to create the oval.
- Row 1: 10 sc in the 2nd ch from the hook, then 3 sc in the very last ch. Now, turn to work on the other side of the chain: 9 sc, 1 inc (24)
- Row 2: 1 inc, 9 sc, 3 inc, 9 sc, 2 inc (30)
- Row 3: 1 inc, 10 sc, 1 inc, (1 sc, 1 inc) * 2, 10 sc, 1 inc, 1 sc, 1 inc, 1 sc (36)
- Row 4: 2 sc, 1 inc, 11 sc, 1 inc, (2 sc, 1 inc) * 2, 11 sc, 1 inc, 2 sc, 1 inc (42)
- Row 5: 1 sc, 1 inc, 12 sc, 1 inc, (3 sc, 1 inc) * 2, 12 sc, 1 inc, 3 sc, 1 inc, 2 sc (48)
- Row 6: 3 sc, 1 inc, 13 sc, 1 inc, (4 sc, 1 inc) * 2, 13 sc, 1 inc, 4 sc, 1 inc, 1 sc (54)
- Row 7: 54 sc (54)
- Row 8: 2 sc, 1 inc, 14 sc, 1 inc, (5 sc, 1 inc) * 2, 14 sc, 1 inc, 5 sc, 1 inc, 3 sc (60)
- Rows 9-21: 60 sc (13 rows total)
- Row 22: 2 sc, 1 dec, 14 sc, 1 dec, (5 sc, 1 dec) * 2, 14 sc, 1 dec, 5 sc, 1 dec, 3 sc (54)
- Row 23: (7 sc, 1 dec) * 6 (48)
- Row 24: 24 dec (24)
Note: Fasten off, leaving a long tail for sewing the head to the body. Stuff the head firmly.
The Body
- Row 1: 6 sc in a MR (6)
- Row 2: 6 inc (12)
- Row 3: (1 sc, 1 inc) * 6 (18)
- Row 4: (2 sc, 1 inc) * 6 (24)
- Row 5: (3 sc, 1 inc) * 6 (30)
- Row 6: (4 sc, 1 inc) * 6 (36)
- Rows 7-12: 36 sc (6 rows)
- Row 13: (4 sc, 1 dec) * 6 (30)
- Row 14: 30 sc (30)
- Row 15: (3 sc, 1 dec) * 6 (24)
- Row 16: 24 sc, then sl st to close (24)
Stuff the body firmly before closing the final hole.
The Arms (Make 2)
- Row 1: 7 sc in a MR (7)
- Rows 2-6: 7 sc (5 rows total)
Fasten off, leaving a tail for sewing. Do not stuff the arms.
The Ears (Make 2)
The ears are worked in rows to create a small semi-circle shape.
- Row 1: 5 sc in a MR, turn.
- Row 2: 5 inc, sl st to close (10)
Fasten off, leaving a tail for sewing.
The Muzzle
This is the small white/cream piece that will sit on the face.
- Row 1: 6 sc in a MR (6)
- Row 2: 6 inc (12)
- Row 3: (1 sc, 1 inc) * 6, sl st to close (18)
Fasten off, leaving a tail for sewing.
The Legs (Make 2)
Like the head, these are worked in an oval shape using a foundation chain.
- Row 1: 5 ch. Work on both sides of the chain starting from the 2nd ch from hook: 3 sc, 3 sc in the last ch. Turn to work on the other side: 2 sc, 1 inc (10)
- Row 2: 1 inc, 2 sc, 3 inc, 2 sc, 2 inc (16)
- Rows 3-4: 16 sc (2 rows)
- Row 5: 4 sc, 3 dec, 4 sc, 1 dec (12)
Fasten off, leaving a tail for sewing. Stuff the legs lightly.
The Tail
- Row 1: 6 sc in a MR (6)
- Row 2: 6 inc (12)
- Row 3: (1 sc, 1 dec) * 4, sl st to close (8)
Fasten off, leaving a tail for sewing.
Finishing
Assembly is where your little bear truly comes to life! Take your time to ensure everything is symmetrical.
1. Facial Features
First, sew the muzzle onto the center of the head. Place your safety eyes or beads just above the muzzle. Use your black embroidery floss to stitch a small nose onto the muzzle and a tiny mouth underneath. For an extra touch of cuteness, use pink yarn to stitch two small horizontal lines on the cheeks to represent blush.
2. Body Assembly
Sew the head onto the top of the body. Use a strong stitch to ensure it doesn’t wobble. Next, sew the ears to the top of the head, making sure they are even. Attach the arms to the sides of the body and the legs to the bottom. Finally, sew the tail to the back of the body.
3. Adding the Keychain
Once the bear is fully assembled, thread your keychain ring or lobster clasp through the top of the head (you can insert it through the head before you finish stuffing to make it more secure). If you want a more decorative look, you can add a small braided cord loop or a tiny bell.
Tips for Success
To make your bear look professional and polished, keep these tips in mind:
- Tension is Key: Amigurumi should be worked with tight tension. If your stitches are too loose, the white stuffing will show through, which can look messy and allow the stuffing to fall out.
- Use Stitch Markers: When working in rounds, it is very easy to lose your place. Always use a stitch marker in the first stitch of every round.
- Don’t Overstuff: While you want the bear to be firm, overstuffing can cause the stitches to stretch out and lose their shape. Stuff until the bear is plump but still holds its form.
- Symmetry Matters: When sewing the eyes and ears, use a ruler or simply measure against the center of the face to ensure they are even. This makes a huge difference in how “cute” the bear looks!
- Safety First: If you are making these for small children, please avoid using plastic safety eyes. Instead, embroider the eyes using black yarn to prevent any choking hazards.
Happy crocheting! We can’t wait to see your custom bears!