How to Crochet a Cute Mini Fluffy Cat: Easy Amigurumi Pattern
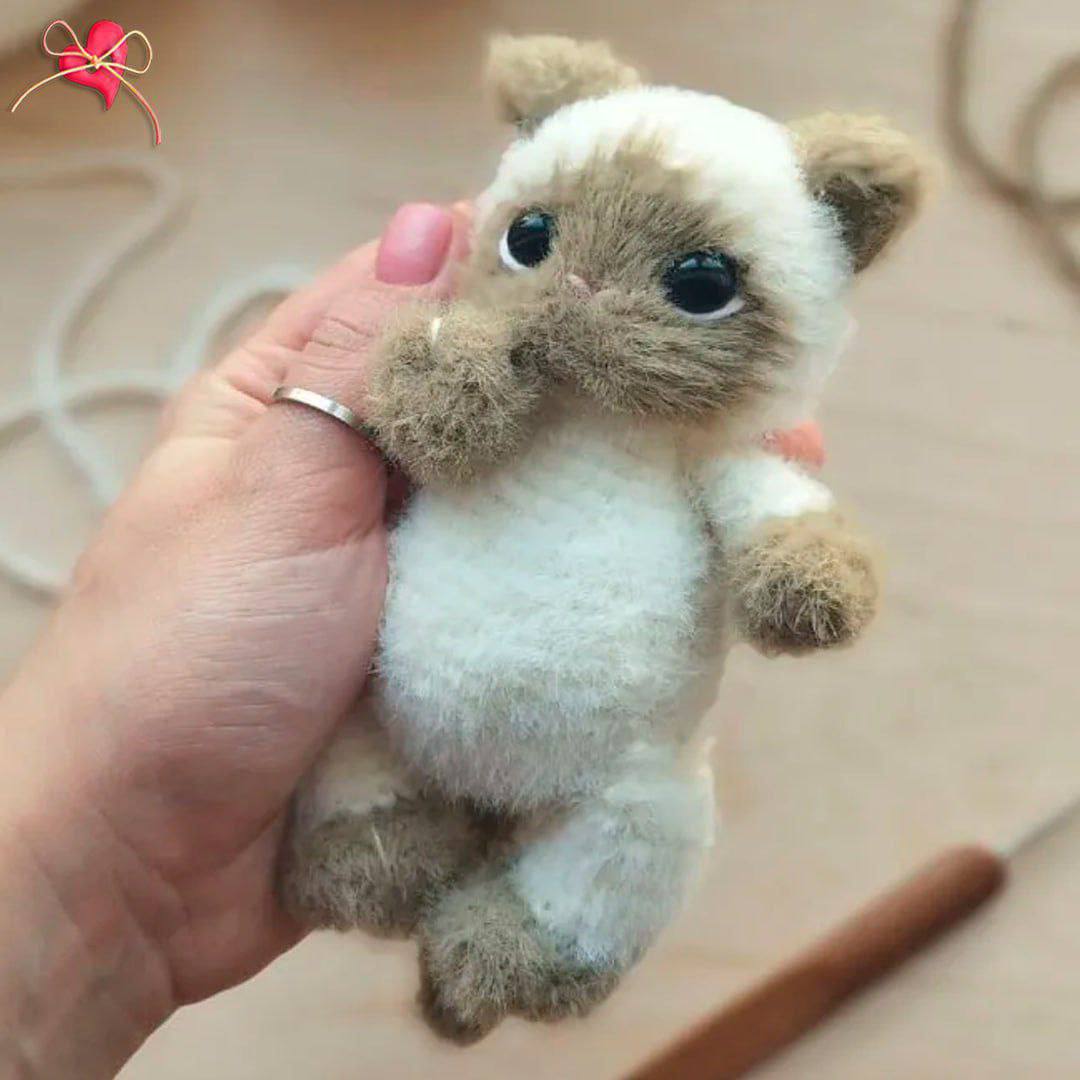
There is nothing quite as heartwarming as a tiny, fluffy companion! Whether you are looking for a quick gift or a new addition to your own crochet collection, this mini fluffy cat is the perfect project. With its adorable proportions and soft texture, this little kitty is designed to be cuddly and charming.
This pattern is written with beginners in mind. We will be using basic amigurumi techniques like the magic ring and simple increases and decreases. Because we are using plush or chenille-style yarn, the project works up quickly, and the finished result is incredibly soft to the touch. Let’s dive in and create your new feline friend!
Materials & Abbreviations
To get started, you will need a few basic supplies. Since this is a “fluffy” pattern, the choice of yarn is key to getting that cuddly look.
Materials Needed
- Yarn: Super bulky chenille or plush yarn. You will need a main color (for the body) and a contrasting lighter color (for the muzzle and belly if you choose the multi-colored version).
- Crochet Hook: A hook size that works well with your plush yarn to keep stitches tight (typically between 3.5mm and 4.5mm).
- Safety Eyes: 6mm or 8mm black safety eyes.
- Stuffing: High-quality polyester fiberfill.
- Tools: A yarn needle, stitch markers, and scissors.
Abbreviations (US Terms)
- MR: Magic Ring
- sc: Single crochet
- inc: Increase (two single crochet stitches in one stitch)
- dec: Decrease (single crochet two stitches together)
- sl st: Slip stitch
- st(s): Stitch(es)
- Rnd: Round
Step-by-Step Instructions
The Head
You have two choices for the head: a solid color for a simple look, or a color-changed muzzle for a more realistic “Siamese” or “Ragdoll” appearance. Both options follow the same shaping, but the color-change version requires switching yarns.
Option 1: Solid Color Head
- Rnd 1: 7 sc in MR (7)
- Rnd 2: 7 inc (14)
- Rnd 3: (1 sc, inc) x7 (21)
- Rnd 4: (2 sc, inc) x7 (28)
- Rnd 5: (3 sc, inc) x7 (35)
- Rnds 6-8: sc in each st around (35)
- Rnd 9: (4 sc, inc) x7 (42)
- Rnd 10: sc in each st around (42)
- Rnd 11: (13 sc, inc) x3 (45)
- Rnds 12-16: sc in each st around (45)
- Rnd 17: (7 sc, dec) x5 (40)
- Rnd 18: 20 dec (20)
Option 2: Head with Color-Changed Muzzle
Follow the solid color pattern for Rnds 1-5. Starting at Round 6, introduce your muzzle color as follows (muzzle color stitches are specified):
- Rnd 6: 17 main color sc, 2 muzzle color sc, 16 main color sc (35)
- Rnd 7: 16 main color sc, 4 muzzle color sc, 15 main color sc (35)
- Rnd 8: 15 main color sc, 6 muzzle color sc, 14 main color sc (35)
- Rnd 9: (4 main sc, inc) x2, 4 main sc, inc (muzzle color), 4 main sc, inc (muzzle color), 2 main sc, 2 main sc, inc (muzzle color), (4 main sc, inc) x2 (42)
- Rnd 10: 15 main color sc, 12 muzzle color sc, 15 main color sc (42)
- Rnd 11: 13 main color sc, inc (muzzle color), 13 main color sc, inc (muzzle color), 13 main color sc, inc (muzzle color) (45)
- Rnds 12-16: 15 main color sc, 15 muzzle color sc, 15 main color sc (45)
After Round 16, return to the main color for Round 17 and 18 as written in the solid color section.
Eye Placement: Place the safety eyes between rounds 10 and 11, leaving 9 stitches of space between them.
The Body
- Rnd 1: 7 sc in MR (7)
- Rnd 2: 7 inc (14)
- Rnd 3: (1 sc, inc) x7 (21)
- Rnd 4: (2 sc, inc) x7 (28)
- Rnd 5: (3 sc, inc) x7 (35)
- Rnd 6: (6 sc, inc) x5 (40)
- Rnd 7: (7 sc, inc) x5 (45)
- Rnds 8-10: sc in each st around (45)
- Rnd 11: (13 sc, dec) x3 (42)
- Rnd 12: (12 sc, dec) x3 (39)
- Rnd 13: (11 sc, dec) x3 (36)
- Rnd 14: sc in each st around (36)
- Rnd 15: (10 sc, dec) x3 (33)
- Rnd 16: sc in each st around (33)
- Rnd 17: (9 sc, dec) x3 (30)
- Rnd 18: (8 sc, dec) x3 (27)
- Rnd 19: (7 sc, dec) x3 (24)
- Rnd 20: sc in each st around (24)
- Rnd 21: (4 sc, dec) x4 (20)
Fasten off, leaving a long tail for sewing the head to the body.
Arms (Make 2)
- Rnd 1: 6 sc in MR (6)
- Rnd 2: 6 inc (12)
- Rnd 3: (1 sc, inc) x6 (18)
- Rnds 4-5: sc in each st around (18)
- Rnd 6: (6 sl st, 6 dec) (12)
- Rnd 7: (6 sl st, 6 sc) (12)
- Rnds 8-12: sc in each st around (12)
Fold the arm in half so it faces forward and crochet through both layers to close the end. Leave a tail for sewing.
Legs (Make 2)
- Rnd 1: 6 sc in MR (6)
- Rnd 2: 6 inc (12)
- Rnd 3: (1 sc, inc) x6 (18)
- Rnd 4: (2 sc, inc) x6 (24)
- Rnds 5-6: sc in each st around (24)
- Rnd 7: (8 sl st, 8 dec) (16)
- Rnd 8: (8 sl st, 8 sc) (16)
- Rnds 9-16: sc in each st around (16)
Fold the leg in half so it faces forward and crochet through both layers to close the end. Leave a tail for sewing.
Ears (Make 2)
- Rnd 1: 6 sc in MR (6)
- Rnd 2: 6 inc (12)
- Rnd 3: (1 sc, inc) x6 (18)
- Rnd 4: (2 sc, inc) x6 (24)
Fold the piece in half and crochet through both layers to close. To give the ear a pointed shape, fold the piece again (about 1/3 of the way) and use a slip stitch to secure the sides together.
Tail
- Rnd 1: 8 sc in MR (8)
- Rnds 2-18: sc in each st around (8)
Fold the tail in half and crochet through both layers to close the tip. Leave a tail for sewing.
Finishing & Assembly
Now comes the magic part where your pieces become a kitten! Use your yarn needle and a sturdy thread of the same color as your yarn.
Putting it Together
- Head & Body: Stuff the head and body firmly with fiberfill. Sew the head securely to the top of the body.
- Limbs: Sew the arms between rounds 20 and 21 of the body. Sew the legs between rounds 8 and 9 of the body.
- Tail: Attach the tail between rounds 9 and 10 of the body.
- Ears: Sew the ears onto the head, aligning them roughly with the level of the eyes.
Adding the Details
To give your cat more expression, we will add some facial sculpting and embroidery:
- Eye Indentations: Use your yarn needle to create “eye sockets.” Insert the needle from the chin up through the head and come out through the center of one eye. Pull slightly to create a dimple, then knot it. Repeat for the other eye.
- Nose: Embroider a tiny nose using two small stitches in the center between the eyes.
- Final Touches: Using white or a light-colored thread, embroider small highlights in the eyes and tiny eyebrows to give your kitten a personality!
Tips for Success
Working with plush yarn can be a little different than working with standard acrylic or cotton. Here are a few tips to make your process smoother:
- Use Stitch Markers: Because plush yarn can hide your stitches, a stitch marker is essential. Place one in the first stitch of every round so you don’t lose your place.
- Tight Tension: Make sure your stitches are tight enough that the stuffing doesn’t peek through. If you see gaps, try dropping down half a hook size.
- The “Invisible” Decrease: For the cleanest look, use the invisible decrease method. Instead of a standard decrease, insert your hook into the front loop of the first stitch and then the front loop of the second stitch, then complete the sc.
- Stuffing Firmly: Amigurumi looks best when it’s firm. Use small clumps of fiberfill and push them into the corners with your crochet hook to avoid lumps.