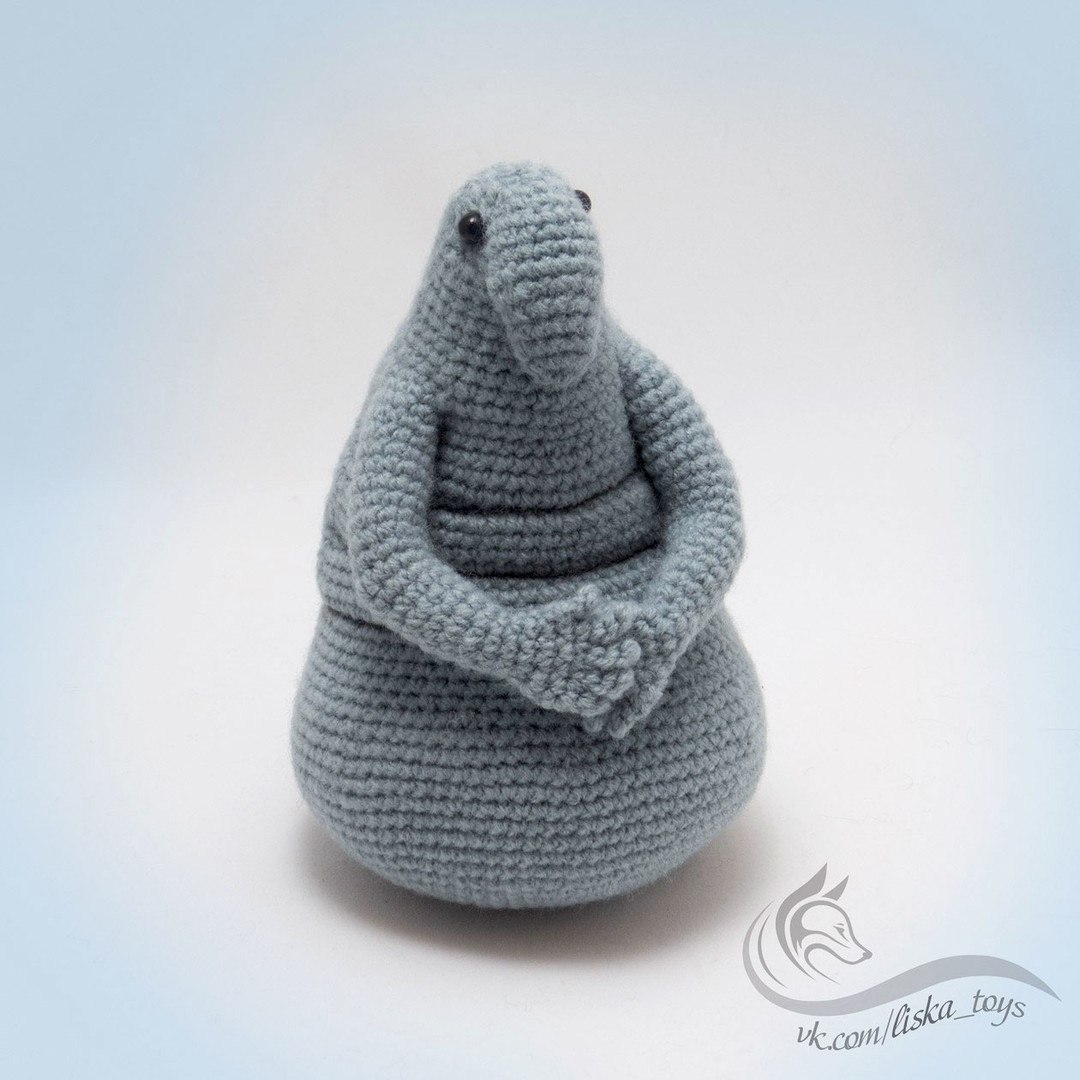
Adorable Crochet Zhdun Amigurumi Pattern: Create Your Own Waiting Man
Have you ever felt like you’ve been waiting forever for something? Meet Zhdun, the internet’s favorite “Waiting Man.” With his patient expression and plump, cozy shape, Zhdun is the perfect companion for your desk or shelf. Whether you’re a seasoned pro or a beginner looking for a fun project, this amigurumi pattern is a wonderful way to practice your shaping and assembly skills.
In this tutorial, we will guide you through creating this quirky character from the bottom up. The finished doll stands approximately 6 inches tall and has a wonderfully squishy feel. Let’s grab our hooks and get started!
Materials & Abbreviations
Materials You’ll Need
- Yarn: Approximately 250-300 yards of fine baby yarn or DK weight yarn in a grey or muted blue shade.
- Crochet Hook: 2.0mm (or a size that ensures your stitches are tight enough so stuffing doesn’t show through).
- Stuffing: Polyester fiberfill.
- Eyes: Small black safety eyes or black embroidery thread.
- Tools: Tapestry needle, stitch markers, and scissors.
- Optional: A small piece of craft wire for the arms to make them poseable.
Abbreviations (US Terms)
- MR: Magic Ring
- sc: Single crochet
- inc: Increase (2 sc in one stitch)
- dec: Invisible decrease
- hdc: Half double crochet
- ch: Chain
- sl st: Slip stitch
- st: Stitch
- [ ] x 6: Repeat the instructions inside the brackets 6 times.
Step-by-Step Instructions
The Body
The body is worked in a continuous spiral. Do not join rounds with a slip stitch unless specified.
- Round 1: MR, 6 sc (6)
- Round 2: 6 inc (12)
- Round 3: [1 sc, inc] x 6 (18)
- Round 4: 1 sc, inc, [2 sc, inc] x 5, 1 sc (24)
- Round 5: [3 sc, inc] x 6 (30)
- Round 6: 2 sc, inc, [4 sc, inc] x 5, 2 sc (36)
- Round 7: [5 sc, inc] x 6 (42)
- Round 8: 3 sc, inc, [6 sc, inc] x 5, 3 sc (48)
- Round 9: [7 sc, inc] x 6 (54)
- Round 10: 4 sc, inc, [8 sc, inc] x 5, 4 sc (60)
- Round 11: [9 sc, inc] x 6 (66)
- Round 12: 5 sc, inc, [10 sc, inc] x 5, 5 sc (72)
- Round 13: [11 sc, inc] x 6 (78)
- Round 14: 6 sc, inc, [12 sc, inc] x 5, 6 sc (84)
- Rounds 15-20: 84 sc (84)
- Round 21: 14 sc, [12 sc, dec] x 5 (79)
- Round 22: 14 sc, [11 sc, dec] x 5 (74)
- Round 23: 30 sc, dec, [10 sc, dec] x 3, 6 sc (70)
- Round 24: 26 sc, dec, [5 sc, dec] x 6 (63)
- Rounds 25-30: 63 sc (63)
- Round 31: 29 sc, dec, 29 sc, dec, 1 sc (61)
- Rounds 32-34: 61 sc (61)
- Round 35: dec, 28 sc, dec, 29 sc (59)
Creating the First Fold: At the level of Round 28, create a fold in the fabric. Turn the work right side out and divide the circumference into three equal parts. The back part (where no decreases occurred) will be the spine. Use a backstitch to sew two of the three sections together to create the belly fold.
- Round 36: 59 sc (59)
- Round 37: 1 sc, dec, 27 sc, dec, 27 sc (57)
- Round 38: 57 sc (57)
- Round 39: dec, 26 sc, dec, 27 sc (55)
- Round 40: 55 sc (55)
- Round 41: dec, 24 sc, dec, 27 sc (53)
- Round 42: dec, 23 sc, dec, 24 sc, dec (50)
Creating the Second Fold: At the level of Round 35, create another fold. Turn right side out, divide the circumference in half, and backstitch the front section to create the upper belly fold.
- Round 43: 24 sc, dec, 24 sc (49)
- Round 44: dec, 21 sc, dec, 24 sc (47)
- Round 45: dec, 19 sc, dec, 22 sc, dec (44)
- Round 46: 21 sc, dec, 21 sc (43)
- Round 47: dec, 17 sc, dec, 10 sc, dec, 10 sc (40)
Creating the Third Fold: At the level of Round 42, create a final fold. Turn right side out, divide in half, and backstitch the front section.
- Round 48: 9 sc, inc, 8 sc, ch 4, skip 4 sts, 15 sc, ch 4, skip 4 sts, 1 sc. Move marker forward by one stitch.
- Round 49: 21 sc, dec, 10 sc, dec, 5 sc (38). Work into the chains using the back loop only.
- Round 50: 17 sc, dec, 2 sc, dec, 9 sc, dec, 2 sc, dec (34)
- Round 51: dec, 13 sc, dec, 7 sc, dec, 8 sc (31)
- Round 52: dec, 11 sc, dec, 7 sc, dec, 7 sc (28)
The Arms
Do not cut the yarn after the body; you can transition directly into the arms or attach the yarn to the lower side of the center body.
Right Arm
- Rounds 1-11: 12 sc (12)
- Round 12: 5 sc, [hdc inc] x 2, 5 sc (14)
- Round 13: 5 sc, 2 dec, 5 sc (12)
- Rounds 14-15: 12 sc (12)
- Round 16: dec, 10 sc (11)
- Round 17: 11 sc (11)
- Round 18: dec, 9 sc (10)
- Round 19: dec, 8 sc (9)
- Round 20: dec, 7 sc (8)
- Round 21: inc, 3 sc, inc, 3 sc (10)
- Round 22: inc, 4 sc, inc, 4 sc. Thumb: ch 3, sl st in 2nd ch from hook.
- Round 23: 11 sc; work the 12th stitch on the opposite side of the palm.
- Round 24 (Fingers): From index to pinky: [ch 4, 3 sc in 2nd ch from hook, sl st through both layers of the palm] x 3. For the last finger: ch 3, 2 sc in 2nd ch from hook, sl st through both layers of the palm.
Left Arm
- Rounds 1-11: 12 sc (12)
- Round 12: 11 sc, hdc inc (13)
- Round 13: hdc inc, 10 sc, dec (13)
- Round 14: dec, 11 sc (12)
- Round 15: 12 sc (12)
- Round 16: 7 sc, dec, 3 sc (11)
- Round 17: 11 sc (11)
- Round 18: 7 sc, dec, 2 sc (10)
- Round 19: 7 sc, dec, 1 sc (9)
- Round 20: 7 sc, dec (8)
- Round 21: 7 sc, inc (9)
- Round 22: 3 sc, inc, 4 sc, inc (11)
- Round 23: 4 sc, inc, 5 sc. Thumb: ch 3, sl st in 2nd ch from hook.
- Round 24 (Fingers): From pinky to index: ch 3, 2 sc in 2nd ch from hook, sl st through both layers of palm, then [ch 4, 3 sc in 2nd ch from hook, sl st through both layers of palm] x 3.
The Head
Return to the top of the body to continue working the head.
- Round 53: 28 sc (28)
- Round 54: dec, 10 sc, dec, 14 sc (26)
- Round 55: 26 sc (26)
- Round 56: dec, 8 sc, dec, 14 sc (24)
- Round 57: 22 sc, dec (23)
- Round 58: 10 sc, dec, 11 sc (22)
- Round 59: 4 sc, ch 8, skip 6 sts, 2 sc (22)
- Round 60: dec, 8 sc, dec, 10 sc (20)
- Round 61: [3 hdc in one st, dec, 6 sc, dec, 3 hdc in one st, dec, 1 sc, dec, 2 sc, dec, 1 sc, dec] (22)
- Round 62: [3 sc together in back loop, dec, 1 sc, dec, 1 sc, dec, 3 sc together in back loop, dec, 1 sc, dec, 1 sc, dec] (12)
- Round 63: 6 dec (6)
Fasten off and weave in ends. Stuff the head through the nose opening.
The Nose
- Round 1: 16 sc (6 bottom, 8 top, 1 on each side) (16)
- Round 2: 5 sc, dec, 2 sc, dec, 5 sc (14)
- Round 3: 3 sc, inc, 6 sc, inc, 3 sc (16)
- Round 4: 4 sc, inc, 8 sc, inc, 2 sc (18)
- Round 5: 6 sc, dec, 4 sc, dec, 4 sc (16)
- Round 6: 1 sc, dec, [2 sc, dec] x 3, 1 sc (12)
- Round 7: 12 sc (12)
- Round 8: 3 sc, dec, 4 sc, dec, 1 sc (10)
- Round 9: [3 sc, dec] x 2 (8)
Stuff the top of the nose lightly, fasten off, and sew the nose to the neck area.
Finishing
Now it’s time to bring Zhdun to life! Follow these steps for a professional finish:
- Stuffing: Stuff the body firmly, but leave a little room for the folds to sit naturally.
- Arms: Lightly stuff the arms. If you are using craft wire for poseability, insert it before stuffing. Sew the arms to the sides of the body.
- Eyes: Attach safety eyes or embroider small black beads onto the head.
- Detailing: To give Zhdun his signature “tired” look, you can use a black colored pencil or a thin marker to lightly shade the folds of the belly and the areas around the eyes.
Tips for Success
- Tight Tension: Amigurumi requires tight stitches. If you see stuffing peeking through, try dropping down a hook size.
- Use Markers: Because this pattern is worked in a spiral, a stitch marker is essential to keep track of the beginning of each round.
- Invisible Decreases: To keep the surface smooth, always use the invisible decrease method (working in front loops only) rather than a standard decrease.
- Patience with Folds: The folds are what give Zhdun his personality. Take your time with the backstitching to ensure the fabric bunches correctly.