Easy Crochet Penguin Pattern: Make Your Own Adorable Pippo Amigurumi
Are you looking for a heartwarming, quick, and absolutely adorable crochet project? Look no further! This Pippo the Little Penguin pattern is the perfect project for anyone wanting to create a cozy, winter-themed amigurumi friend. Whether you are looking to make a gift for a child, a desk companion for a friend, or just want to practice your crochet skills, this little penguin is designed to be beginner-friendly and incredibly fun to make.
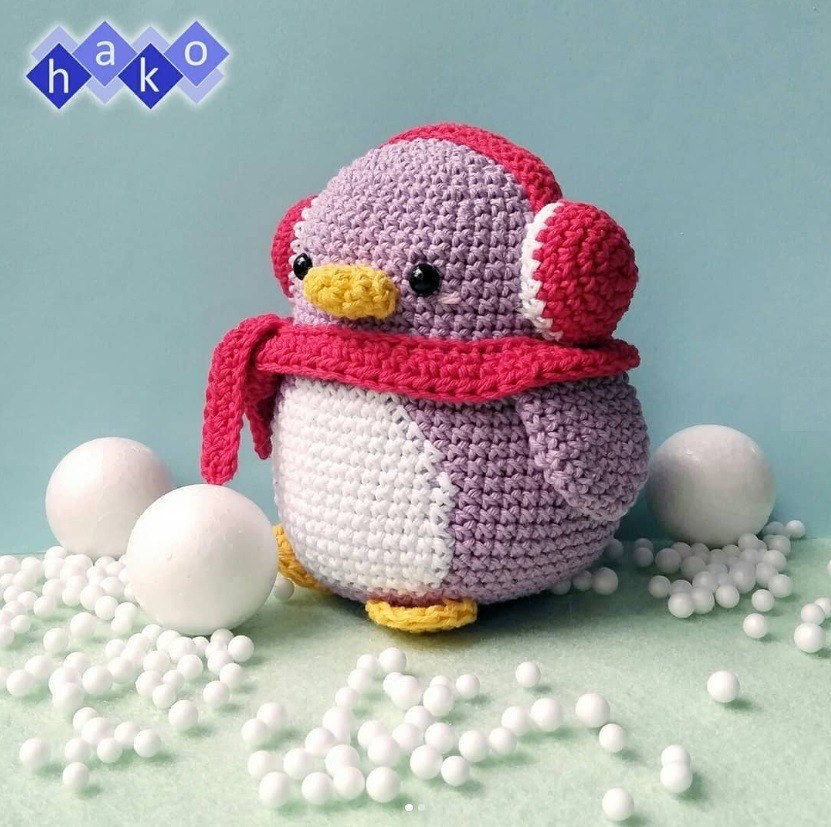
This little guy comes dressed for the cold with a tiny red scarf and a pair of matching earmuffs, making him the ultimate winter mascot. Once finished, your penguin will stand approximately 4 inches tall, making him the perfect size for display on a shelf or tucked into a pocket. In this tutorial, we will walk through every single step, from the magic circle to the final stitch of his scarf, ensuring you have a successful crafting session.
Materials and Abbreviations
Before you pick up your hook, let’s make sure you have everything you need. To achieve the best results and a professional look, I recommend using a consistent tension throughout your work.
What You Will Need
- Crochet Hook: A 2.5 mm hook is ideal for this project to ensure your stitches are tight enough to keep the stuffing inside.
- Yarn: You will need medium-weight yarn in the following colors:
- Purple (Main body color)
- White (Belly and earmuff detail)
- Yellow (Beak and feet)
- Red (Scarf and earmuffs)
- Pink (Optional, for cheek blush)
- Safety Eyes: 6 mm safety eyes.
- Stuffing: High-quality fiberfill.
- Tools: A sewing needle (for assembly), pins (to hold pieces in place), and scissors.
Abbreviations
This pattern uses standard US crochet terms. Please ensure you are using US terminology to avoid confusion with stitch heights!
- ch: chain
- sc: single crochet
- hdc: half double crochet
- dc: double crochet
- inc: increase (work two stitches into the same stitch)
- dec: decrease (join two stitches together into one)
- Rnd: round
Step-by-Step Instructions
The Body and Head
The body and head are worked as one continuous piece to create a seamless, rounded shape. We will start with the purple yarn.
Rnd 1: Start with a magic circle and work 6 sc into it. [6]
Rnd 2: 6 inc. [12]
Rnd 3: (1 sc, inc) repeat 6 times. [18]
Rnd 4: 1 sc, inc, (2 sc, inc) repeat 5 times, 1 sc. [24]
Rnd 5: (3 sc, inc) repeat 6 times. [30]
Rnd 6: 2 sc, inc, (4 sc, inc) repeat 5 times, 2 sc. [36]
Rnd 7: (5 sc, inc) repeat 6 times. [42]
Rnd 8: 3 sc, inc, (6 sc, inc) repeat 5 times, 3 sc. [48]
Rnd 9-18: 48 sc for 10 rounds. [48]
Rnd 19: (7 sc, inc) repeat 6 times. [54]
Rnd 20: 4 sc, inc, (8 sc, inc) repeat 5 times, 4 sc. [60]
Note: It is now time to add the white belly!
Rnd 21: (Purple) 26 sc, (White) 8 sc, (Purple) 26 sc. [60]
Important Step: Insert your 6 mm safety eyes between rounds 13 and 14. Make sure they are placed approximately 8 stitches apart. Ensure the white belly section is centered between the eyes.
Rnd 22: (Purple) 25 sc, (White) 10 sc, (Purple) 25 sc. [60]
Rnd 23: (Purple) 24 sc, (White) 12 sc, (Purple) 24 sc. [60]
Rnd 24-25: (Purple) 23 sc, (White) 14 sc, (Purple) 23 sc (2 rounds). [60]
Rnd 26-28: (Purple) 22 sc, (White) 16 sc, (Purple) 22 sc (3 rounds). [60]
Rnd 29: (Purple) (9 sc, inc) repeat 2 times, 2 sc, (White) (7 sc, inc) repeat 2 times, (Purple) 2 sc, (9 sc, inc) repeat 2 times. [66]
Rnd 30-31: (Purple) 24 sc, (White) 18 sc, (Purple) 24 sc (2 rounds). [66]
Rnd 32: (Purple) (9 sc, dec) repeat 2 times, 2 sc, (White) (7 sc, dec) repeat 2 times, (Purple) 2 sc, (9 sc, dec) repeat 2 times. [60]
Rnd 33: (Purple) 23 sc, (White) 14 sc, (Purple) 23 sc. [60]
Now, cut the white yarn and continue working only with the purple yarn.
Rnd 34: (8 sc, dec) repeat 6 times. [54]
Rnd 35: (7 sc, dec) repeat 6 times. [48]
Begin stuffing the body and head firmly with fiberfill.
Rnd 36: (6 sc, dec) repeat 6 times. [42]
Rnd 37: (5 sc, dec) repeat 6 times. [36]
Rnd 38: (4 sc, dec) repeat 6 times. [30]
Rnd 39: (3 sc, dec) repeat 6 times. [24]
Rnd 40: (2 sc, dec) repeat 6 times. [18]
Rnd 41: (1 sc, dec) repeat 6 times. [12]
Rnd 42: 6 dec. [6]
Fasten off, leaving a yarn tail. Use your sewing needle to weave the tail through the front loops of the remaining 6 stitches and pull tight to close the hole. Weave in your ends.
The Wings (Make 2)
The wings are worked in purple yarn and do not require stuffing.
Rnd 1: 4 sc in a magic circle. [4]
Rnd 2: 4 inc. [8]
Rnd 3: (1 sc, inc) repeat 4 times. [12]
Rnd 4: (2 sc, inc) repeat 4 times. [16]
Rnd 5-10: 16 sc (6 rounds). [16]
Rnd 11: To close the wing, work 7 sc through both layers of the opening. [7]
Fasten off, leaving a long tail for sewing the wings to the body.
The Beak
Using yellow yarn:
Rnd 1: 6 sc in a magic circle. [6]
Rnd 2: 6 inc. [12]
Rnd 3: 12 sc. [12]
Fasten off, leaving a long tail. Stuff the beak lightly before sewing it on.
The Cozy Earmuffs (Make 2 Ear Covers and 1 Band)
First, let’s make the ear covers using red yarn.
Ear Cover Rnd 1: 6 sc in a magic circle. [6]
Rnd 2: 6 inc. [12]
Rnd 3: (1 sc, inc) repeat 6 times. [18]
Rnd 4: (5 sc, inc) repeat 3 times. [21]
Rnd 5: 21 sc. [21]
Rnd 6: (Change to white yarn) 21 sc. [21]
Fasten off, leaving a long tail for sewing.
Now, the earmuff band using red yarn:
Start with a long yarn tail. Chain 25. Work in rows:
Row 1: Start in the second chain from the hook, sc in the next 24 chains, ch 1, turn. [24]
Row 2: 24 sc. [24]
Leave a long tail for sewing the band to the ear covers.
The Tiny Feet (Make 2)
Using yellow yarn:
Rnd 1: 6 sc in a magic circle. [6]
Rnd 2: 1 sc, inc, (2 hdc in 1 stitch) repeat 2 times, inc, 1 sc. [10]
Rnd 3: 3 sc, (2 hdc in 1 stitch), (1 hdc, 1 dc in 1 stitch), (1 dc, 1 hdc in 1 stitch), (2 hdc in 1 stitch), 3 sc. [14]
Fasten off, leaving a long tail for sewing.
The Winter Scarf
Using red yarn:
Chain 90. Work in rows:
Row 1: Start in the second chain from the hook, sc in the next 89 chains, ch 2, turn. [89]
Row 2: 89 hdc. [89]
Fasten off, leaving a long tail for sewing.
Finishing and Assembly
Now comes the most exciting part—bringing Pippo to life! Follow these steps carefully to ensure your penguin looks just like the picture.
- Earmuff Band: Sew the red earmuff band onto the inner part of the red ear covers.
- The Beak: Sew the yellow beak onto the body at Round 13.
- The Feet: Sew both feet to the bottom of the body. Position them slightly towards the front. The “wrong side” of the feet should face upward, with about one-third of the foot visible extending from under the body.
- The Wings: Sew the wings to the sides of the body at Round 19.
- The Earmuffs: Sew the completed earmuffs to the sides of the head. The bottom of the earmuffs should sit approximately one round above where the wings are attached. Tip: Stuff the earmuffs before sewing them shut!
- Cheek Blush: For extra cuteness, use pink yarn to embroider small blush lines under the eyes.
- The Scarf: Wrap the red scarf around the penguin’s neck and tie it in a simple, cute knot.
Tips for Success
To make your Pippo the Penguin as perfect as possible, keep these beginner tips in mind:
Use Pins for Placement
Before you start sewing any pieces (like the wings or the earmuffs), use sewing pins to hold them in place. This allows you to step back and look at your penguin from different angles to ensure everything is symmetrical before making it permanent.
Tight Stitches are Key
When working with amigurumi, you want your stitches to be quite tight. If your stitches are too loose, the fiberfill stuffing might peek through the holes, which can look messy and make the toy less durable.
The Magic Circle Advantage
If you are new to crochet, the magic circle might seem intimidating, but it is the best way to start a sphere. It allows you to pull the center hole completely closed, which is essential for a neat-looking head and body.
Customization
Don’t feel restricted by the colors! While the purple and red look wonderful, you could make a classic black and white penguin, or even a colorful rainbow penguin. The pattern is yours to play with!