Adorable Kitty Rattle and Lovey Crochet Pattern: The Perfect Baby Shower Gift
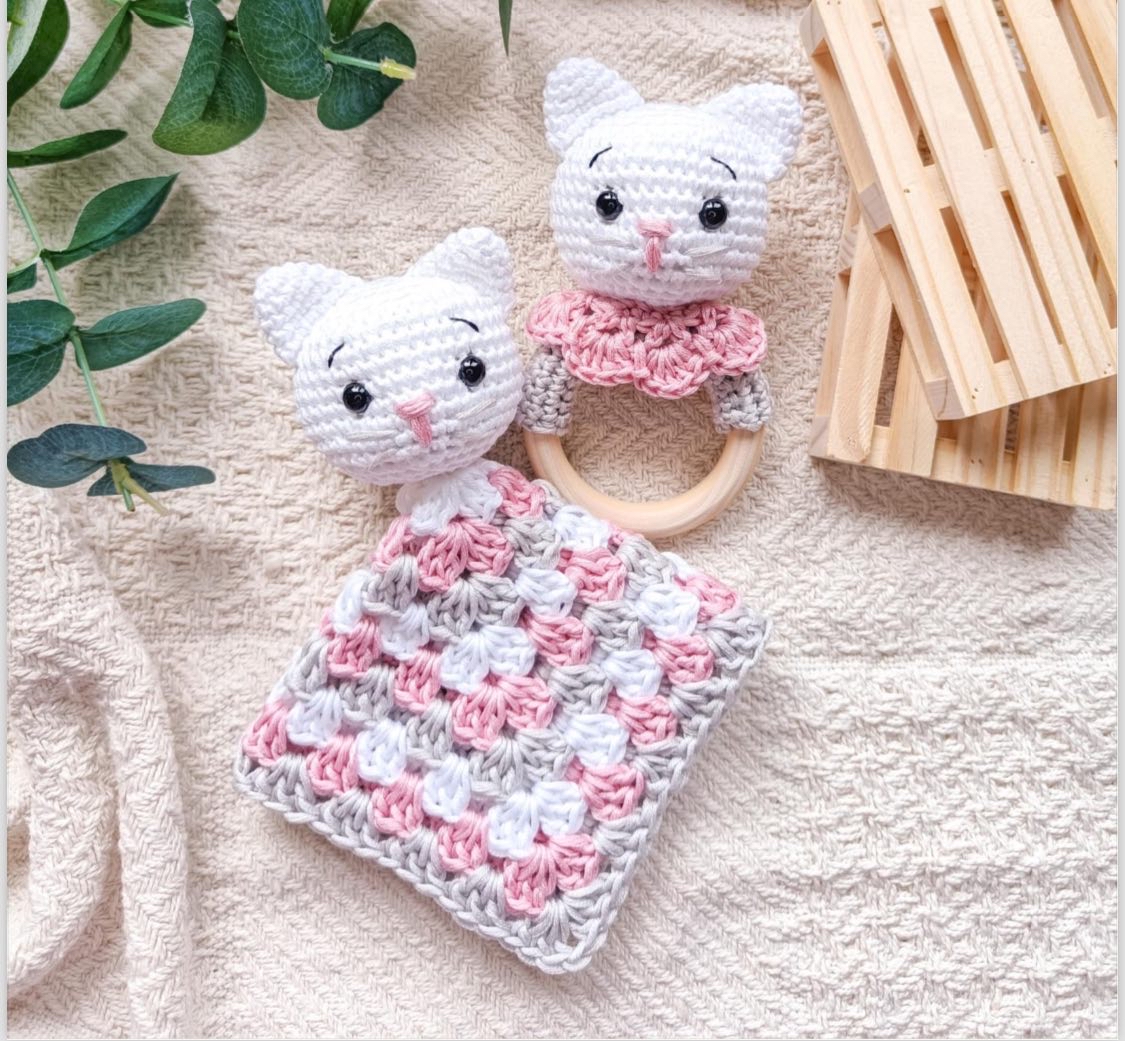
Are you looking for a heartwarming, handmade gift for a new arrival? This adorable Kitty Rattle and Lovey crochet pattern is the ultimate solution. This versatile project is actually two gifts in one: a cute, easy-to-grip rattle for tiny hands and a soft, soothing lovey for naptime cuddles.
The kitty features a sweet, expressive face and a beautiful multi-colored granny square base. Whether you are a seasoned amigurumi artist or a beginner looking for your next project, this pattern is designed to be accessible, fun, and incredibly rewarding. Best of all, it makes for a stunning heirloom-quality gift!
Materials & Abbreviations
To ensure your kitty is soft, safe, and beautiful, I recommend using high-quality cotton yarn. Cotton is breathable, durable, and gentle on a baby’s sensitive skin.
Materials Needed
- Yarn: Cotton yarn (Weight: DK/Light Worsted). I recommend 100% cotton (approx. 100 yards/meters per 50g ball). You can use white for the kitty, pink for the collar, and various colors (grey, white, pink) for the lovey’s granny square.
- Crochet Hooks: 2.5mm (B-1), 3.5mm (E-4), and 5mm (H-8) depending on the section.
- Rattle: One standard baby rattle insert.
- Wooden Ring: One 2.75-inch (7cm) wooden ring.
- Safety Eyes: 8mm safety eyes (2 pairs). Note: Always ensure safety eyes are securely fastened for baby toys.
- Stuffing: Polyester fiberfill.
- Tools: Scissors and a yarn needle for sewing.
Abbreviations (US Terms)
- mr – magic ring
- ch – chain
- sl st – slip stitch
- sc – single crochet
- dc – double crochet
- inc – increase (2 single crochets in one stitch)
- dec – decrease (2 stitches together)
- (…) – repeat the instructions inside the parentheses the specified number of times
- *…* – work the instructions between the asterisks into one stitch
- […] – final stitch count for the row
Step-by-Step Instructions
Making the Kitty Head
Use a 2.5mm crochet hook. Work in a continuous spiral unless otherwise stated.
- Round 1: 6 sc in mr [6]
- Round 2: inc in each st around [12]
- Round 3: (1 sc, inc) x 6 [18]
- Round 4: (1 sc, inc, 1 sc) x 6 [24]
- Round 5: (4 sc, inc) x 6 [30]
- Round 6: (5 sc, inc) x 6 [36]
- Round 7: (6 sc, inc) x 6 [42]
- Rounds 8–13: 42 sc in each round [42]
Safety Eye Placement: Place the safety eyes between rounds 10 and 11, approximately 8 stitches apart.
- Round 14: (5 sc, dec) x 6 [36]
- Round 15: (2 sc, dec, 2 sc) x 6 [30]
- Round 16: (3 sc, dec) x 6 [24]
- Round 17: (1 sc, dec, 1 sc) x 6 [18]
Stuffing: Start stuffing the head with fiberfill. If you are making the rattle, place the rattle insert inside the head now.
- Round 18: (1 sc, dec) x 6 [12]
- Round 19: dec x 6 [6]
Sl st and cut the yarn, leaving a long tail for sewing the gap closed.
Crafting the Ears
Use a 2.5mm crochet hook. Make 2 pieces.
- Round 1: 4 sc in mr [4]
- Round 2: inc x 4 [8]
- Round 3: (inc, 3 sc) x 2 [10]
- Round 4: (inc, 4 sc) x 2 [12]
- Round 5: (inc, 5 sc) x 2 [14]
- Round 6: (inc, 6 sc) x 2 [16]
Sl st and cut the yarn, leaving a tail for sewing.
The Rattle Strip and Collar
For the Strip: Use a 2.5mm hook. Work in rows (turn after every row).
- Make 22 ch.
- Rows 1–8: 21 sc in each row.
Sl st and cut the yarn, leaving a tail for sewing.
For the Collar: Use a 3.5mm hook. Work in rows. To ensure enough expansion for a ruffle, start with a larger chain.
- Make 31 ch.
- Row 1: 30 sc [30]
- Row 2: 3 ch (counts as dc + ch), dc, (skip 1 stitch, *dc, ch, dc*) repeat 7 times [8 V-shaped gaps]
- Row 3: *5 dc* into each V-shaped gap, and a sl st into each gap between the V-gaps. Repeat until the end of the row [8 arcs]
Sl st and cut the yarn, leaving a tail for sewing.
The Granny Square Lovey Base
Use a 5mm hook. You can use a single color or change colors every row for a beautiful tricolor effect.
- Round 1: 2 ch and 8 dc in mr, sl st into 2 ch.
- Round 2: 2 ch, *3 dc, ch, 3 dc* into gaps after every 2 dc, sl st into 2 ch.
- Rounds 3–10: 2 ch, 3 dc into the side gaps of the square, and *3 dc, ch, 3 dc* into the corners, sl st into 2 ch.
Finishing
Assembling the Rattle
Once all components are finished, it is time to bring your kitty to life!
- The Ring: Sew the crocheted strip around the wooden ring.
- The Head: Sew the kitty head securely to the top of the ring.
- The Collar: Sew the pink collar around the base of the head to complete the look.
Creating the Lovey
The lovey is a simpler assembly but just as precious.
- The Head: Make one additional kitty head (this one will not have a rattle inside). Stuff it firmly with fiberfill.
- Attachment: Sew the kitty head directly onto the center of your completed granny square.
Final Details (The Face)
To give your kitty its personality, use a needle and embroidery thread (pink and grey/black):
- Embroider the small pink nose.
- Add thin lines for the whiskers.
- Add tiny eyebrows above the eyes for an extra sweet expression.
Tips for Success
- Tension is Key: When working on the head, keep your tension tight so that the stuffing doesn’t peek through the stitches.
- Safety First: Always double-check that safety eyes are extremely tight. For infants under 3 months, consider embroidering the eyes instead of using plastic safety eyes.
- Yarn Choice: Using 100% cotton makes the toy much easier to wash, which is essential for baby items.
- The “Shape” Trick: When sewing the head, you can pull a thread through the center (from bottom to eye, to the other eye, and back to the bottom) and tighten it slightly to create a more realistic, contoured face.