Adorable Red Crochet Elephant Pattern: A Beginner-Friendly Amigurumi Tutorial
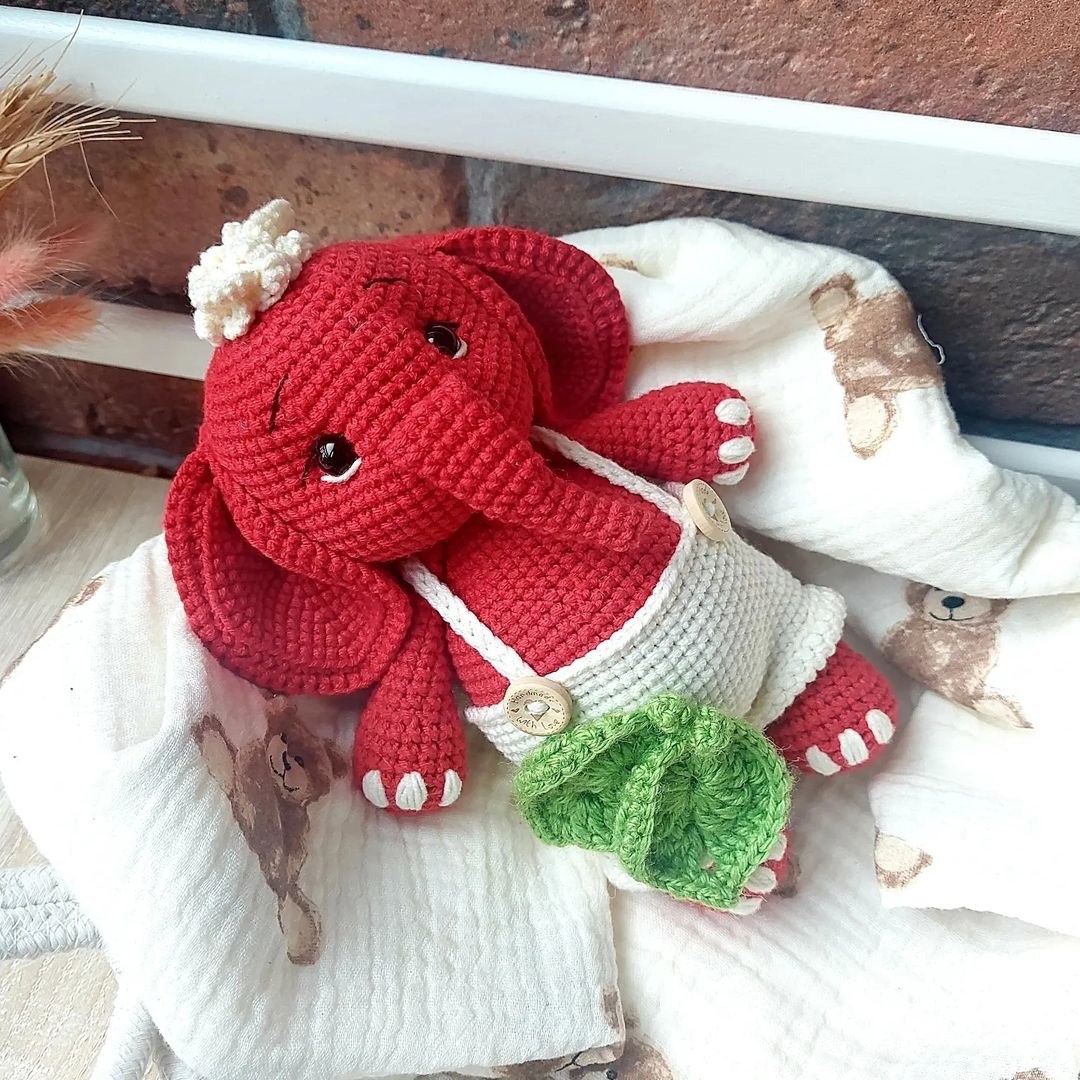
Are you looking for your next cozy crochet project? This adorable, bright red crochet elephant is the perfect addition to any nursery, a sweet gift for a baby shower, or a charming companion for a child’s toy collection. With its chunky limbs, tiny white details, and even a cute little outfit, this amigurumi character is as fun to make as it is to look at!
Don’t let the complex-looking shape fool you; this pattern is designed to be accessible. By following these step-by-step instructions, you will learn how to work in the round, manage increases and decreases, and master the art of joining pieces as you go. Whether you are a seasoned amigurumi artist or a beginner looking to level up your skills, this elephant project is a wonderful way to practice your tension and shaping techniques.
Materials & Abbreviations
To ensure your elephant turns out just like the one in the photo, you will want to use soft, high-quality yarns. Because amigurumi requires a tight tension to prevent stuffing from showing through, I recommend using a slightly smaller hook than the yarn label suggests.
What You Will Need:
- Yarn: Medium weight (worsted) cotton or acrylic yarn in Red, White, and Green.
- Crochet Hook: 3.5mm (E) or 4.0mm (G) hook, depending on your tension.
- Safety Eyes: Small black safety eyes (approx. 8mm-10mm).
- Stuffing: Poly-fill fiberfill.
- Other Tools: A tapestry needle for sewing, stitch markers, and scissors.
- Optional: Small wooden buttons for the overalls.
US Crochet Abbreviations:
- MR: Magic Ring (Magic Circle)
- ch: Chain
- sc: Single crochet
- inc: Increase (2 sc in the same stitch)
- dec: Decrease (sc 2 together)
- BLO: Back Loops Only
- st(s): Stitch(es)
- sl st: Slip stitch
Step-by-Step Instructions
Arms
Note: If you prefer to sew the arms on later, fold the piece and work the specified rounds together, leaving a long tail for sewing. If you wish to crochet them directly onto the body, work them as instructed.
- R1: 6 sc in MR (6)
- R2: 6 inc (12)
- R3: (1 sc, inc) * 6 (18)
- R4-5: 18 sc in BLO (Back Loops Only)
- R6-8: 18 sc (18)
- R9: (1 sc, dec) * 6 (12)
- R10-19: 12 sc (12)
- R20: (2 sc, dec) * 3 (9)
Fasten off, leaving a tail for assembly.
Legs
Note: If you prefer to sew the legs on later, fold the piece and work the specified rounds together, leaving a long tail for sewing.
- R1: 6 sc in MR (6)
- R2: 6 inc (12)
- R3: (1 sc, inc) * 6 (18)
- R4: (2 sc, inc) * 6 (24)
- R5-6: 24 sc in BLO
- R7-8: 24 sc (24)
- R9: (2 sc, dec) * 6 (18)
- R10-14: 18 sc (18)
- R15: (1 sc, dec) * 6 (12)
- R16-20: 12 sc (12)
Fasten off, leaving a long tail for sewing.
Trunk
- Start with 12 ch, join to form a ring.
- R1-7: 12 sc (12)
- R8: (2 sc, dec) * 3 (9)
- R9-11: 9 sc (9)
- R12: dec, 7 sc (8)
- R13: dec, 6 sc (7)
- R14: 7 sc (7)
Fasten off, leaving a tail for sewing.
Body & Head
This piece is worked in one continuous piece, starting from the bottom of the body and moving up through the head.
- R1: 6 sc in MR (6)
- R2: 6 inc (12)
- R3: (1 sc, inc) * 6 (18)
- R4: (2 sc, inc) * 6 (24)
- R5: (3 sc, inc) * 6 (30)
- R6: (4 sc, inc) * 6 (36)
- R7: 36 sc (36)
- R8: (5 sc, inc) * 6 (42)
- R9: (6 sc, inc) * 6 (48)
- R10: (7 sc, inc) * 6 (54)
- R11: 54 sc (54)
- R12: (8 sc, inc) * 6 (60)
- R13 (Attaching Legs): 12 sc, 6 sc (crocheting together with one leg), 24 sc, 6 sc (crocheting together with the second leg), 12 sc (60)
- R14-20: 60 sc (60)
- R21: 18 sc, (6 sc, dec) * 3, 18 sc (57)
- R22: 18 sc, (5 sc, dec) * 3, 18 sc (54)
- R23: 54 sc (54)
- R24: (7 sc, dec) * 6 (48)
- R25: 48 sc (48)
- R26: (6 sc, dec) * 6 (42)
- R27: 42 sc (42)
- R28: (5 sc, dec) * 6 (36)
- R29: (4 sc, dec) * 6 (30)
- R30: 30 sc (30)
- R31: (3 sc, dec) * 6 (24)
- R32 (Attaching Arms): 4 sc, 4 sc (crocheting together with one arm), 8 sc, 4 sc (crocheting together with the second arm), 4 sc (24)
- R33: 24 sc (24)
- R34: 24 inc (48)
- R35: (7 sc, inc) * 6 (54)
- R36: 54 sc (54)
- R37: (8 sc, inc) * 6 (60)
- R38-42: 60 sc (60)
- R43 (Attaching Trunk): 60 sc, but crochet the trunk into the center of the face as you work this round (60)
- R44-48: 60 sc (60)
- R49: (8 sc, dec) * 6 (54)
- R50: 2 sc, dec, (7 sc, dec) * 5, 5 sc (48)
- R51: (6 sc, dec) * 6 (42)
- R52: 2 sc, dec, (5 sc, dec) * 5, 3 sc (36)
- R53: (4 sc, dec) * 6 (30)
- R54: (3 sc, dec) * 6 (24)
- R55: (2 sc, dec) * 6 (18)
- R56: (1 sc, dec) * 6 (12)
Continue decreasing and pull the hole tight. Insert your safety eyes between rounds 45 and 46 before you finish stuffing the head.
Ears
You will need to make 4 ear pieces in total.
Pieces 1 & 2 (Single Layer)
- R1: 6 sc in MR (6)
- R2: 6 inc (12)
- R3: (1 sc, inc) * 6 (18)
- R4: (2 sc, inc) * 6 (24)
- R5: (3 sc, inc) * 6 (30)
- R6: (4 sc, inc) * 6 (36)
- R7: (5 sc, inc) * 6 (42)
- R8: (6 sc, inc) * 6 (48)
- R9: (7 sc, inc) * 6 (54)
Pieces 3 & 4 (Double Layer)
Follow the exact same steps as Pieces 1 & 2. However, after Round 9, do not cut your yarn. Fold the piece with the wrong side facing inward and crochet two rounds of 54 sc through both layers to create a thicker, double-sided ear.
Finishing
Once all pieces are crocheted, it is time for the assembly magic! Follow these steps to bring your elephant to life:
- Stuffing: Stuff the body, head, arms, legs, and trunk firmly with poly-fill. Ensure the stuffing is distributed evenly so the elephant can sit upright.
- Attaching Ears: Sew the ears onto the head. As a general guide, aim for the level of the eyes, but feel free to adjust them to your liking to give your elephant more personality!
- The Eyes: If you haven’t already, secure the safety eyes between rounds 45 and 46. You can use embroidery thread to add eyelashes or detail around the eyes for extra cuteness.
- The Outfit: Using your white and green yarn, crochet a small set of overalls or a simple skirt. Use your tapestry needle to attach them to the body and add small wooden buttons for that perfect “handmade” look.
Tips
To make your crochet journey even smoother, keep these expert tips in mind:
- Use Stitch Markers: Amigurumi is worked in continuous spirals. It is very easy to lose your place! Always use a stitch marker at the beginning of every round.
- Tension is Key: If you see your stuffing poking through the stitches, try using a smaller hook. Tight stitches make for a professional-looking toy.
- Consistent Decreases: For a neat look, try using the “invisible decrease” method (inserting the hook into the front loops only of the next two stitches) instead of a standard decrease.
- Customize Your Elephant: Don’t be afraid to get creative! You can change the elephant’s color to pink, blue, or even a variegated yarn. You could also crochet a little flower or hat to add even more charm.
Happy crocheting! We can’t wait to see your adorable red elephant!