How to Crochet a Cute Amigurumi Dragon: A Detailed Step-by-Step Tutorial
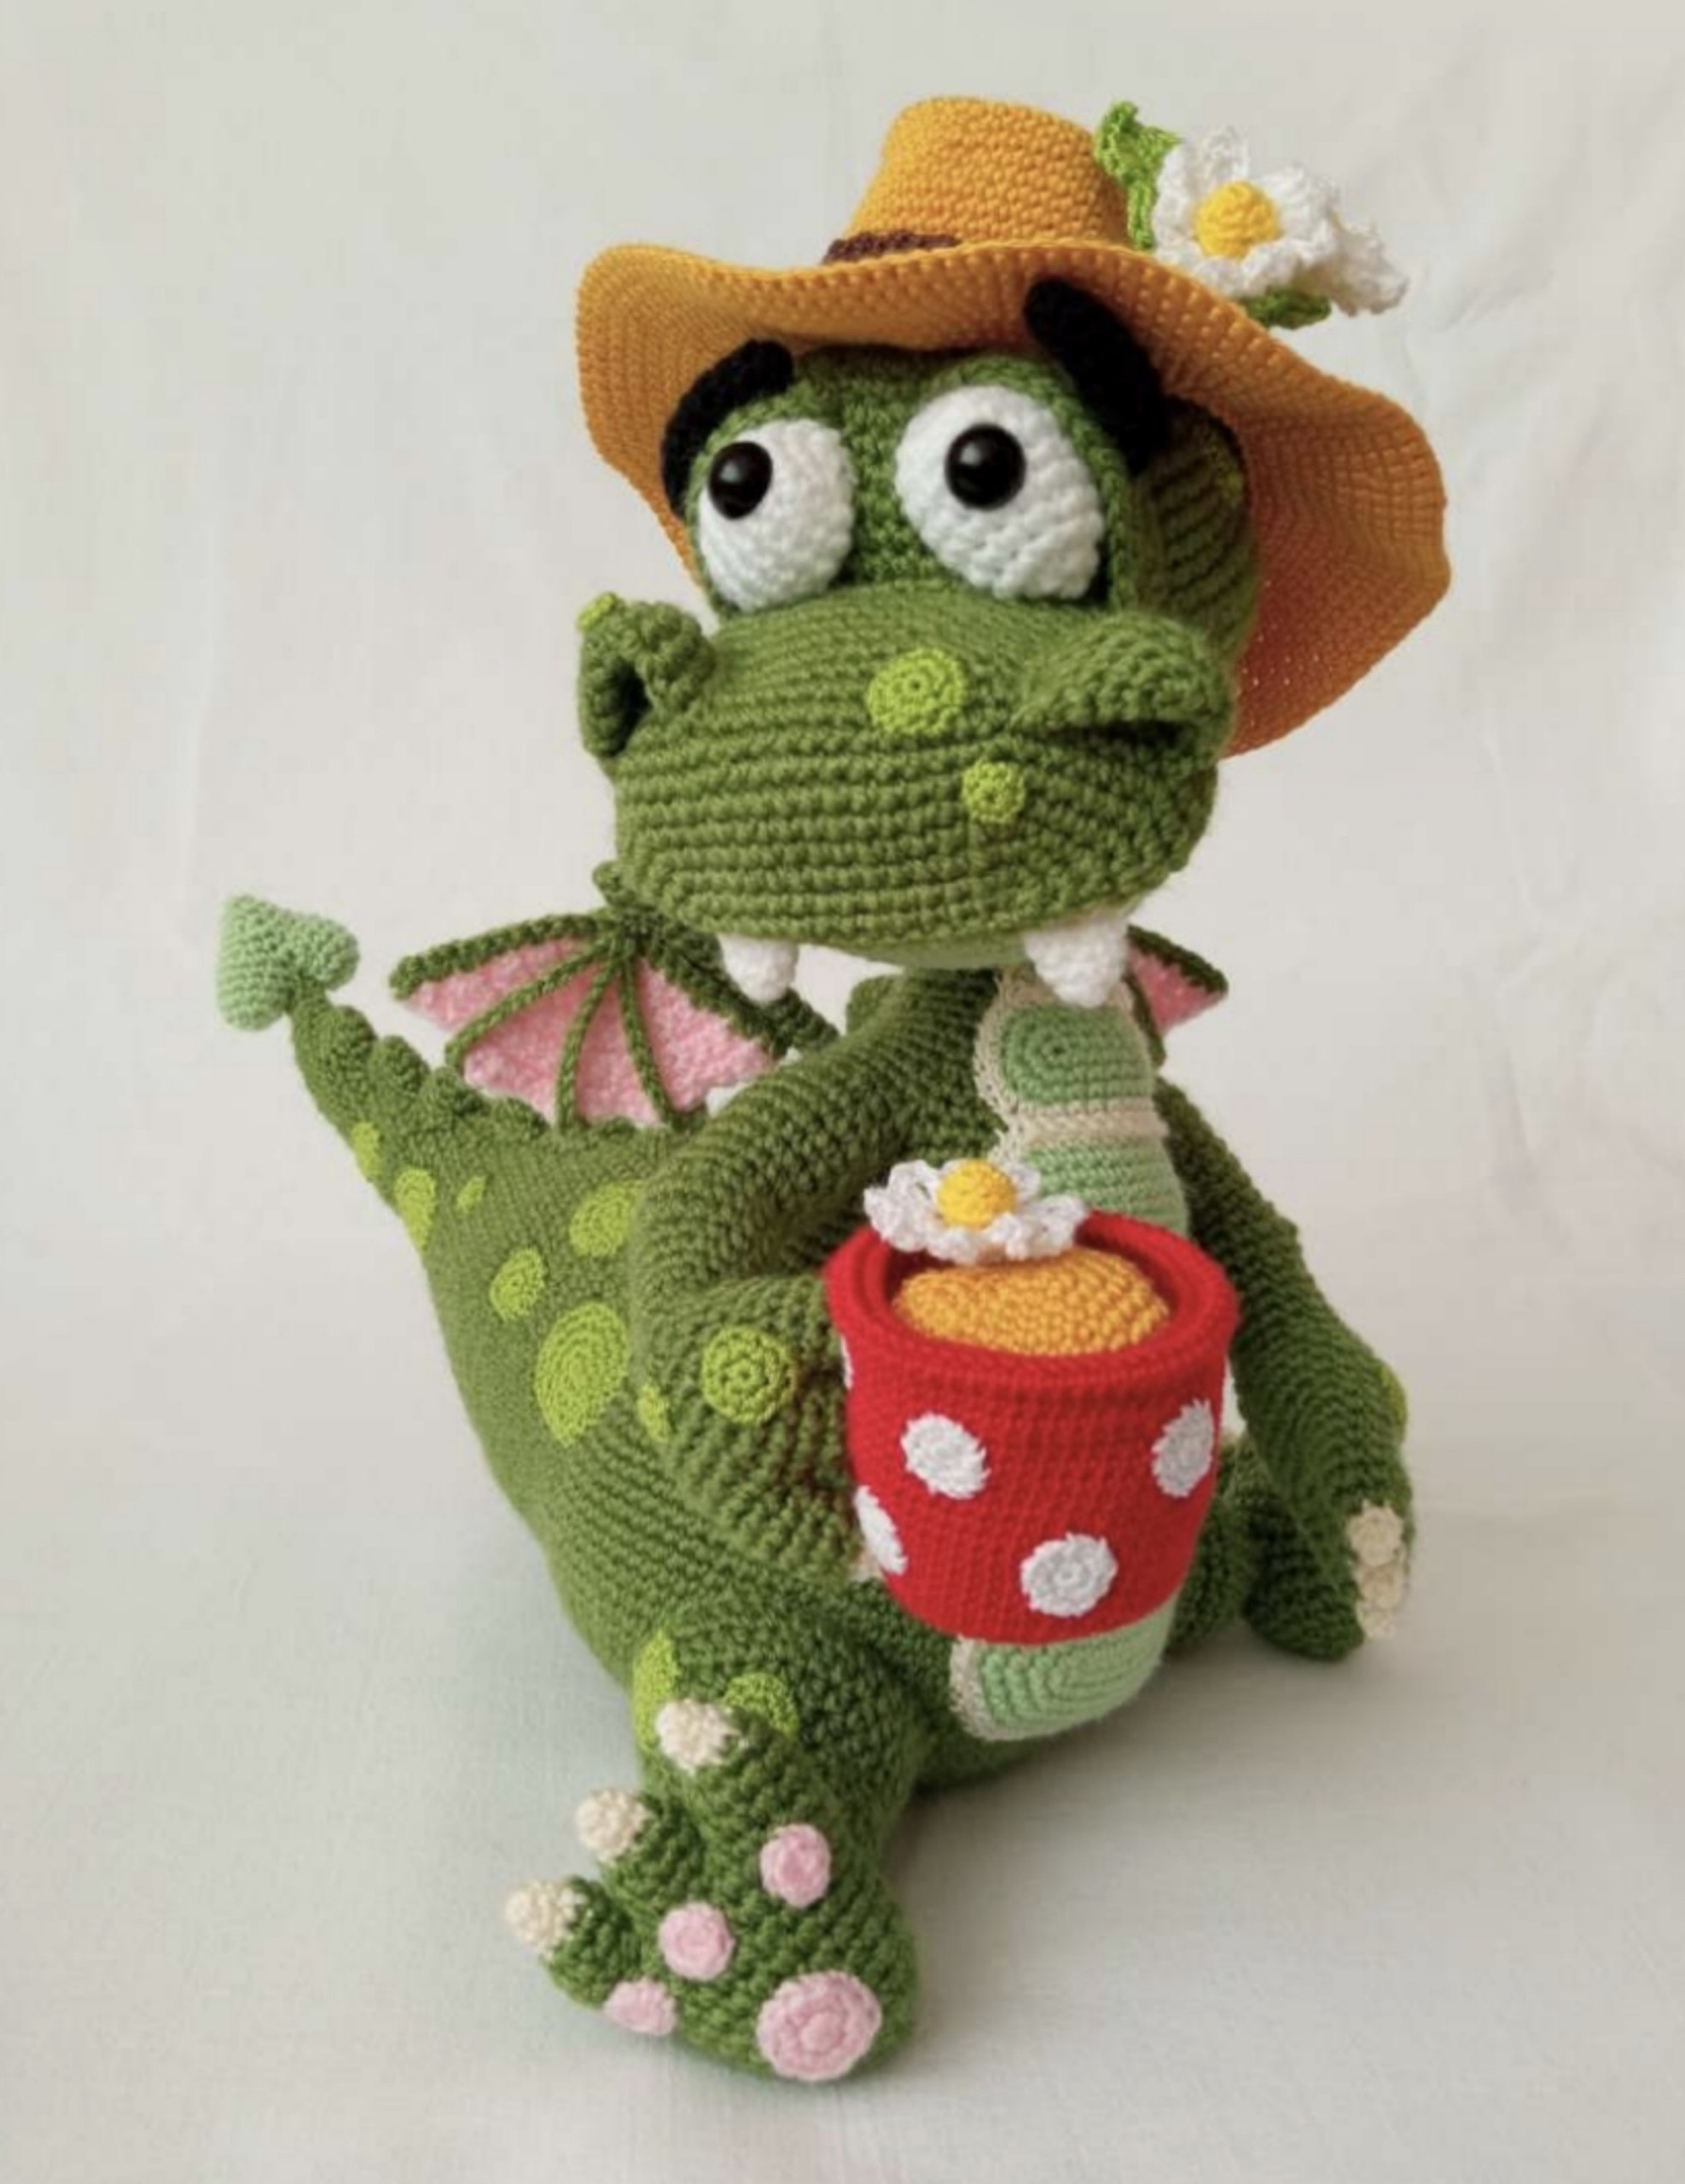
There is something undeniably magical about dragons! Whether they are fierce protectors of treasure or, in this case, a whimsical little friend wearing a sun hat and sipping tea, dragons make for the perfect crochet project. This adorable amigurumi dragon is a wonderful project for intermediate beginners. While the dragon itself is straightforward, the charm lies in the tiny details: the spotted scales, the tiny wings, the little flower bouquet, and even a miniature tea mug!
In this tutorial, we will walk through every single stitch required to bring this character to life. We will cover everything from the sturdy, poseable limbs to the delicate little daisies on his hat. Grab your hook and some cozy yarn, and let’s get started on this enchanting adventure!
Materials & Abbreviations
To achieve the best results and ensure your dragon reaches the approximately 10-inch size shown in the photos, please use the following materials. If you use thicker yarn, your dragon will grow larger!
Required Materials
- Yarn (Fine/Fingering weight cotton or acrylic blend):
- Main Color: Green (approx. 5.5 oz / 160g)
- Claws/Teeth/Eyes: Cream or Off-white
- Spots: Bright Lime/Yellow-Green
- Belly: Light Sage or Mint Green
- Wings/Heel Pads: Light Pink or Begonia
- Hat: Bright Yellow
- Hat Ribbon: Chocolate Brown
- Mug: Bright Red
- Mug Polka Dots: White
- Tea: Yellow
- Flowers: White and Yellow
- Crochet Hook: 1.5 mm (or the size needed to keep your stitches very tight)
- Safety Eyes: 12 mm plastic safety eyes
- Stuffing: High-quality polyester fiberfill
- Wire: Thick wire (for the body/tail frame) and thin floral wire (for the wings and flowers)
- Extras: Scissors, tapestry needle, glue gun, and small pieces of cardboard (for the mug base)
Abbreviations (US Terms)
- MR: Magic Ring
- ch: Chain
- sc: Single Crochet
- hdc: Half Double Crochet
- dc: Double Crochet
- tr: Treble Crochet
- dtr: Double Treble Crochet
- inc: Increase (2 sc in one stitch)
- dec: Decrease (sc 2 stitches together)
- sl st: Slip Stitch
- st: Stitch
- [ ]: Indicates stitches worked into the same loop
Step-by-Step Instructions
The Limbs (Arms and Feet)
We begin by creating the paws. For both the arms and the feet, we start with the claws using cream yarn, then switch to the main green color.
Front Arms (Make 2)
First Finger: Start with a MR and work 4 sc into it (4). R2: 1 inc, 3 sc (5). R3: 1 inc, 4 sc (6). Change to main green yarn. R4: (1 sc, 1 inc) x 3 times (9). R5-7: 9 sc. Fasten off, leave a tail, and stuff lightly.
Second & Third Finger: Repeat the same steps for the second finger. For the third finger, do not fasten off; instead, continue crocheting to join the fingers together.
Joining the Fingers: Place a marker. 5 sc across the 3rd finger, 1 sc through both the 3rd and 2nd finger, 4 sc across the 2nd finger, 1 sc through both the 2nd and 1st finger, 8 sc across the 1st finger, 4 sc across the 2nd finger, and 3 sc across the 3rd finger (26). R1: 26 sc. R2: (4 sc, 1 dec) x 2 times, 6 sc, 1 dec, 4 sc, 1 dec (22), then 1 sl st. R3-4: 22 sc. R5: (4 sc, 1 dec) x 3 times, 4 sc (19). R6: 19 sc. R7: (1 dec, 3 sc) x 4 times, 2 sc (15). R8-10: 15 sc. Insert about 5 inches of wire into the middle finger, then stuff the arm. R11-13: 15 sc. R14: 3 sc, 3 inc, 9 sc (18) — this creates the elbow. R15: 18 sc. R16: 3 sc, 3 dec, 9 sc (15). R17: 15 sc. R18: 1 inc, 14 sc (16). R19: 16 sc. Stuff the elbow area firmly. R20: 1 inc, 15 sc (17). R21: 17 sc. R22: 1 inc, 16 sc (18). R23: 18 sc. R24: (4 sc, 1 dec) x 3 times (15). Fasten off.
Feet (Make 2)
Follow a similar logic for the feet, starting with cream claws. R1: 5 sc in MR (5). R2: 1 inc, 4 sc (6). R3: 1 inc, 5 sc (7). Change to green. R4: (1 sc, 1 inc) x 3 times, 1 sc (10). R5-6: 10 sc. Stuff and fasten off. Join the three toes using the same “joining” method as the arms, resulting in 28 stitches. Continue increasing to create the foot shape, leaving an opening at the top to stuff the foot through. Once stuffed, close the hole and add the pink heel pads.
The Tail
The tail is a long, tapered piece that requires a wire core for poseability. Start with a MR and 6 sc (6). R2-3: 6 sc. R4: (1 sc, 1 inc) x 3 times (9). R5-6: 9 sc. R7: (2 sc, 1 inc) x 3 times (12). R8: 12 sc. R9: (3 sc, 1 inc) x 3 times (15). R10-13: 15 sc. R14: (4 sc, 1 inc) x 3 times (18). R15: 18 sc. R16: (5 sc, 1 inc) x 3 times (21). R17: 21 sc. R18: (6 sc, 1 inc) x 3 times (24). R19-20: 24 sc. R21: (7 sc, 1 inc) x 3 times (27). R22: 27 sc. Continue the pattern of increasing every few rows until you reach 80 stitches. The widest part (the end of the tail) is the bottom, and the narrow part is the top. Insert about 18 inches of wire into the center, stuff firmly, and fasten off.
The Body
The body is worked in a continuous spiral to create a curved shape. Start with a MR and 6 sc. Increase steadily (R2: 12, R3: 18, etc.) until you reach 96 stitches. Between rows 39 and 44, the pattern transitions to create a curve for the back. Once you have reached the lower part of the body, stop and prepare to attach the tail. Place the top of the tail against the curve of the back and the bottom level with the base of the body. Thread the wire through the body and out the top to secure them together. Continue crocheting the body, working around the attached tail and arms to integrate them seamlessly. Once finished, stuff the body firmly.
The Head & Face
The head is a large, rounded sphere. Start with a MR and 6 sc. Increase until you reach 54 stitches. R16-17: Use a combination of increases and half double crochets to widen the head. Decrease back down to 24 stitches. Stuff the head well.
The Nose
The nose is worked in two separate pieces. The top part is worked in green starting from a 15-ch foundation. It is worked in rows to create a snout shape. The bottom part is worked in light sage/mint green using the same stitch pattern but is stuffed to create the “under-snout” look. Finally, crochet two small green circles for the nostrils. Sew the bottom nose piece to the head first, then the top piece, and finally the nostrils on top.
Eyes and Brows
Crochet two white spheres for the eyes, insert the safety eyes, and stuff lightly. Cover them with green “eyelids” to give the dragon a sleepy, cute expression. For the eyebrows, crochet two small black strips and sew them above the eyes—one lying flat and one slightly curved upward for character.
The Spikes & Spots
To give your dragon texture, we will add spikes and spots.
- Spikes: Make 5 large spikes for the head, 7 medium spikes for the back and tail, and 4 small spikes for the very tip of the tail. These are simple cones made by increasing in a spiral.
- Spots: Crochet various sizes of flat circles (from tiny 6-stitch rings to larger 24-stitch discs) in a bright lime green. Sew these randomly across the head and body.
The Wings
The wings are worked in flat rows rather than a circle. Using pink yarn, work a foundation of 2 chains. Work in rows, increasing and using double/treble crochets to create the scalloped edge of the wing. Once finished, attach a green “support rod” made of crochet and wire to the base of the wing so it can stand up and stay in place. Sew the wings to the dragon’s back.
The Accessories: Hat & Mug
The final touches make this dragon unique!
- The Hat: A bright yellow sun hat worked in rounds. Add a chocolate brown ribbon around the base. For the decoration, crochet a small daisy (white petals, yellow center) and a tiny bouquet of flowers to tuck into the ribbon.
- The Mug: A small red mug with white polka dots. Crochet a yellow “tea” disc and a tiny daisy to place inside. Don’t forget the tiny red handle!
Finishing
Assembly is the most important part of amigurumi! When attaching the legs, place the dragon on a flat surface and use sewing pins to position the feet so the dragon sits upright and stable. As you sew, continue to add small amounts of stuffing to the joints to ensure there are no gaps. For the tail, ensure the wire is centered so the dragon can be posed easily.
Tips for Success
- Tension is Key: Use a smaller hook than the yarn suggests. This ensures your stitches are tight enough that the white stuffing won’t peek through the green fabric.
- Wire Safety: When using wire for limbs or wings, make sure to blunt the ends thoroughly (you can use a bit of tape or glue) so they don’t poke through the crochet fabric.
- Invisible Joins: When joining pieces like the nose or the belly, try to hide your starting and ending threads inside the stuffing to keep the finished look clean.
- Scale: If you find your dragon is getting too big, switch to a slightly smaller hook. If it’s too small, go up a hook size.