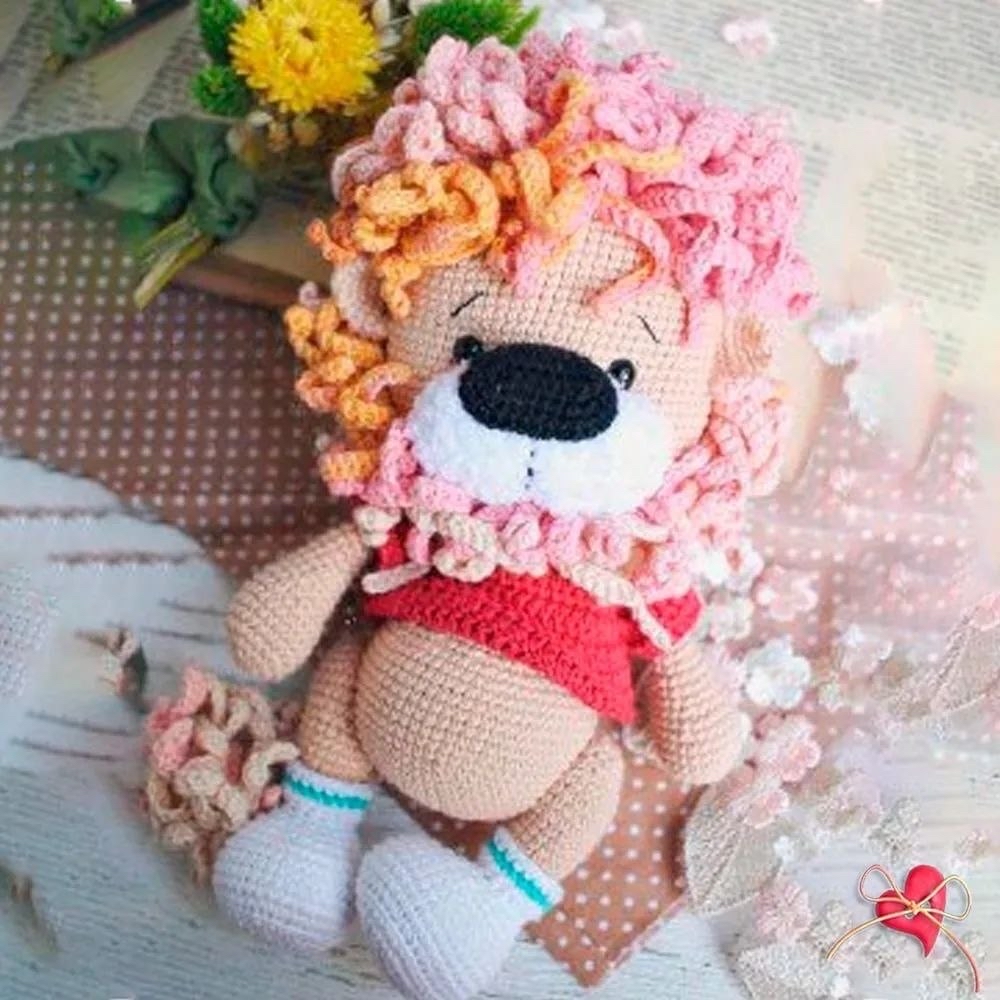
Adorable Crochet Lion Amigurumi Pattern: Step-by-Step Tutorial
If you are looking for a project that combines cuteness with a bit of texture, this adorable crochet lion is the perfect choice! This amigurumi lion features a wonderful mix of materials—smooth cotton for the body and a plush, velvet-style yarn for the muzzle—making him incredibly huggable. Standing approximately 9 inches tall, he is the ideal size for a nursery decoration or a special gift for a child.
This pattern is designed to be beginner-friendly, though it does incorporate a few different techniques like working in the front and back loops and creating curly tendrils for the mane. Whether you are an experienced crocheter or just starting your amigurumi journey, this guide will walk you through every stitch to create your own little king of the jungle.
Materials & Abbreviations
Materials Needed
- Main Body Yarn: Approx. 50 yards of medium-weight (worsted) 100% cotton in a tan or light brown color.
- Mane and Tail Yarn: Approx. 80 yards of variegated cotton yarn (shades of pink, orange, and yellow work beautifully).
- Muzzle Yarn: A small amount of plush chenille or velvet yarn in cream or off-white.
- T-shirt Yarn: Approx. 10 yards of red cotton yarn.
- Detail Yarn: Small amounts of white yarn for socks and black yarn for the nose.
- Crochet Hooks: 2.0 mm (for the body) and 2.75 mm (specifically for the plush muzzle).
- Safety Eyes: 8 mm plastic safety eyes.
- Leg Joints: Two 25 mm plastic doll joints for the legs.
- Stuffing: High-quality polyester fiberfill.
- Tools: Yarn needle, scissors, and stitch markers.
Abbreviations (US Terms)
- MR: Magic Ring
- ch: Chain
- sc: Single crochet
- inc: Increase (2 sc in the same stitch)
- dec: Decrease (sc 2 stitches together)
- sl st: Slip stitch
- hdc: Half double crochet
- dc: Double crochet
- BLO: Back loop only
- FLO: Front loop only
- st(s): Stitch(es)
Step-by-Step Instructions
The Head
The head is worked as an oval that eventually expands into a sphere.
Round 1: Ch 11. Starting in the 2nd ch from hook: 9 sc, 3 sc in the last ch, 8 sc across the other side, inc. (22 sts)
Round 2: Inc, 8 sc, inc, 1 sc, inc, 8 sc, inc, 1 sc. (26 sts)
Round 3: 2 inc, 8 sc, 2 inc, 1 sc, 2 inc, 8 sc, 2 inc, 1 sc. (34 sts)
Round 4: 1 sc, 2 inc, 10 sc, 2 inc, 3 sc, 2 inc, 10 sc, 2 inc, 2 sc. (42 sts)
Round 5: 42 sc.
Round 6: 1 sc, 2 inc, 14 sc, 2 inc, 3 sc, 2 inc, 14 sc, 2 inc, 2 sc. (50 sts)
Round 7: 50 sc.
Round 8: (1 sc, inc) x 2, 17 sc, (inc, 1 sc) x 2, (1 sc, inc) x 2, 17 sc, (inc, 1 sc) x 2. (58 sts)
Round 9: 58 sc.
Round 10: (2 sc, inc) x 2, 17 sc, (inc, 2 sc) x 2, (2 sc, inc) x 2, 17 sc, (inc, 2 sc) x 2. (66 sts)
Rounds 11-18: 66 sc for 8 rounds.
Round 19: 2 sc, inc, 1 sc, inc, 23 sc, inc, 1 sc, inc, 4 sc, inc, 1 sc, inc, 23 sc, inc, 1 sc, inc, 2 sc. (74 sts)
Rounds 20-30: 74 sc for 11 rounds. Insert safety eyes between rounds 20 and 21, approximately 12 stitches apart.
Round 31: 2 sc, dec, 1 sc, dec, 23 sc, dec, 1 sc, dec, 4 sc, dec, 1 sc, dec, 23 sc, dec, 1 sc, dec, 2 sc. (66 sts)
Round 32: (9 sc, dec) x 6. (60 sts)
Round 33: (8 sc, dec) x 6. (54 sts)
Round 34: (7 sc, dec) x 6. (48 sts)
Round 35: (2 sc, dec) x 12. (36 sts)
Stuff the head firmly with fiberfill.
Round 36: (1 sc, dec) x 12. sl st, fasten off. (24 sts)
The Legs (Make 2)
The legs begin with white for the feet and transition to the main tan color.
Round 1: Ch 6. Starting in 2nd ch from hook: inc, 3 sc, 3 sc in last ch, 4 sc. (12 sts)
Round 2: 2 inc, 3 sc, 3 inc, 3 sc, inc. (18 sts) + 1 sc as a shifting stitch to align the next round.
Round 3: 3 inc, 5 sc, 4 inc, 5 sc, inc. (26 sts) + 2 sc as shifting stitches.
Round 4: 2 sc, inc, 5 sc, (inc, 1 sc) x 5, 5 sc, inc, 2 sc. (33 sts)
Round 5 (Right Leg): 9 sc, 5 inc, 19 sc. (38 sts)
Round 5 (Left Leg): 19 sc, 5 inc, 9 sc. (38 sts)
Round 6: Work in BLO for 38 sc.
Rounds 7-11: 38 sc for 5 rounds.
Round 12 (Right Leg): 9 sc, 5 dec, 19 sc. (33 sts)
Round 12 (Left Leg): 19 sc, 5 dec, 9 sc. (33 sts)
Round 13: 2 sc, dec, 5 sc, (dec, 1 sc) x 5, 5 sc, dec, 2 sc. (26 sts)
Round 14: 7 sc, 6 dec, 7 sc. (20 sts)
Round 15: 5 sc, 5 dec, 5 sc. (15 sts)
Round 16: Change to main tan color, working in BLO. (15 sts). Do not cut the white yarn yet!
Rounds 17-18: 15 sc for 2 rounds.
Round 19: (4 sc, inc) x 3. (18 sts)
Round 20: (5 sc, inc) x 3. (21 sts)
Rounds 21-23: 21 sc for 3 rounds.
Round 24: 10 sc, 2 inc, 9 sc. (23 sts)
Round 25: 23 sc.
Round 26 (Right): 6 sc, ch 2, skip 2 sts, 15 sc. (23 sts)
Round 26 (Left): 16 sc, ch 2, skip 2 sts, 5 sc. (23 sts)
Round 27: 23 sc.
Round 28: dec, 8 sc, 2 dec, 9 sc. (20 sts). Insert the plastic leg joint here.
Round 29: (3 sc, dec) x 4. (16 sts)
Round 30: (2 sc, dec) x 4. (12 sts)
Round 31: dec x 6. sl st, fasten off.
Socks Detail: Return to the white yarn from Round 16. Working in FLO: (4 sc, inc) x 3. Work one row of 18 sc. Change to accent color: (5 sc, inc) x 3. Change back to white: 21 sc. sl st and fasten off.
The Arms (Make 2)
Round 1: 6 sc in MR. (6)
Round 2: inc x 6. (12)
Round 3: (1 sc, inc) x 6. (18)
Round 4: (2 sc, inc) x 6. (24)
Rounds 5-7: 24 sc for 3 rounds.
Round 8: (4 sc, dec) x 4. (20)
Round 9: 20 sc.
Round 10: (3 sc, dec) x 4. (16)
Rounds 11-27: 16 sc for 17 rounds. sl st and fasten off.
The Body
Round 1: 6 sc in MR. (6)
Round 2: inc x 6. (12)
Round 3: (1 sc, inc) x 6. (18)
Round 4: (2 sc, inc) x 6. (24)
Round 5: (3 sc, inc) x 6. (30)
Round 6: (4 sc, inc) x 6. (36)
Round 7: (5 sc, inc) x 6. (42)
Round 8: (6 sc, inc) x 6. (48)
Round 9: (7 sc, inc) x 6. (54)
Round 10: (8 sc, inc) x 6. (60)
Round 11: 60 sc.
Round 12: 13 sc, ch 2, skip 2 sts, 30 sc, ch 2, skip 2 sts, 13 sc. (60 sts)
Rounds 13-19: 60 sc for 7 rounds.
Round 20: (8 sc, dec) x 6. (54)
Round 21: 18 sc, dec, (2 sc, dec) x 4, 18 sc. (49)
Insert and secure the legs at this stage.
Round 22: 18 sc, dec, (1 sc, dec) x 4, 17 sc. (44)
Round 23: 44 sc + 1 shifting stitch.
Round 24: 4 sc, dec, 32 sc, dec, 4 sc. (42)
Round 25: (5 sc, dec) x 6. (36)
Rounds 26-27: 36 sc for 2 rounds.
Round 28: (4 sc, dec) x 6. (30)
Rounds 29-30: 30 sc for 2 rounds.
Round 31: (3 sc, dec) x 6. (24) + 2 shifting stitches.
Round 32: 3 sc, join 5 sc with arm and body, 8 sc, join 5 sc with arm and body, 3 sc. (24)
Round 33: 3 sc, 5 sc across arm, 8 sc, 5 sc across arm, 3 sc. (24)
Rounds 34-35: 24 sc for 2 rounds. sl st and fasten off.
The T-Shirt
Foundation: Ch 28, join with sl st to form a ring. Ch 1.
Round 1: 8 dc, in next st work (2 dc, ch 1, 2 dc), 4 dc, in next st (2 dc, ch 1, 2 dc), 8 dc, in next st (2 dc, ch 1, 2 dc), 4 dc, in next st (2 dc, ch 1, 2 dc). sl st. (44 sts)
Round 2: 10 dc, work (2 dc, ch 1, 2 dc) into the ch-1 space of previous row, 8 dc, (2 dc, ch 1, 2 dc) into ch-1 space, 12 dc, (2 dc, ch 1, 2 dc) into ch-1 space, 8 dc, (2 dc, ch 1, 2 dc) into ch-1 space, 2 dc. sl st. (60 sts)
Round 3: 12 dc, (2 dc, ch 1, 2 dc) into ch-1 space, 12 dc, (2 dc, ch 1, 2 dc) into ch-1 space, 16 dc, (2 dc, ch 1, 2 dc) into ch-1 space, 12 dc, (2 dc, ch 1, 2 dc) into ch-1 space, 4 dc. sl st. (76 sts)
Round 4: 14 dc, (2 dc, ch 1, 2 dc) into ch-1 space, 16 dc, (2 dc, ch 1, 2 dc) into ch-1 space, 20 dc, (2 dc, ch 1, 2 dc) into ch-1 space, 16 dc, (2 dc, ch 1, 2 dc) into ch-1 space, 6 dc. sl st. (92 sts)
Round 5: 17 dc, skip 20 sts, 26 dc, skip 20 sts, 9 dc. sl st. (52 sts)
Round 6: 52 dc. sl st.
Round 7: 17 dc, inc dc, 25 dc, inc dc, 8 dc. sl st. (54 sts)
Sleeves: Attach yarn to the arm openings of the shirt. Work 20 hdc around each sleeve. sl st and fasten off.
The Mane and Tail
Mane Base: Ch 11. Starting in 2nd ch: 9 sc, 3 sc in last ch, 8 sc, inc (22). Round 2: inc, 8 sc, inc, 1 sc, inc, 8 sc, inc, 1 sc (26). Round 3 (BLO): 2 inc, 8 sc, 2 inc, 1 sc, 2 inc, 8 sc, 2 inc, 1 sc (34). Round 4: 1 sc, 2 inc, 10 sc, 2 inc, 3 sc, 2 inc, 10 sc, 2 inc, 2 sc (42). Round 5: 1 sc, 2 inc, 14 sc, 2 inc, 3 sc, 2 inc, 14 sc, 2 inc, 2 sc (50). Round 6 (BLO): (1 sc, inc) x 2, 17 sc, (inc, 1 sc) x 2, (1 sc, inc) x 2, 17 sc, (inc, 1 sc) x 2 (58). Rounds 7-9: 58 sc. sl st and fasten off.
Curly Tendrils: Attach variegated yarn to FLO of round 2, 5, and 9. Ch 15, sc in each ch back to the base, sl st into the next base stitch. Repeat around. Use your fingers to curl the chains into spirals.
Mane Bottom & Back: Create similar oval bases using the same increase patterns as the main mane, but modify the rounds to fit the back of the head, ensuring the back piece covers the nape of the neck.
Tail: 6 sc in MR. inc x 6 (12). BLO 12 sc. (1 sc, inc) x 6 (18). 18 sc. BLO 18 sc. 18 sc for 2 rounds. (1 sc, dec) x 6 (12). Transition to main tan color: dec x 6 (6). 6 sc for 12 rounds. inc, 5 sc (7). 7 sc for 7 rounds. Attach variegated yarn to FLO of rounds 2, 5, and 8; create curly tendrils as done for the mane.
Facial Details
- Muzzle (Plush Yarn): Ch 9. Starting in 2nd ch: inc, 6 sc, 4 sc in last ch, 6 sc, inc (20). Round 2: 1 sc, inc, 6 sc, inc, 2 sc, inc, 6 sc, inc, 1 sc (24). Round 3: 24 sc. sl st and fasten off.
- Nose: Ch 8. Starting in 2nd ch: inc, 5 sc, 4 sc in last ch, 5 sc, inc (18). Round 2: 2 inc, 5 sc, 4 inc, 5 sc, 2 inc (26). Rounds 3-4: 26 sc. sl st and fasten off.
- Ears: 6 sc in MR. inc x 6 (12). (1 sc, inc) x 6 (18). (2 sc, inc) x 6 (24). 24 sc for 2 rounds. Fold in half and sc 12 across the bottom to close.
Finishing & Assembly
Now it is time to bring your lion to life! Follow these steps for a professional look:
- Ears: Sew the ears to the head between rounds 14 and 20.
- Muzzle: Sew the muzzle to the center of the face between rounds 21 and 33.
- Facial Shaping: Gently pull a thread from the bridge of the nose up toward the eyes to create a cute “scrunch” in the face. Embroider a vertical line on the muzzle and add small eyebrows.
- Nose: Sew the black nose onto the center of the muzzle.
- Mane: Pin the bottom mane piece from ear to ear, just under the muzzle. Sew it securely. Fit the top mane piece over the head like a hat, sewing it into the back loops of round 9. Finally, sew the back piece to cover the head’s rear.
- Tail: Sew the tail to the body between rounds 11 and 13.
- Final Step: Sew the head securely to the body and dress him in his red t-shirt!
Tips for Success
- Tension is Key: When working with plush yarn for the muzzle, keep your tension loose. If you pull too tight, the stitches will look distorted.
- Perfect Spirals: To get those tight curly tendrils for the mane, use a combination of your crochet hook and your fingers to roll the chains in different directions.
- Stuffing: Stuff the head and body firmly, but avoid overstuffing the limbs, as they need to be flexible to sit naturally.
- Customization: Feel free to experiment with different variegated yarns for the mane! A mix of gold, burgundy, and cream can create a very realistic look.