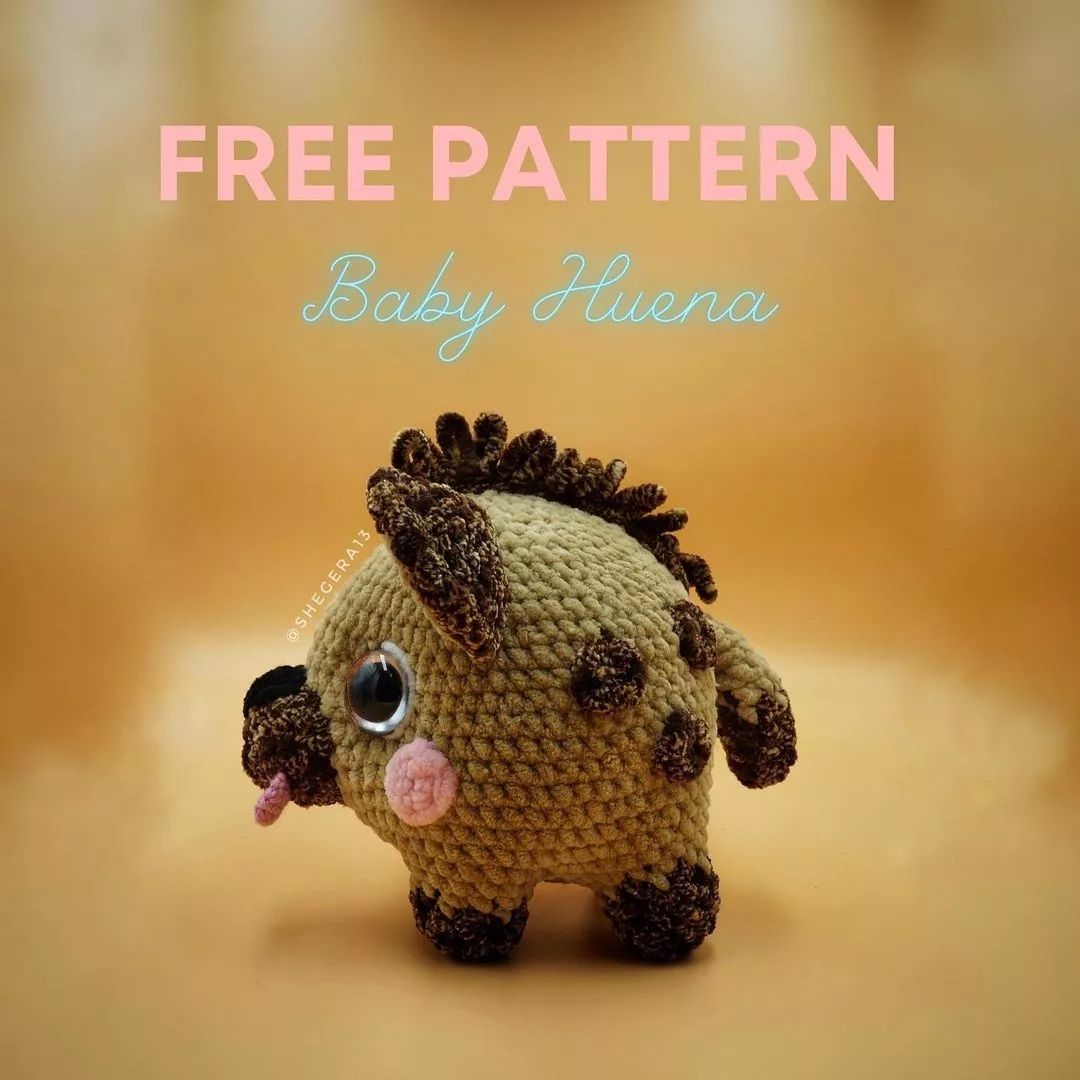
Adorable Baby Hyena Crochet Pattern: Free Amigurumi Tutorial
Looking for your next cozy crochet project? Get ready to fall in love with this Baby Hyena! This little critter is the perfect combination of quirky and cute, making it a fantastic gift for animal lovers or a wonderful addition to your own handmade plushie collection. Using super bulky velvet yarn, this amigurumi turns out incredibly soft, squishy, and huggable.
Whether you are an experienced amigurumi artist or a beginner looking to practice joining pieces, this tutorial will guide you through every stitch. We will be using a “bottom-up” construction method, where we create the legs and join them together to form the base of the body. Let’s grab our hooks and get started!
Materials & Abbreviations
To create your baby hyena, you will need a few different types of yarn to achieve those distinct colors and textures. For the main body, we recommend a chenille or velvet-style yarn for that signature plush feel.
Yarn and Tools
- Super Bulky/Super Chunky Velvet Yarn:
- Beige (approx. 1 skein)
- Dark Brown (approx. 1/2 skein)
- Black (small amount)
- White (small amount)
- Sport Weight Yarn: Pink (small amount for the tongue and cheeks)
- Crochet Hooks: 4.0 mm (for the bulky yarn) and 2.5 mm (for the pink sport weight yarn)
- Safety Eyes: 13 mm
- Fiberfill: High-quality synthetic stuffing
- Notions: Tapestry needle, scissors, and sewing thread
Abbreviations (US Terms)
- MR: Magic Ring
- sc: Single crochet
- inc: Increase (2 sc in one stitch)
- dec: Decrease (sc 2 stitches together)
- ch: Chain
- hdc: Half double crochet
- dc: Double crochet
- st(s): Stitch(es)
Finished Size: Approximately 6 inches tall depending on your tension.
Step-by-Step Instructions
The Tail
Using dark brown velvet yarn:
- Round 1: 6 sc in MR
- Round 2: 6 sc
- Round 3: (1 sc, inc) * 3 (9 sts)
- Round 4: 9 sc
- Round 5: (2 sc, inc) * 3 (12 sts)
Now, change to beige yarn:
- Round 6: (1 sc in dark brown, 1 sc in beige) * 6 (12 sts)
Continue only with beige yarn:
- Round 7: (2 sc, dec) * 3 (9 sts)
- Round 8: 9 sc
- Round 9: (1 sc, dec) * 3 (6 sts)
- Round 10: 6 sc
- Round 11: Fold the tail in half. Crochet 3 sc through both layers to close the end.
Lightly stuff the tail, fasten off, and leave a tail for sewing.
The Legs (Make 4)
Using dark brown velvet yarn. Important: Do not cut the yarn after completing the fourth leg, as we will use it to join the body.
- Round 1: 6 sc in MR
- Round 2: 6 inc (12 sts)
- Rounds 3-4: 12 sc
Change to beige yarn:
- Round 5: (1 sc in dark brown, 1 sc in beige) * 6 (12 sts)
Continue with beige yarn:
- Round 6: (5 sc, inc) * 2 (14 sts)
Fasten off the first three legs. For the fourth leg, keep the yarn attached.
The Body and Tummy
Joining the Legs
Now we will connect the four legs to create the base of our hyena. Using the yarn still attached to the fourth leg:
- Round 1: Ch 3, join to the second leg and crochet 9 sc around it. Ch 3, join to the third leg and crochet 9 sc around it. Ch 3, join to the fourth leg and crochet 9 sc around it. Ch 3, then join back to the first leg with 1 sc. This creates a ring with 9 sc on the outside of each leg and 5 sc on the inside chains, totaling 48 sc.
Place a stitch marker at the back of the body.
- Round 2: 16 sc, (inc, 1 sc) * 6, 20 sc (54 sts)
- Round 3: 19 sc, (inc, 1 sc) * 6, 23 sc (60 sts)
- Rounds 4-10: 60 sc
- Extra: Work 1 extra sc to keep the spiral alignment.
The Tummy (Bottom-Up)
Before we continue upward toward the head, we need to create the tummy. Turn the toy upside down. Attach beige yarn to the back of the last chain that connected the legs. Crochet in a spiral:
- Round 1: 32 sc (this includes 5 sc on the legs and 3 sc on the connecting chains)
- Round 2: (6 sc, dec) * 4 (28 sts)
- Round 3: (5 sc, dec) * 4 (24 sts)
- Round 4: (2 sc, dec) * 6 (18 sts)
- Round 5: (1 sc, dec) * 6 (12 sts)
- Round 6: 6 dec (6 sts)
Sew the hole closed, fasten off, and return to the main body.
The Upper Body and Head
Pick up your beige yarn at the point where you paused the main body:
- Round 11: 57 sc, join the tail and crochet 3 sc through both the tail and the body (60 sts)
- Rounds 12-13: 60 sc
- Round 14: (8 sc, dec) * 6 (54 sts)
- Round 15: (7 sc, dec) * 6 (48 sts)
- Extra: Work 1 extra sc.
- Round 16: (6 sc, dec) * 6 (42 sts)
- Round 17: (5 sc, dec) * 6 (36 sts)
- Round 18: (3 sc, dec) * 3, 6 sc, (dec, 3 sc) * 3 (30 sts)
Eyes: Insert safety eyes between rounds 10 and 11, approximately 10 sc apart. Begin stuffing the head firmly.
- Round 19: (2 sc, dec) * 3, 6 sc, (dec, 2 sc) * 3 (24 sts)
- Round 20: (1 sc, dec) * 3, 6 sc, (dec, 1 sc) * 3 (18 sts)
Continue stuffing. Work 1 extra sc.
- Round 21: (1 sc, dec) * 6 (12 sts)
- Round 22: 6 dec (6 sts)
Sew the hole closed and fasten off.
The Snout, Tongue, and Cheeks
The Snout
Using dark brown velvet yarn:
- Round 1: 6 sc in MR
- Round 2: 6 inc (12 sts)
- Round 3: (3 inc, 3 sc) * 2 (18 sts)
- Rounds 4-5: 18 sc
Fasten off. Use black thread to embroider a small triangle for the nose.
The Tongue
Using pink sport weight yarn and a 2.5 mm hook:
- Round 1: 6 sc in MR
- Round 2: 6 inc (12 sts)
- Rounds 3-4: 12 sc
- Round 5: Fold in half and crochet 6 sc through both sides to close.
Sew the tongue to the side of the snout.
The Cheeks (Make 2)
Using pink sport weight yarn:
- Round 1: 6 hdc in MR
Fasten off and sew these under the eyes.
The Ears (Make 2)
Light Part: Using beige yarn, work 6 sc in MR, then follow the increase sequence: 6 inc (12), (1 sc, inc) * 6 (18), and (2 sc, inc) * 6 (24). Fasten off.
Dark Part: Using dark brown yarn, repeat the same process (6 sc in MR, 12, 18, 24 sts). Do not cut the yarn.
Assembly: Place the light part and dark part together. Crochet through both layers using dark brown yarn: 10 sc, 2 hdc, 1 dc, 2 hdc, 9 sc. Fasten off.
Finishing
Now it is time to bring your baby hyena to life! Follow these final assembly steps:
- Ears: Sew the ears to the head between rounds 12 and 20, spaced 8 sc apart. Make sure the “sharp” pointed side of the ear is facing upward.
- Snout: Sew the snout to the center of the face between rounds 4 and 11.
- Mane: Use dark brown yarn and loop stitches to create a fuzzy tuft of hair running from the ears down toward the tail.
- Spots: To create the hyena’s spots, work 6 sc in a MR with dark brown yarn. Make 6 of these and sew them randomly on the back of the body.
- Details: Use white thread to add small highlights to the safety eyes to make them look more expressive. You can also use a needle to “sculpt” the area around the eyes by pulling the yarn slightly to create eye sockets.
Tips for Success
Working with velvet yarn can be a bit different than standard acrylic. Here are a few tips to make your experience smoother:
- Finding the Stitches: Velvet yarn can hide the stitch holes. Use your fingers to feel for the “V” of the stitch rather than relying only on your eyes.
- Tension Control: Because the yarn is so bulky, it is easy to accidentally create gaps. Keep your tension consistent, but not too tight, to ensure the stuffing doesn’t peek through.
- Joining Legs: When joining the legs for the body, be careful not to twist the legs. Lay them flat on a table before you start chaining and crocheting around them.
- Needle Sculpting: For a more professional look, use a long tapestry needle to pull the snout or eyes slightly deeper into the head. This creates a 3D “sculpted” effect that adds a lot of character to your plushie.