Free Crochet Little Pirate Boy Pattern: Amigurumi Tutorial
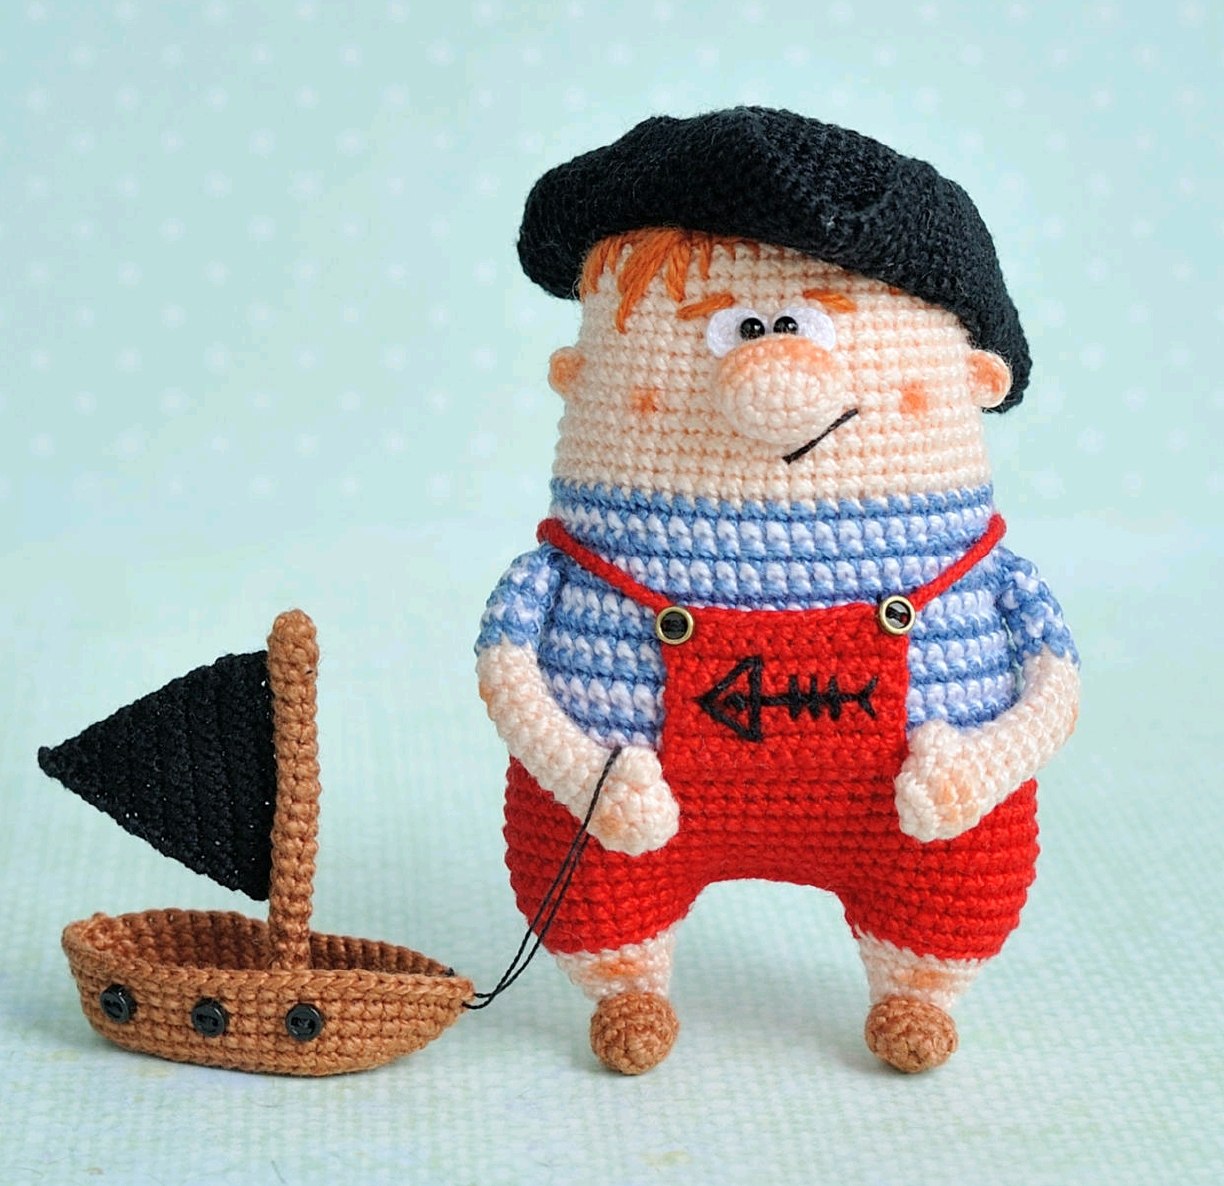
Welcome to this adorable crochet project! Today, we are making a tiny, adventurous little pirate boy, complete with a striped sailor shirt, red overalls, a classic pirate hat, and even his very own little sailboat. This project is perfect for those who love miniature amigurumi and want to practice their color changes and shaping techniques.
This pattern is designed to be beginner-friendly, though it involves some detailed work on the face and assembly. By the end of this tutorial, you’ll have a charming little character that stands about 3 inches tall. Let’s dive into the salty seas of crochet!
Materials & Abbreviations
Yarn Requirements
For this project, a fine 100% cotton yarn (fingering weight) works best to keep the stitches tight and the details sharp. You will need the following colors:
- Caramel: For the hair and eyebrows.
- Flesh/Skin Tone: For the head, hands, and feet.
- Blue and White: For the striped sailor shirt.
- Red: For the overalls.
- Brown: For the shoes and the boat.
- Black: For the hat and the pirate flag.
- White Embroidery Floss: For the whites of the eyes.
Tools & Notions
- Crochet Hooks: 0.9mm (main body) and 0.6mm (for the eyes).
- Safety Eyes or Beads: 2mm black beads for pupils.
- Wire: 1mm aluminum or copper wire for the arms.
- Stuffing: High-quality polyester fiberfill.
- Buttons: Two 3mm copper-colored buttons (overalls) and three 3mm black buttons (boat).
- Adhesive: Clear gel glue or fabric glue.
- Other: Yarn needle, scissors, stitch markers, and sewing pins.
US Crochet Abbreviations
- MR: Magic Ring
- ch: Chain
- sc: Single crochet
- inc: Increase (two sc in one stitch)
- dec: Decrease (sc two together)
- sl st: Slip stitch
- tr: Treble crochet
- BLO: Back loop only
- FLO: Front loop only
- Bobble: 3 treble crochets in one stitch, worked together as one.
Step-by-Step Instructions
The Head, Body, and Legs
The most unique part of this pattern is that the head, body, and legs are worked as one continuous piece from the top down. Stuff the piece firmly as you go.
Part 1: The Top of the Head (Caramel Yarn)
- R1: 6 sc in MR (6)
- R2: 6 inc (12)
- R3: (1 sc, inc) * 6 (18)
- R4: 1 sc, inc, (2 sc, inc) * 5, 1 sc (24)
- R5: (3 sc, inc) * 6 (30)
- R6: 2 sc, inc, (4 sc, inc) * 5, 2 sc (36)
- R7: (5 sc, inc) * 6 (42)
- R8-9: sc in each stitch around (42)
Part 2: The Face and Neck (Flesh Yarn)
Cut the caramel yarn and switch to the skin tone.
- R10: BLO sc in each stitch around (42)
- R11: sc in each stitch around (42)
- R12: (13 sc, inc) * 3 (45)
- R13-15: sc in each stitch around (45)
- R16: 7 sc, inc, (14 sc, inc) * 2, 7 sc (48)
- R17-19: sc in each stitch around (48)
- R20: (11 sc, inc) * 4 (52)
- R21-22: sc in each stitch around (52)
Part 3: The Striped Shirt (Blue & White Yarn)
Switch to blue yarn.
- R23: sc in each stitch around (52)
Now, alternate colors every row. R24 in white, R25 in blue, R26 in white, and so on, until R34.
- R24: sc in each stitch around (52)
- R25: 6 sc, inc, (12 sc, inc) * 3, 6 sc (56)
- R26-31: sc in each stitch around (56)
- R32: (13 sc, inc) * 4 (60)
- R33-34: sc in each stitch around (60)
Part 4: The Overalls and Legs (Red Yarn)
Switch to red yarn.
- R35: sc in each stitch around (60)
- R36: BLO sc in each stitch around (60)
- R37-42: sc in each stitch around (60)
Creating the Legs: Now we split the body into two legs. Stuff the torso and head firmly before this step.
- R43: Crochet 4 sc, place a marker in the 4th stitch. Crochet another 22 sc (total 26). Fold the front and back of the body together. Insert your hook into the 27th stitch and the 4th stitch (marked), and join with a sl st. Work 7 sl sts across the bottom edge to close the gap. Then, crochet 22 sc around the first leg.
Left Leg:
- R44: 10 sc, dec, 10 sc, 1 sc (offset stitch) (21)
Switch to Flesh yarn:
- R45: BLO (5 sc, dec) * 3 (18)
- R46: 2 sc, dec, (4 sc, dec) * 2, 2 sc (15)
- R47: (3 sc, dec) * 3 (12)
- R48: 1 sc, dec, (2 sc, dec) * 2, 1 sc, sl st (9)
Fasten off, leaving a long tail for sewing the boot.
Right Leg: Repeat R44 in red, then R45-48 in flesh yarn exactly as you did for the left leg. Stuff the legs firmly.
The Boots (Brown Yarn)
Make two boots:
- R1: 5 sc in MR (5)
- R2: 5 inc (10)
- R3-5: sc in each stitch around (10)
- R6: 5 dec (5)
Pull the loop closed. Sew the boots to the bottom of the legs.
The Arms (Flesh, Blue, and White Yarn)
Make two arms (starting with the right):
- R1: 5 sc in MR (5)
- R2: 5 inc (10)
- R3: sc in each stitch around (10)
- R4: 2 sc, Bobble stitch, 7 sc (10)
- R5: (3 sc, dec) * 2 (8)
- R6-13: sc in each stitch around (8)
Switch to blue and white, alternating colors every row for 5 more rows (R14-18). Fasten off.
Note for Left Arm: In R4, work 7 sc, Bobble stitch, 2 sc.
Insert a folded 3.5-inch piece of wire into each arm and sew the wire to the palm for poseability.
Finishing the Little Pirate
The Face and Details
- Nose: Ch 5. Starting from 2nd ch: 3 sc, 3 sc in last ch. On other side of chain: 2 sc, inc (10). R2: inc, 2 sc, 3 inc, 2 sc, 2 inc (16). R3-4: sc around (16). R5: (2 sc, dec) * 4 (12). Stuff and sew to center of face.
- Ears: 4 sc in MR. Fasten off and sew between rows 16 and 20 of the head.
- Eyes: Use the 0.6mm hook and white floss. Ch 4. Starting from 2nd ch: 2 sc, 3 sc in last ch. On other side: 1 sc, inc (8). R2: inc, 1 sc, 3 inc, 2 sc, inc, sl st (13). Glue these to the face and add 2mm black beads as pupils.
- Embroidery: Use black thread for the mouth and caramel thread for the eyebrows and hair. For the hair, use alternating long and short vertical stitches starting from the back of the head toward the front.
- Blush: Use a small amount of dry pastel or blush to add color to the cheeks, nose, and elbows.
Overalls, Hat, and Boat
The Overalls
Pin two points on the belly, about 12 stitches apart. Join red yarn at R35 and work 12 sc. Work 8 rows of 12 sc (turning rows). Fasten off. Embroider a fish skeleton on the front using black thread. Create two chain straps (approx. 35 chains each) and sew them in a cross on the back. Add the copper buttons to the front.
The Pirate Hat (Black Yarn)
- R1-7: Increase from 6 to 42 sc using standard amigurumi circles.
- R8: (13 sc, inc) * 3 (45)
- R9-11: sc around (45)
- R12: (14 sc, inc) * 3 (48)
- R13-15: sc around (48)
- R16: FLO (3 sc, inc) * 12 (60)
- R17-20: (5 sc, inc) through (8 sc, inc) to reach 100 stitches.
- R21: sc around (100).
Fold the brim upward as shown in the photos and stitch in place to create the tricorne shape.
The Sailboat (Brown and Black Yarn)
- Hull: Ch 12. Work around the chain: 10 sc, 3 sc in last ch, 9 sc, inc (24). Increase at the “nose” of the boat every row from R5 to R9 to create a pointed shape.
- Mast: 5 sc in MR, then 20 rows of 5 sc. Insert wire for stability.
- Flag: Ch 16. Work 15 sc. Then decrease one stitch at the end of every row (dec) until you reach 1 stitch.
Assemble the boat by sewing the mast to the hull and the flag to the mast. Add black buttons along the side for detail.
Tips for Success
- Tension: Keep your tension tight, especially on the skin-colored sections, to prevent the fiberfill from showing through.
- Wire Safety: When inserting wire into the arms, ensure the ends are tucked securely so they don’t poke through the crochet fabric.
- Color Changes: For the cleanest stripes, change colors on the last stitch of the previous row.
- Customization: Feel free to change the colors! A blue coat or a different colored hat can give your pirate a whole new personality.