Adorable Mini Crochet Sheep Pattern: Easy Step-by-Step Tutorial
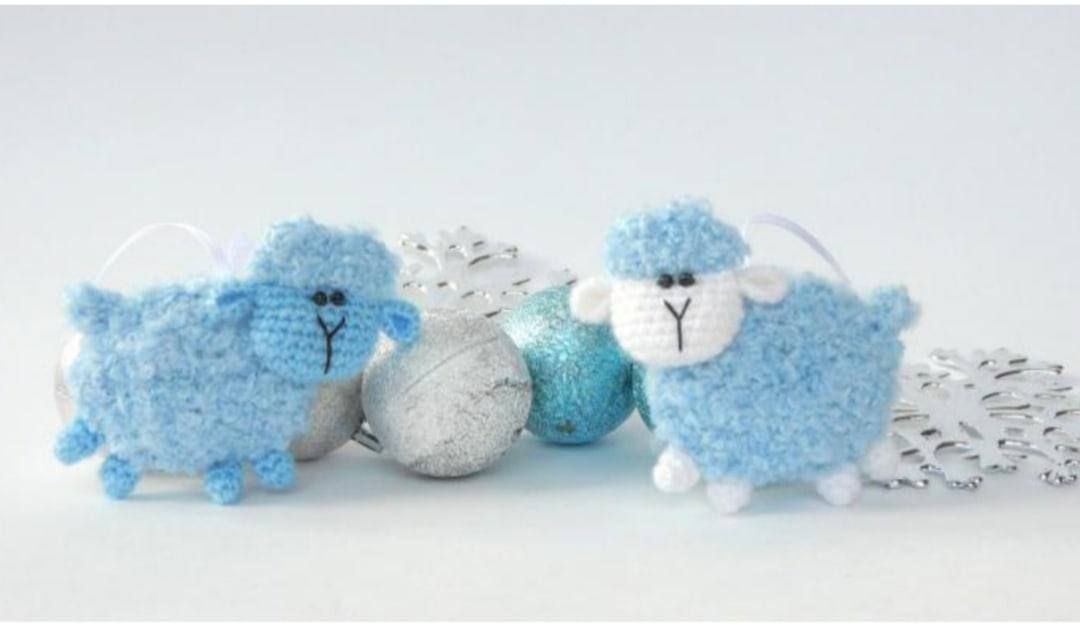
There is nothing quite as charming as a tiny, fluffy sheep! Whether you are looking to create a sweet addition to your Christmas tree, a whimsical keychain for your bag, or even a cute handmade brooch, this mini crochet sheep is the perfect project. These little lambs are quick to make, requiring very little yarn, making them an ideal choice for using up your scrap stash.
This pattern is designed to be beginner-friendly, though it uses a mix of yarn textures to get that iconic “woolly” look. If you have never worked with bouclé yarn before, don’t be intimidated—this tutorial will guide you through the process of creating a professional-looking plushie with a little bit of patience and a crochet hook.
Materials & Abbreviations
To get started on your little flock, gather the following materials. Since this project is so small, you only need a small amount of each yarn (roughly 10-20 yards per color).
Supplies Needed
- Bouclé Yarn: A textured, loopy yarn in white, cream, or light blue for the sheep’s wool.
- Smooth Yarn: A thin, smooth yarn (such as a fingering weight or a thin wool blend) in a contrasting color like tan, beige, or brown for the head, ears, and legs.
- Embroidery Floss: Black or dark brown thread for stitching the nose and mouth.
- Beads: Two small black beads for the eyes.
- Crochet Hooks: A 2.0mm hook (for the smooth yarn) and a 2.5mm hook (for the bouclé yarn).
- Stuffing: A small amount of polyester fiberfill.
- Extras: A sewing needle, scissors, and an optional satin ribbon or brooch pin.
US Crochet Terms & Abbreviations
- ch: chain
- sc: single crochet
- sl st: slip stitch
- inc: increase (work two single crochet stitches into the same stitch)
- dec: decrease (crochet two stitches together into one)
- MR: magic ring
- (…) : The number at the end of the row in parentheses indicates the total stitch count for that round.
- x [number]: Repeat the sequence inside the parentheses the specified number of times.
Step-by-Step Instructions
We will be working in a continuous spiral for most of this project. This means you will not join your rounds with a slip stitch unless specifically instructed. I recommend using a stitch marker to keep track of the start of each row.
The Body
You will need to crochet two identical pieces for the body using the 2.5mm hook and bouclé yarn. Note: When working with bouclé yarn, the “wrong side” of the fabric often looks like the “right side” because the loops sit more prominently on the back. Keep this in mind for the final assembly.
- Round 1: Ch 6. Starting in the 2nd chain from the hook, work 4 sc. In the last chain, work 3 sc. Turn your work and crochet along the opposite side of the chain: work 3 sc, then 2 sc in the very first chain. (12)
- Round 2: Inc, 3 sc, 3 inc, 3 sc, 2 inc. (18)
- Round 3: Inc, 4 sc, (inc, sc) x 3, 3 sc, (inc, sc) x 2. (24)
- Round 4: 24 sc. (24)
Pro Tip: If you find that your work is curling or feels too tight in Round 4 (which can happen depending on the gauge of your yarn), you can replace Round 4 with the following increase row: Inc, 6 sc, (inc, 2 sc) x 3, 3 sc, (inc, 2 sc) x 2. (30)
The Tail
On one of the two body pieces, we will add a small tail before fastening off. Without cutting the yarn, work 2 sc, ch 3, sc in the 2nd chain from the hook, 1 sc, and then 1-2 sl st back into the body to secure the tail. Fasten off and weave in your ends.
The finished body piece should measure approximately 2 inches in length and 1.5 inches in height.
The Head
Switch to the 2.0mm hook and your smooth yarn for the face.
- Round 1: Ch 6. Starting in the 2nd chain from the hook, work 4 sc. In the last chain, work 3 sc. Turn and work along the opposite side: 3 sc, 2 sc in the first chain. (12)
- Round 2: Inc, 3 sc, 3 inc, 3 sc, 2 inc. (18)
- Round 3: (8 sc, inc) x 2. (20)
- Rounds 4–7: 20 sc. (20) Note: In Round 7, stop 1 stitch before the end of the round.
- Round 8: (dec, 8 sc) x 2. (18)
Fasten off the smooth yarn and stuff the head lightly with fiberfill.
Adding the Curly Top: Now, switch back to the bouclé yarn. Attach the yarn to the edge of the head. Work one round of sc into every stitch around the entire edge, catching both sides of the fabric. For the final row, turn the piece and work 1 decrease on each side. If you want the head to be extra curly, you can repeat this for 2-3 rows. Fasten off and hide the ends.
The Ears
Make two ears using the smooth yarn and 2.0mm hook.
- Round 1: 6 sc in a magic ring. (6)
- Round 2: Inc x 6. (12)
Leave a long tail for sewing. Fold the circle in half with the right sides facing inward and sew a few stitches across the flat edge to secure the semi-circle shape.
The Legs
Depending on how you want your sheep to stand, choose one of the following options:
Option 1: Two-Legged (Upright) Sheep
- Upper Paws: 6 sc in a magic ring, work 4 rows of 6 sc. Make 2 pieces.
- Lower Legs: 6 sc in a magic ring, work 5 rows of 6 sc. Make 2 pieces.
Option 2: Four-Legged (Walking) Sheep
- Legs: 6 sc in a magic ring, work 3 rows of 6 sc. Make 4 pieces.
Finishing & Assembly
Now it is time to bring your little lamb to life!
The Face
Sew the ears to the sides of the head. Using your beads, sew two small eyes centered on the face. With your embroidery floss, stitch a small “Y” shape to create a sweet little nose and mouth. If you are making the head as a brooch, you can stop here and sew a felt backing and a pin to the back!
Putting it Together
For an upright sheep: Sew the head to the top of the body. If you want to hang the sheep as an ornament, sew a satin ribbon between the head and the body before completing the assembly.
For a four-legged sheep: Sew the head to the side of the body to give it a grazing silhouette.
Sew the legs to the bottom of the body. Finally, place the two body pieces together. Use a needle and yarn to sew the edges together using an overcast stitch, pulling the thread tight so it disappears into the bouclé loops. Before you close the last few stitches, add a small amount of stuffing to the body to give it a plump look.
Tips for Success
- Working with Bouclé: Because the stitches are hard to see in textured yarn, use a stitch marker! If you lose your place, you can gently feel for the gaps between stitches with your fingernail.
- Tension: Keep your tension loose when working the body, but tight when working the smooth yarn sections (head and legs) to ensure the stuffing doesn’t peek through.
- Customization: Don’t feel limited to white! These make adorable pastel-colored sheep for baby showers or even bright, neon-colored fantasy sheep.
- The Perfect Tail: For the upright sheep, if you didn’t add the tail during the body rounds, you can simply chain 3, work 2 sc, and sew it to the back of the finished body.