Adorable Amigurumi Baby Bull Crochet Pattern: Easy Step-by-Step Tutorial
Cute Amigurumi Baby Bull Crochet Pattern: A Step-by-Step Tutorial
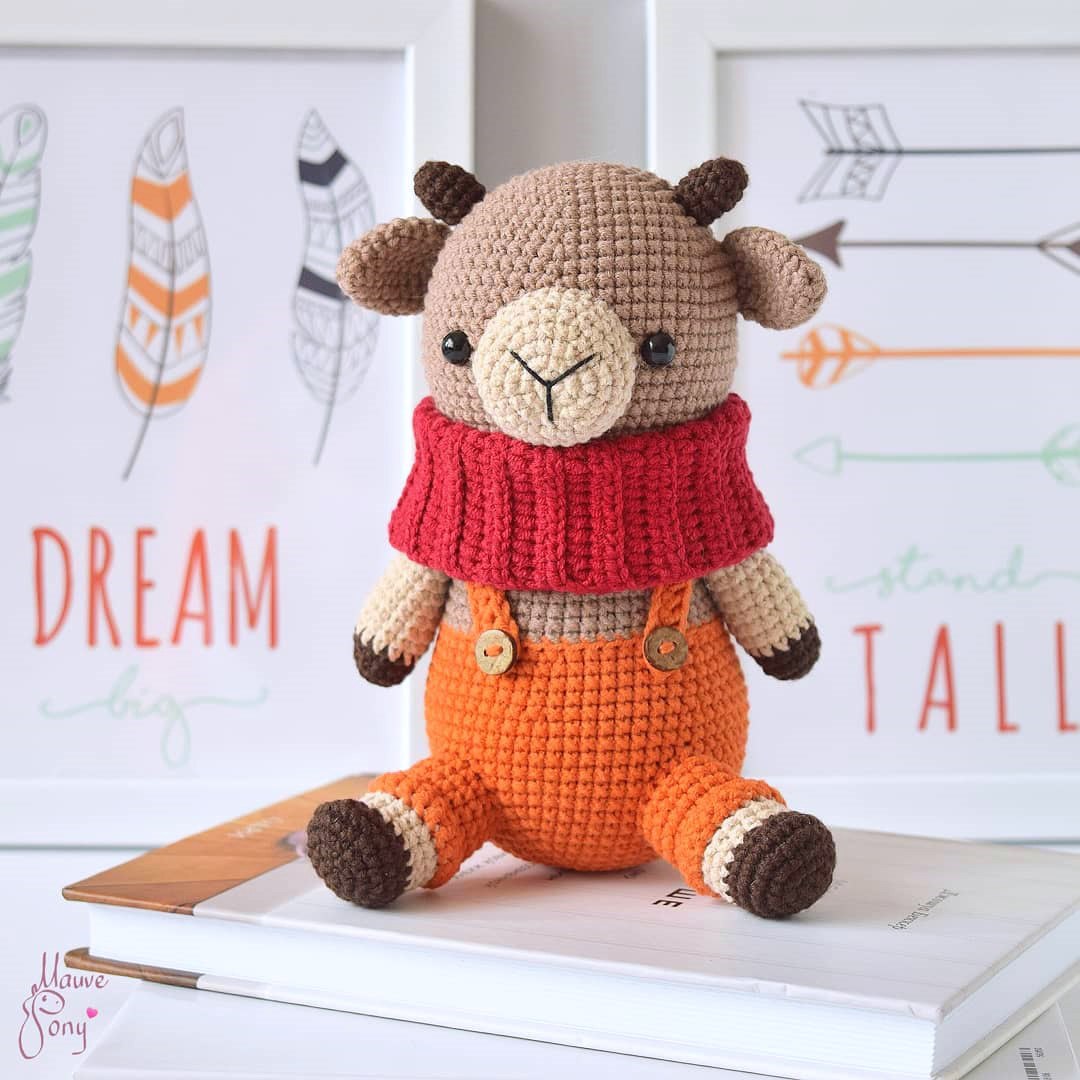
Looking for a charming new project to add to your amigurumi collection? This adorable baby bull is the perfect companion for a nursery, a thoughtful handmade gift, or a cozy desk buddy. With its oversized head, tiny overalls, and a cozy snood, this little calf is designed to bring a smile to anyone’s face.
This pattern is written for beginners and intermediate crocheters. We will be using the “continuous spiral” method, meaning you won’t be joining your rounds with a slip stitch unless specifically noted. To keep your work tidy, we recommend using a stitch marker to track the start of each round. Let’s dive into creating your own little farm friend!
Materials & Abbreviations
To get the best results, we suggest using a sport-weight cotton blend yarn. This provides the necessary structure to keep the bull sitting upright while remaining soft to the touch.
Materials Needed
- Yarn: Sport-weight cotton blend in five colors:
- Main Body/Head (Milk Chocolate/Light Brown)
- Muzzle and Accents (Beige)
- Horns and Hooves (Dark Brown)
- Overalls (Orange-Brown)
- Scarf/Snood (Cherry Red)
- Small amount of black embroidery floss for the nose.
- Crochet Hook: 2.0mm (or a size that prevents stuffing from showing through).
- Eyes: 6mm safety eyes (or black beads).
- Stuffing: High-quality polyester fiberfill.
- Accessories: 2 small decorative buttons for the overalls.
- Tools: Yarn needle, scissors, and stitch markers.
US Crochet Terms & Abbreviations
- ch: Chain
- sc: Single crochet
- inc: Increase (two single crochets in one stitch)
- dec: Decrease (invisible decrease recommended)
- hdc: Half double crochet
- sl st: Slip stitch
- MR: Magic Ring
- BLO: Back loop only
- FLO: Front loop only
- st(s): Stitch(es)
Step-by-Step Instructions
The Head (Main Color)
The head is worked from the top down. Ensure you stuff it firmly, but leave a little room to avoid distorting the face shape.
- Round 1: 6 sc in MR (6)
- Round 2: 6 inc (12)
- Round 3: (1 sc, 1 inc) x 6 (18)
- Round 4: (2 sc, 1 inc) x 6 (24)
- Round 5: (3 sc, 1 inc) x 6 (30)
- Round 6: (4 sc, 1 inc) x 6 (36)
- Round 7: (5 sc, 1 inc) x 6 (42)
- Round 8: 42 sc
- Round 9: (6 sc, 1 inc) x 6 (48)
- Round 10: 48 sc
- Round 11: (7 sc, 1 inc) x 6 (54)
- Round 12: 54 sc
- Round 13: (8 sc, 1 inc) x 6 (60)
- Rounds 14-20: 60 sc
- Round 21: (8 sc, 1 dec) x 6 (54)
- Round 22: 54 sc
- Round 23: (7 sc, 1 dec) x 6 (48)
- Round 24: 48 sc
- Round 25: (6 sc, 1 dec) x 6 (42)
Eye Placement: Insert the safety eyes between rounds 17 and 18. Place them approximately 1.5 to 2 inches apart. Begin stuffing the head firmly now.
- Round 26: (5 sc, 1 dec) x 6 (36)
- Round 27: (4 sc, 1 dec) x 6 (30)
- Round 28: (3 sc, 1 dec) x 6 (24)
- Stuff the head completely.
- Round 29: (2 sc, 1 dec) x 6 (18)
- Round 30: (1 sc, 1 dec) x 6 (12)
- Round 31: 6 dec
Fasten off, weave in the end, and sew the opening closed.
The Muzzle (Beige)
- Round 1: 6 sc in MR (6)
- Round 2: 6 inc (12)
- Round 3: (1 sc, 1 inc) x 6 (18)
- Round 4: (2 sc, 1 inc) x 6 (24)
- Round 5: 24 sc
- Round 6: (3 sc, 1 inc) x 6 (30)
Fasten off, leaving a long tail for sewing. Lightly stuff and sew to the face.
The Ears (Make 2 – Main Color)
- Round 1: 6 sc in MR (6)
- Round 2: (1 sc, 1 inc) x 3 (9)
- Round 3: (2 sc, 1 inc) x 3 (12)
- Round 4: 12 sc
- Round 5: (3 sc, 1 inc) x 3 (15)
- Rounds 6-8: 15 sc
- Round 9: (1 sc, 1 dec) x 5 (10)
Flatten the ear and crochet 5 sc across the opening to close it. Leave a tail for sewing.
The Horns (Make 2 – Dark Brown)
- Round 1: 6 sc in MR (6)
- Round 2: (1 sc, 1 inc) x 3 (9)
- Rounds 3-5: 9 sc, finish with a sl st.
Lightly stuff and leave a tail for sewing.
The Upper Arms (Make 2)
Start with Dark Brown yarn.
- Round 1: 6 sc in MR (6)
- Round 2: 6 inc (12)
- Round 3: 12 sc
- Round 4: (5 sc, 1 inc) x 2 (14)
Switch to Beige yarn.
- Rounds 5-14: 14 sc. Stuff the arm halfway.
- Round 15: (5 sc, 1 dec) x 2 (12)
- Round 16: 12 sc
Flatten the arm and crochet 6 sc across the opening to close. Leave a tail for sewing.
The Body (Overalls Color)
- Round 1: 6 sc in MR (6)
- Round 2: 6 inc (12)
- Round 3: (1 sc, 1 inc) x 6 (18)
- Round 4: (2 sc, 1 inc) x 6 (24)
- Round 5: (3 sc, 1 inc) x 6 (30)
- Round 6: (4 sc, 1 inc) x 6 (36)
- Round 7: (5 sc, 1 inc) x 6 (42)
- Round 8: (6 sc, 1 inc) x 6 (48)
- Round 9: (7 sc, 1 inc) x 6 (54)
- Round 10: 54 sc
- Round 11: (8 sc, 1 inc) x 6 (60)
- Rounds 12-18: 60 sc
- Round 19: (8 sc, 1 dec) x 6 (54)
- Rounds 20-22: 54 sc
- Round 23: (7 sc, 1 dec) x 6 (48)
Switch to Main Color (Light Brown).
- Round 24: 48 sc in BLO
- Rounds 25-27: 48 sc
- Round 28: (6 sc, 1 dec) x 6 (42)
- Rounds 29-30: 42 sc
- Round 31: (5 sc, 1 dec) x 6 (36). Begin stuffing.
- Round 32: 6 sc, 6 sc around the first arm (attaching it), 12 sc, 6 sc around the second arm (attaching it), 6 sc (36)
- Round 33: 36 sc. Finish stuffing the body completely.
- Round 34: (4 sc, 1 dec) x 6, finish with sl st (30)
Fasten off and leave a long tail for sewing to the head.
The Lower Legs (Make 2)
Start with Dark Brown yarn.
- Round 1: 6 sc in MR (6)
- Round 2: 6 inc (12)
- Round 3: (1 sc, 1 inc) x 6 (18)
- Round 4: (2 sc, 1 inc) x 6 (24)
- Round 5: 24 sc
- Round 6: 9 sc, 3 dec, 9 sc (21)
Switch to Beige yarn.
- Round 7: 8 sc, 3 dec, 7 sc (18)
- Rounds 8-9: 18 sc. Stuff the foot.
Switch to Overalls Color.
- Round 10: 18 sc in BLO
- Rounds 11-15: 18 sc, finish with sl st. Stuff the leg.
Leg Detail: Reattach the Overalls Color yarn to the front loops of Round 10. Crochet 18 sc in FLO, then one more round of 18 sc. Fasten off.
The Tail (Main Color)
Wrap yarn 3-4 times around two fingers. Slip the loops off your fingers and ch 1 through all loops to secure. Ch 10, then work 10 sl st back across the chain. Fasten off, leaving a long tail. Wrap the yarn tightly around the base of the loops and secure. Cut the long loops and brush them out to create a fluffy tail. Sew to the back of the body.
Overall Straps (Make 2 – Overalls Color)
- Ch 34. Starting from the 3rd chain from the hook, work 32 hdc (one in each ch).
Sew the straps to the back of the overalls, cross them over the shoulders, and sew them to the front. Attach buttons for a decorative finish.
The Snood (Cherry Red)
- Round 1: Ch 24. Work 22 hdc starting from 3rd ch, ch 2, turn.
- Rounds 2-34: 22 hdc in BLO, ch 2, turn.
- Round 35: 22 sc in BLO.
Fasten off and sew the two ends together to form a tube. Wrap it around the bull’s neck.
Finishing
Now it is time to assemble your baby bull! Start by sewing the head to the body. Then, attach the muzzle to the lower half of the face. Add the ears and horns to the top of the head. Finally, sew the lower legs to the bottom of the body so that the bull can sit comfortably.
Use your black embroidery floss to stitch two small vertical lines on the muzzle to create the nostrils. Give your bull a little pat, and he is ready for his new home!
Tips for Success
- Invisible Decreases: To keep the surface smooth, use the invisible decrease method (insert hook into the front loop of the first stitch, then the front loop of the second stitch, and crochet together).
- Stuffing: Use a chopstick or a knitting needle to push stuffing into the corners of the head and legs for a professional look.
- Tension: Keep your tension consistent, especially when switching colors, to avoid gaps in the fabric.
- Customization: Feel free to change the colors! You could make a highland cow by using a shaggier yarn or a different color palette.