Adorable Crochet Baby Bull Pattern: Step-by-Step Amigurumi Tutorial
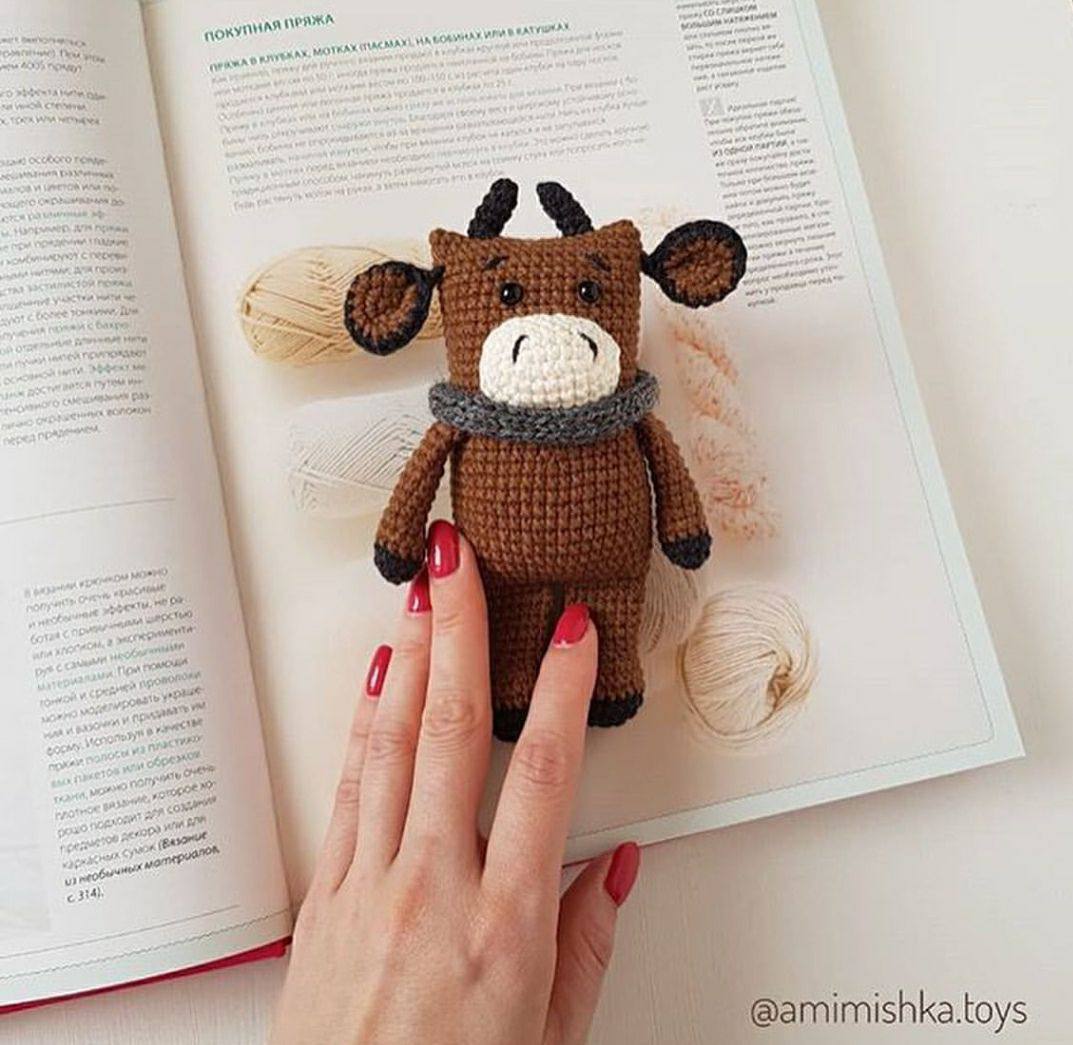
Looking for a cozy, farmhouse-inspired project to add to your crochet collection? This baby bull amigurumi is the perfect blend of cute and cuddly. Whether you are looking to make a unique gift for a nursery or want to practice your amigurumi skills, this little bovine is a wonderful project. With its tiny horns and cozy snood, this plushie is sure to bring a smile to anyone’s face.
This pattern is designed to be beginner-friendly, but it does involve a few different techniques, including working in the round and joining separate pieces. We will guide you through every step, from the tiny hooves to the final assembly. Let’s get hooking!
Materials & Abbreviations
To create your baby bull, you will need a few basic supplies. For the yarn, we recommend a sport-weight acrylic or cotton blend to keep the stitches tight and the stuffing secure.
Materials Needed
- Main Color Yarn (Brown): Sport weight (approx. 100-150 yards)
- Contrast Color Yarn (Dark Brown): For the hooves and inner ears (approx. 50 yards)
- Muzzle Yarn (Cream/White): Sport weight (approx. 20 yards)
- Snood Yarn (Yellow/Green): Sport weight (approx. 20 yards)
- Detail Yarn (Black): A small amount for embroidery
- Crochet Hook: 2.0mm (or a size that prevents stuffing from showing)
- Knitting Needles: 2.5mm (for the snood)
- Safety Eyes: 6mm (2 pieces)
- Stuffing: Polyester fiberfill
- Tools: Yarn needle, scissors, and stitch markers
Abbreviations (US Terms)
- MR: Magic Ring
- SC: Single Crochet
- INC: Increase (2 SC in one stitch)
- DEC: Decrease (SC 2 together)
- CH: Chain
- ST: Stitch
- FLO: Front Loop Only
Finished Size: Approximately 6 inches tall.
Step-by-Step Instructions
The Arms (Make 2)
We start with the contrast color for the hooves before switching to the main body color.
- Round 1: 6 SC in MR (6)
- Round 2: INC in each ST around (12)
- Round 3: SC in each ST around (12)
Switch to Main Color.
- Rounds 4-5: SC in each ST around (12)
- Round 6: 3 SC, 3 DEC, 3 SC (9)
- Rounds 7-14: SC in each ST around (9)
Stuff the bottom of the arm lightly. Fold the piece in half and SC 4 across the opening to flatten the top. Fasten off and weave in the ends.
The Ears (Make 4)
You will need two ears in the contrast color and two in the main color.
Contrast Color (Make 2):
- Round 1: 6 SC in MR (6)
- Round 2: INC in each ST around (12)
- Round 3: (1 SC, INC) x 6 (18)
Fasten off.
Main Color (Make 2):
- Round 1: 6 SC in MR (6)
- Round 2: INC in each ST around (12)
- Round 3: (1 SC, INC) x 6 (18)
Joining the Ears: Place one main color circle and one contrast color circle back-to-back (wrong sides facing in). SC 18 around the edge of both pieces together. Fold the joined circle in half and SC 2 across the top to create a fold. Fasten off.
The Legs (Make 2)
Start with the contrast color for the hooves.
- Round 1: 6 SC in MR (6)
- Round 2: INC in each ST around (12)
- Round 3: (1 SC, INC) x 6 (18)
- Round 4: (2 SC, INC) x 6 (24)
Switch to Main Color.
- Rounds 5-6: SC in each ST around (24)
- Round 7: 6 SC, 6 DEC, 6 SC (18)
- Round 8: 6 SC, 3 DEC, 6 SC (15)
- Rounds 9-12: SC in each ST around (15)
Stuff the bottom of the leg. Work an additional 4 SC. Fold the leg in half and SC 7 across the opening. Fasten off.
The Body
The body is worked from the legs upward. Using the main color, join your yarn to the first leg.
The Join: Work 7 SC across the first leg, CH 3, then work 7 SC across the second leg. Now we will work in a continuous spiral.
- Round 1: Work across the back (7 SC in FLO, 3 SC in the chain, 7 SC in FLO). Work across the front (7 SC in FLO, 3 SC in the chain, 7 SC in FLO). (34)
Place a stitch marker here; this is the start of your round.
- Round 2: 16 SC, INC, 16 SC, INC (36)
- Round 3: (5 SC, INC) x 6 (42)
- Round 4: 24 SC, (INC, 6 SC) x 2, INC, 3 SC (45)
- Rounds 5-12: SC in each ST around (45)
- Round 13: 24 SC, (DEC, 6 SC) x 2, DEC, 3 SC (42)
- Round 14: SC in each ST around (42)
- Round 15 (Attaching Arms): 20 SC, 4 SC worked together with the arm, 14 SC, 4 SC worked together with the second arm (42)
- Rounds 16-28: SC in each ST around (42)
Eyes: Place safety eyes between rounds 24 and 25, leaving 6 stitches between them.
- Round 29 (Attaching Ears): 2 SC worked together with an ear, 22 SC, 2 SC worked together with the second ear, 16 SC (42)
- Rounds 30-31: SC in each ST around (42)
Fasten off, leaving a long tail for sewing. Stuff the body firmly. Fold the body in half and sew the top opening closed using a whipstitch through both loops of the stitches.
The Muzzle
Using the cream or white yarn, CH 7. Start in the second CH from the hook.
- Round 1: 5 SC, 3 SC in the last CH. Working along the other side of the chain: 4 SC, INC (12)
- Round 2: INC, 4 SC, 3 INC, 4 SC, 2 INC (18)
- Round 3: 1 SC, INC, 4 SC, (1 SC, INC) x 3, 4 SC, (1 SC, INC) x 2 (24)
- Round 4: SC in each ST around (24)
Fasten off, leaving a long tail for sewing.
The Horns (Make 2)
Using the black yarn:
- Round 1: 5 SC in MR (5)
- Rounds 2-5: SC in each ST around (5)
Fasten off, leaving a tail for sewing.
The Snood
The snood is a knitted accessory. Using 2.5mm needles and the snood yarn:
- Cast on 6 stitches (including 2 edge stitches).
- Work in stockinette stitch (one row knit, one row purl) until the piece is long enough to wrap comfortably around the bull’s neck.
- Cast off and sew the ends together to form a loop.
Finishing
Now it is time to put everything together!
- Muzzle: Position the muzzle beneath the eyes, centered between rounds 16 and 23. Stuff the muzzle as you sew it to the head.
- Details: Using black yarn and a needle, embroider two small vertical lines for nostrils on the muzzle and two small curved lines above the eyes for eyebrows.
- Horns: Sew the horns onto the top center seam of the head, roughly 3-4 stitches away from the edge. Gently bend the tips of the horns inward for a more natural look.
- Accessories: Slide the knitted snood around the neck and adjust it for the cutest look.
Tips for Success
Use the Invisible Decrease
To keep your amigurumi looking professional and smooth, use the invisible decrease. Instead of a standard SC decrease, insert your hook into the front loop of the first stitch, then the front loop of the second stitch, and complete the SC. This prevents gaps from appearing in the fabric.
Keep Tension Consistent
Amigurumi requires tight stitches so that the stuffing doesn’t leak through. If you notice holes, try dropping down a hook size (for example, moving from a 2.5mm to a 2.0mm hook).
Marker Your Rounds
Since we are working in continuous spirals, it is very easy to lose track of where a round begins. Always use a stitch marker or a piece of scrap yarn in the first stitch of every round to ensure your increases and decreases are placed correctly.