Adorable No-Sew Crochet Baby Cow Pattern: Step-by-Step Tutorial
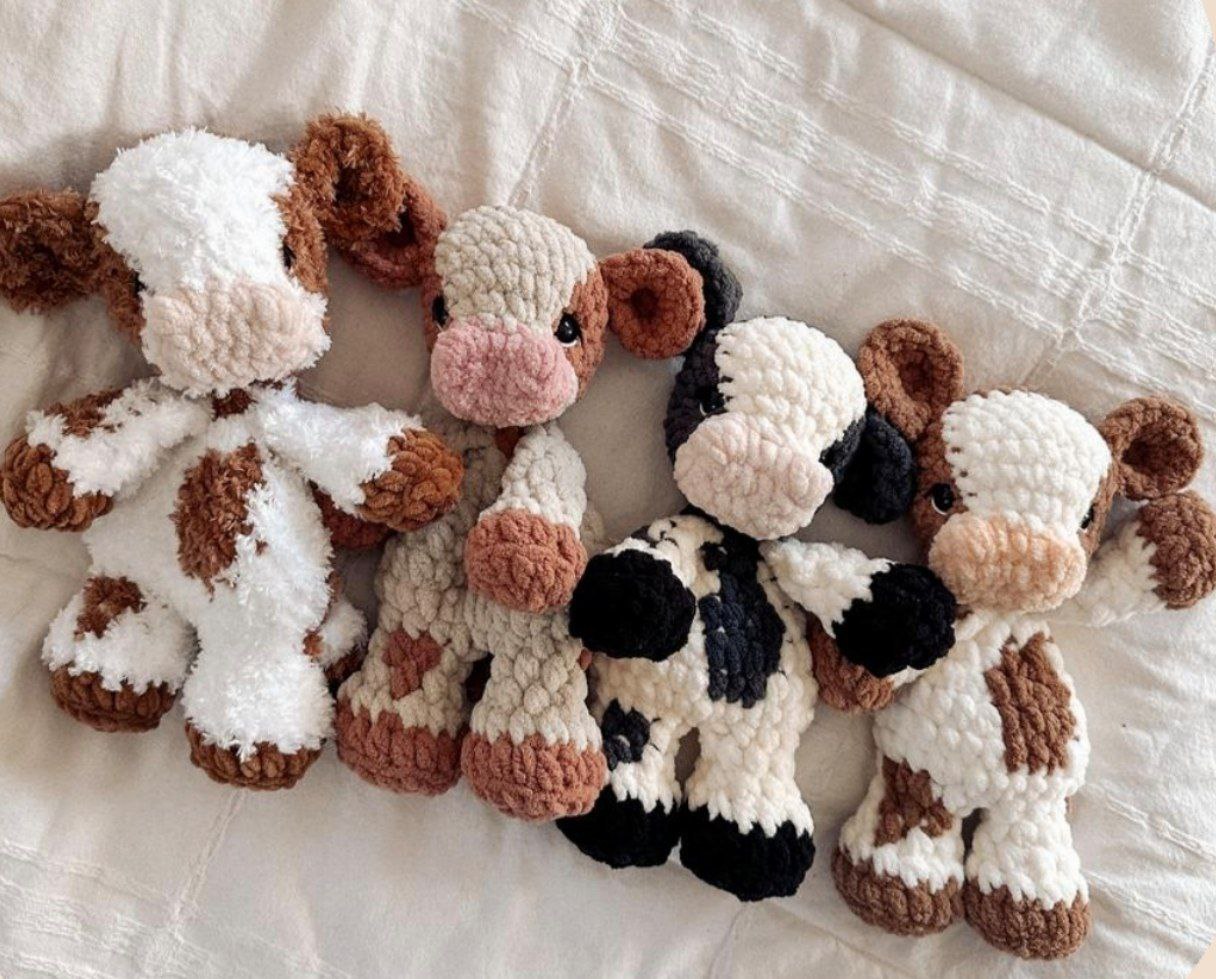
If you are looking for a cuddly, chunky project that doesn’t involve hours of sewing pieces together, you have come to the right place! This no-sew crochet baby cow pattern is perfect for beginners and experienced makers alike. By joining the limbs and head as you go, you create a seamless, sturdy plushie that is ready for hugs the moment you fasten off the last stitch.
This chunky calf stands approximately 12 inches tall and uses super bulky yarn to ensure it’s soft, squishy, and works up quickly. Whether you want to make a classic Holstein, a rustic Highland cow, or a fantasy-colored calf, this versatile pattern provides the perfect base.
Materials & Abbreviations
Materials You Will Need
- Crochet Hooks: 5mm, 7mm, and 8mm
- Super Bulky Yarn (Weight 6):
- Main Color (e.g., White/Cream) – approx. 35 yards
- Contrast Color (e.g., Brown/Black) – approx. 30 yards
- Muzzle Color (e.g., Pink/Peach)
- Medium/Worsted Weight Yarn (Weight 4): Preferred color for the optional headband and black/white for eye detailing.
- Fur Yarn: For the hair/top knot.
- Stuffing: Polyester fiberfill.
- Eyes: 14mm safety eyes (optional).
- Tools: Yarn needle, scissors, and stitch markers.
Abbreviations (US Terms)
- ch: chain
- sc: single crochet
- hdc: half double crochet
- dc: double crochet
- tr: treble crochet
- sl st: slip stitch
- inc: increase (2 stitches in one stitch)
- dec: invisible decrease
- MR: magic ring
- BLO: back loop only
- st: stitch
- puff: puff stitch
- FO: fasten off
Step-by-Step Instructions
Note: This pattern is worked in continuous rounds. Do not join or turn unless specifically stated. Use a stitch marker in the first stitch of every row to keep track of your progress.
The Arms (Make 2)
Hook: 8mm | Start with Hoof Color
- Round 1: 6 sc in MR (6)
- Round 2: 6 hdc inc (12)
- Round 3: BLO hdc 12 (12)
Change to Main Color
- Round 4: (1 hdc, dec) x4 (8)
Stuff lightly to give shape. Do not stuff further up the arm.
- Round 5: 2 hdc, 2 dec, 2 hdc (6)
- Round 6: 6 hdc (6)
- Round 7: (1 hdc, dec) x2 (4)
Flatten the top and sc across both layers to close. FO and leave a tail, as these will be crocheted into the body later.
The Legs (Make 2)
Hook: 8mm | Start with Hoof Color
- Round 1: 8 sc in MR (8)
- Round 2: 8 hdc inc (16)
- Round 3: BLO hdc 16 (16)
Change to Main Color
- Round 4: (2 hdc, dec) x4 (12)
Stuff lightly. Do not stuff further up the leg.
- Round 5: (1 hdc, dec) x4 (8)
- Round 6: 8 hdc (8)
FO the first leg, leaving a long tail. For the second leg, do not FO; you will transition directly into the body.
The Body
Hook: 8mm
Hold the legs together. Join the two legs by working a hdc into the center stitch of the left leg. This counts as your first stitch.
- Round 1: 1 hdc, 3 hdc in contrast color (spot), 3 hdc, 3 hdc in the joining area, 8 hdc (19)
- Round 2: hdc, inc, hdc, inc, hdc, inc, (1 hdc, inc) x5, hdc, inc, hdc (28)
- Round 3: 5 hdc, 3 hdc (spot), inc, 3 hdc, 3 hdc (spot), 8 hdc, inc, hdc, 2 hdc, hdc (30)
- Round 4: 6 hdc, 3 dec, hdc, 4 hdc (spot), 5 hdc, 3 dec, 2 hdc (24)
- Round 5: 4 hdc, dec, 4 hdc, dec, 3 hdc (spot), hdc, dec, 4 hdc, dec (20)
- Round 6: 2 hdc, dec, hdc, hdc, dec, 2 hdc, dec, hdc, hdc, dec, 2 hdc, dec (15)
- Round 7: hdc, dec, hdc, dec, (1 hdc, dec) x3 (10)
- Round 8: 2 dec, hdc, join first arm with 2 hdc, hdc, join second arm with 2 hdc (8)
- Round 9: (2 hdc, dec) x2 (6)
FO and leave a tail to join to the head. You can weave in a small tail between the legs to create a tiny nub for the tail start.
The Ears (Make 2)
Hook: 8mm | Use Contrast Color
- Round 1: 6 sc in MR (6)
- Round 2: 6 sc (6)
- Round 3: 2 inc, 2 hdc in each of the next 2 sts, 2 inc (14)
FO and leave a tail. Mark the first and last stitches of Round 3 for attachment.
The Head
Hook: 7mm | Start with Muzzle Color
- Round 1: ch 7, starting in 2nd ch from hook: 5 sc, inc. Working around the other side of the chain: 4 sc, inc (13)
- Round 2: puff, 3 sc, puff, sc, 2 inc, 3 sc, 2 inc (17)
Change to Main Color
- Round 3: 17 sc (17)
Change to Contrast Color (following spot pattern)
- Round 4: inc, 4 inc, 2 inc, dec, 6 sc, dec (22)
- Round 5: inc, sc, inc, sc, (inc, sc) x3, (inc, sc) x2, 8 sc (29)
- Round 6: 6 sc, 9 sc, 14 sc (29)
- Round 7: 6 sc, 9 sc, 9 sc, join the body using 3 sc, 2 sc (29)
- Round 8: 6 sc, 9 sc, 14 sc (29)
- Round 9: dec, 3 sc, join first ear with 2 sc, 8 sc, sc, join second ear with 2 sc, 3 sc, dec, 6 sc (27)
Change to Main Color
- Round 10: 4 sc, dec, 9 sc, dec, 6 sc, dec, 2 sc (24)
Begin stuffing the head firmly.
- Round 11: (2 sc, dec) x6 (18)
- Round 12: (sc, dec) x6 (12)
- Round 13: 6 dec (6)
FO and weave the tail through the remaining stitches to close the hole.
Horns and Hair
Horns (7mm Hook): Attach yarn near the ear. Work 1 puff stitch, ch 1 to secure, and FO. Pull the tail through the head and secure it inside. Repeat for the second horn.
Hair (8mm Hook): Use fur yarn. Attach near the horn. ch 10, sl st back into the same stitch. Repeat this three times to create three strands of hair. Pull the ends through the head to secure and hide the tails inside.
The Tail
Hook: 8mm
Attach main color to the center back of the body (around rounds 2-3). ch 9, starting in 2nd ch from hook: 8 sc, sl st back into the body. FO.
For the tuft: Using contrast color, create a slip knot at the end of the tail. (ch 6, sl st back to end) x3. Tie and hide the ends.
Finishing and Face Sculpting
Eyes and Face Shape
If using safety eyes, place them between rounds 5 and 6, approximately 12 stitches apart, aligned with the sides of the nostrils.
To give the face a more defined, “cute” look, use a 12-inch piece of main or black worsted yarn. Insert the needle through the back of the head, come out at the outer corner of one eye, go across the bridge of the nose, and exit at the inner corner of the second eye. Pull tight to indent the eye sockets and secure at the back of the head.
Final Touches
Ensure the ears are pressed flat against the head. If you left tails when attaching the ears, you can use them now to stitch the ears more securely into place.
Optional Vintage Headband
Hook: 5mm | Use Worsted Weight Yarn
Leaf End: ch 10, sc in 2nd ch from hook, hdc, dc, 2 tr, dc, hdc, sc, sl st in 1st ch. ch 1, work around the other side of the chain: sl st, sc, hdc, dc, 2 tr, dc, hdc, sc, sl st in the first sc.
The Band: ch 2, hdc in the sl st. Repeat (ch 3, hdc in the same stitch) 11 times. This creates 12 “bumps.” Wrap around the cow’s head to check the length; add more bumps if necessary.
Second Leaf: Repeat the “Leaf End” instructions. FO and tie the headband in a knot around the cow’s head.
Pro Tips for Success
- Tension Matters: When joining the body to the head, keep your tension tight to avoid gaps where stuffing might peak through.
- Yarn Choice: For a Highland cow look, use a rusty-orange yarn for the body and extra-long fur yarn for the head.
- Safety First: If making this for a child under 3 years old, embroider the eyes with black yarn instead of using plastic safety eyes.
- Invisible Decreases: Always use the invisible decrease method (inserting hook into the front loops only) to keep the plushie looking professional and smooth.