Easy Crochet Cardigan Pattern: A Beginner-Friendly Colorful Sweater Tutorial
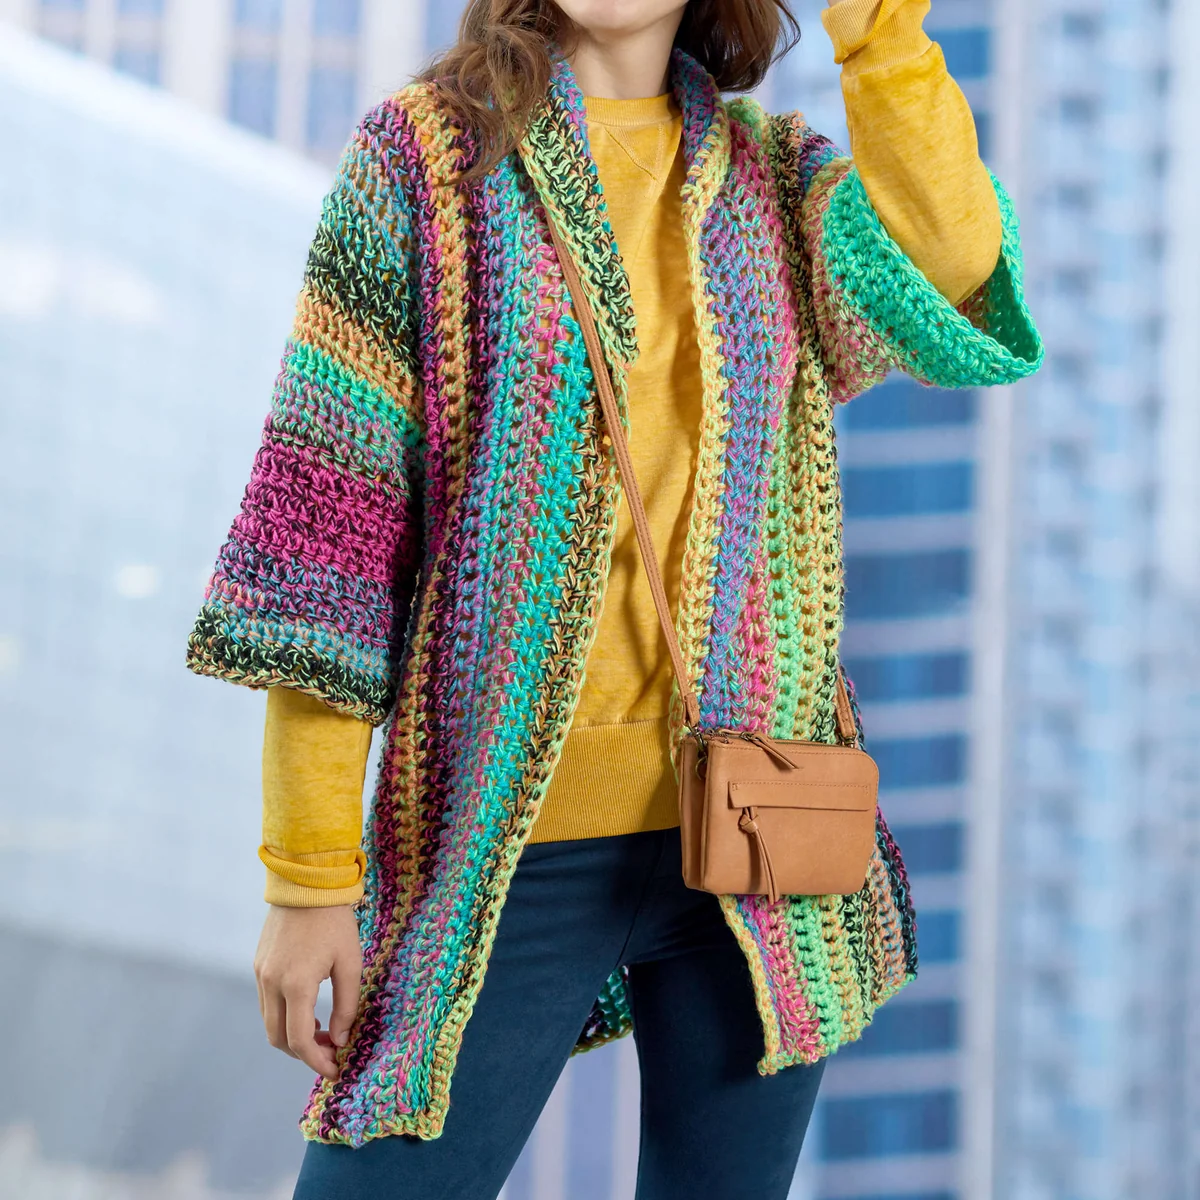
There is nothing quite like the feeling of wearing something you made with your own two hands, especially when it is a cozy, oversized cardigan. Whether you are looking for a chunky layer for chilly autumn mornings or a colorful statement piece to throw over a simple t-shirt, this Easy-to-Wear Cardigan is the perfect project.
The beauty of this pattern lies in its unique construction. Instead of working from the bottom up, we create the body of the cardigan lengthwise from one side to the other. This means less time spent wrestling with massive pieces of fabric on your lap and more time seeing your colorful progress grow. Because it uses a mix of simple stitches and a slightly elongated single crochet, the resulting fabric has a lovely drape that feels professional yet remains incredibly easy to execute.
Materials & Abbreviations
Before you pick up your hook, gather your materials. This project is designed for a medium-weight yarn, which provides the perfect balance of warmth and workability.
Materials Needed
- Yarn: Medium Weight (4) yarn. Depending on your size, you will need 3 to 5 balls (approximately 888 to 1,480 yards). A variegated or “tweed” yarn works beautifully for this pattern to give it that multi-colored, bohemian look.
- Crochet Hook: 8mm (US L-11) crochet hook.
- Notions: Yarn needle for weaving in ends and sewing seams.
Abbreviations (US Terms)
- ch: chain
- sc: single crochet
- hdc: half double crochet
- dc: double crochet
- st(s): stitch(es)
- yo: yarn over
- [ ]: Repeat the directions inside the brackets the number of times specified.
- * or **: Repeat whatever follows the asterisk as indicated.
The Special Stitch: Extended Single Crochet (esc)
The “esc” is what gives this cardigan its signature texture and flexibility. To make an extended single crochet: Insert your hook into the indicated stitch, yarn over, and pull up a loop. Yarn over and draw through one loop only (this creates a chain stitch). Yarn over again and draw through both loops on your hook. It is essentially a single crochet with an extra chain built into the stem!
Gauge and Sizing
Important Note: For this specific pattern, your row gauge is more critical than your stitch gauge to ensure the cardigan fits correctly.
- Gauge: 7 esc = 4 inches; 8 rows (alternating 4 rows of sc and 4 rows of esc) = 4 inches.
- Finished Bust Measurements: 37″ (Small), 41″ (Medium), 45″ (Large), 49″ (XL), 53″ (2XL), 57″ (3XL).
- Length: Approximately 32.5 inches.
Step-by-Step Instructions
The Cardigan Body
We begin by creating the main rectangle of the body, working from the left side toward the right side.
Foundation: Chain 115.
Row 1 (Right Side): Single crochet (sc) in the 2nd chain from the hook and in each chain across to the end. Turn. (114 sc)
Row 2: Chain 2 (counts as your first esc), work an extended single crochet (esc) in each sc across to the end. Turn.
Row 3: Chain 1, sc in each esc across to the end. Turn.
Repeating the Pattern: Repeat Rows 2 and 3 alternately for the next 14 (16, 18, 20, 22, 24) rows. You are essentially building a striped fabric of sc and esc.
Creating the Front Opening
To create the opening where the cardigan separates, we will work the next 5 rows specifically to split the fabric.
Row 1 (Wrong Side): Ch 1, sc in the first 61 sc. Now, work (sc, ch 1) in the next stitch—this counts as your first esc. Work an esc in each remaining sc to the end. (61 sc and 53 esc)
Row 2: Ch 1, sc in each of the first 53 esc. Leave the remaining stitches unworked. Turn. (53 sc)
Row 3: Ch 2 (counts as first esc), esc in each sc across to the end. Turn. (53 esc)
Row 4: Ch 1, sc in each esc across to the end. Now, chain 62. Turn. (53 sc and 62 ch)
Row 5: Skip the first 2 chains (this counts as 1 esc). Work an esc in the 3rd chain from the hook and in each chain and sc across to the end. Turn. (114 esc)
Now that the opening is established, continue working in the alternating sc and esc pattern for another 16 (18, 20, 22, 24, 26) rows across all stitches. Fasten off, but leave a long tail for sewing.
The Sleeves
Fold your finished body piece in half. Match up the stitches of the last row. Sew 38 stitches together for the side seam, starting from the corner and moving inward. Leave the center 38 stitches open—this creates your armhole.
Join your yarn with a slip stitch at the armhole edge with the wrong side facing you.
- Round 1: Ch 2 (counts as 1 esc), esc in each stitch around the armhole opening. Join with a slip stitch to the beginning ch-2. Turn. (38 esc)
- Round 2: Ch 1, sc in each stitch around. Join with a slip stitch in the first sc. Turn.
- Round 3: Ch 2 (counts as 1 esc), esc in each stitch around. Join with a slip stitch to the beginning ch-2. Turn.
- Rounds 4-19: Repeat Rounds 2 and 3 alternately.
- Round 20: Repeat Round 2.
Fasten off and repeat this entire process for the second side seam and sleeve.
The Collar
With the right side facing, join your yarn with a slip stitch at the bottom corner of the right front edge.
Row 1 (Right Side): Work the following sequence carefully:
- Slip stitch very loosely in the next 9 sts.
- Sc in the next 10 sts.
- Hdc in the next 20 sts.
- Dc in the next 11 sts.
- [2 dc in the next st, dc in the next st] 5 times.
- 2 dc in the next st.
- Continue working in the row ends across the back of the neck.
- 2 dc in each of the next 3 rows.
- [2 dc in the next st, dc in the next st] 6 times.
- Dc in the next 10 sts.
- Hdc in the next 20 sts.
- Sc in the next 10 sts.
- Slip stitch very loosely in the last 10 sts. Turn. (142 sts)
Rows 2-5: Simply follow the stitches from the row below: slip stitch in each slip stitch, sc in each sc, hdc in each hdc, and dc in each dc. Turn.
Row 6: Ch 1, sc in each stitch across to the end. Do not turn; do not fasten off yet.
Finishing
Bottom Edging
To give the cardigan a clean, professional look, we add a simple edge. Working in the row ends on the wrong side: Ch 1, sc in the last row, skip the next 2 rows, sc in the next row, skip 2 rows, sc in each row until you reach the last 6 rows (the collar rows). Finally, [skip 2 rows, sc in the next row] twice. Fasten off.
Final Step: Use your yarn needle to weave in all loose ends securely so they don’t pop out during wear.
Tips for Success
Choosing Your Yarn
Because this pattern uses large stitches (esc), a variegated yarn is highly recommended. It hides the “seams” of the construction and creates a beautiful, effortless color gradient without you having to change yarns manually.
Tension and Fit
If you find your cardigan is coming out too tight or too loose, check your gauge again. Since we are working lengthwise, a slight difference in tension can change the total length of the garment. If you are between sizes, we recommend sizing up for a more “oversized” cozy fit.
Blocking Your Work
For the best result, we recommend “blocking” your finished cardigan. Lay it flat on a surface, gently shape the sleeves and collar, and steam it lightly with an iron (without touching the yarn) or dampen it and pin it into shape. This helps the stitches settle and gives the cardigan a professional drape.