Adorable Crochet Horseshoe Horse Pattern: A Mini Plush Tutorial
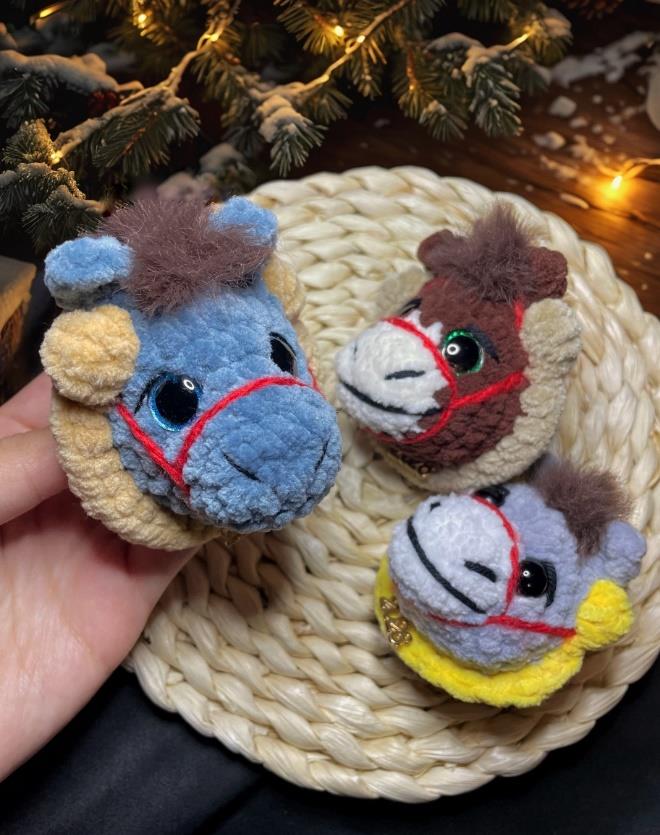
If you are looking for a quick, cute, and satisfying crochet project, this mini horseshoe horse is the perfect choice! This little amigurumi is designed to be worked as one continuous piece, meaning you won’t have to spend hours sewing separate parts together. Whether you want to create a lucky charm, a festive ornament, or a tiny companion for a child, this plushie is an absolute delight to make.
This pattern is specifically designed for those who love the “chunky” look of plush yarn. Because of the texture, the finished horse has a soft, huggable feel and a professional, store-bought appearance. Even if you are a beginner, this tutorial will guide you through the process step-by-step, including a few specialty stitches that give the horse its unique shape.
Materials & Abbreviations
To get started, gather the following supplies. We recommend using a plush or chenille-style yarn to achieve the look seen in the photos, but any soft yarn will work!
Materials Needed
- Plush Yarn: Approximately 50-100 yards of your primary color (e.g., brown, blue, or grey) and a small amount of a contrasting color for the horseshoe base (e.g., yellow or cream).
- Furry/Faux-Fur Yarn: A small amount for the mane.
- Embroidery Thread: Black yarn or thread for the nostrils and smile, and red thread for the bridle.
- Crochet Hook: 3.5 mm (E) hook.
- Safety Eyes: 12 mm plastic safety eyes.
- Stuffing: High-quality polyester fiberfill.
- Extras: A stitch marker, yarn needle, and an optional small charm or pendant for the bottom.
Abbreviations (US Terms)
- ch: chain
- sc: single crochet
- hdc: half double crochet
- inc: increase (two sc in one stitch)
- dec: decrease (sc two stitches together)
- BLO: back loop only
- FLO: front loop only
- Bobble: 3 sc worked into one stitch, closed together with a single crochet at the top to create a bump.
- ( ) * X: repeat the instructions inside the parentheses X times.
- (number): the total stitch count at the end of the round.
Step-by-Step Instructions
The horse is worked in a spiral. Using a stitch marker is highly recommended to keep track of the beginning of each round.
The Main Body and Head
Note on Color: If you want a two-toned horse (for example, a white face with a brown head), work the first two rounds in your secondary color before switching to the main color.
Round 1: Chain 5. Starting in the 2nd chain from the hook: 1 inc, 2 sc, 4 sc in the last chain. Now, working along the other side of the foundation chain: 2 sc, 1 inc. (12)
Round 2: 5 sc, inc, 2 sc, inc, 2 sc, inc. (15)
Round 3: 15 sc. To shift the shaping for the next round, work an additional 4 sc in the final stitch to create a new starting point for your marker. (19)
Round 4: 3 sc, 8 inc worked in FLO (front loop only), 3 sc, 1 inc. (24)
Round 5: 24 sc.
Round 6: 10 sc. First Ear: (ch 4, starting in 2nd ch from hook: 1 sc, 2 hdc), then join back to the main body. Continue across the base of the ear with 4 sc. Second Ear: (ch 4, starting in 2nd ch from hook: 1 sc, 2 hdc), then join back to the main body. 1 sc. Change to Horseshoe Color: Work 1 Bobble stitch. Now, working in FLO (front loop only), work 8 hdc. (24)
Round 7: (Continue in Horseshoe Color) 8 hdc in FLO, 1 Bobble. Change back to Main Color: 7 sc (specifically: 1 sc before the ear, 4 sc between the ears, and 2 sc after the ear). Finally, work 8 sc in BLO (back loop only). (24)
Round 8: Working in BLO, 8 sc, then 4 sc to mark the new beginning of the round. (24)
Pro Tip: Before moving to Round 9, insert your 12mm safety eyes between Rounds 4 and 5. Make sure they are securely fastened and spaced evenly to give your horse a cute expression!
Round 9: (1 sc, dec) * 8. (16). Begin stuffing the head firmly with fiberfill.
Round 10: 8 dec. (8)
Cut the yarn, leaving a tail. Use your yarn needle to weave the tail through the remaining front loops, pulling tightly to close the hole. Secure with a knot and hide the end inside the body.
Finishing Touches
Now that the main shape is complete, it’s time to add the details that bring your little horse to life.
Adding the Mane
Using your furry yarn, attach the thread to the back of the head. Work a series of single crochets (sc) from the back of the neck up toward the crown of the head. This creates a textured, fluffy mane. Once you reach the top, fasten off and weave in the ends securely.
Face Embroidery
The face is where the personality comes in! Use your embroidery thread or a thin strand of yarn for these details:
- The Smile: Embroider a small, curved line under the nose for a friendly expression.
- Nostrils: Add two tiny vertical stitches just above the smile.
- The Bridle: Using red yarn, embroider a strap across the nose and around the sides of the face to create a classic horse bridle.
Finally, if you have a small metal charm or a “lucky” pendant, you can sew it to the bottom of the horseshoe base for an extra special touch.
Tips for Success
Working with Plush Yarn
Plush yarn can sometimes be “slippery” or hide your stitches. To avoid getting lost, always use a stitch marker. If you find it hard to see where to insert your hook, try gently pulling the yarn to reveal the gaps between the stitches.
Perfecting the Bobble Stitch
The bobble stitch is what gives the horseshoe its characteristic “bump.” To make it stand out, ensure you pull the final loop tight. If the bobble looks too flat, you can use a needle to gently push the stuffing from the inside to pop the bobble outward.
Customization Ideas
Once you’ve mastered the basic pattern, try these variations:
- Holiday Theme: Use red and green yarn for a Christmas-themed lucky horse.
- Size Change: Use a larger hook and chunky blanket yarn to create a larger plushie.
- Accessories: Add a tiny crochet blanket or a bow around the neck for added cuteness.